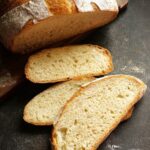
Crusty Potato Bread (no knead overnight recipe)
The soft and bouncy crumb of this loaf stays moist and fresher for longer thanks to extra starch from mashed potatoes incorporated into the dough. Cooked in a covered pot for a great rise and crispy crust, the substantial, tasty loaf is perfect for sandwiches, toast, or eating with soups.
It's recommended you read the accompanying blog post and the Recipe Notes below before starting to cook. Use digital scales and metric measurements as these were used to test the recipe.
Ingredients
- 250 g peeled potatoes (a floury type suitable for mashed potatoes e.g. Rooster, King Edward, Maris Piper)
- water (for cooking the potatoes: reserve it and use in the bread dough)
- salt (see instructions for amounts)
- 600 g strong white bread flour (plus extra for dusting)
- 1.5 tsp (7g) instant dried yeast (i.e. the type that does not need activating before adding to the rest of the ingredients)
Instructions
The day before baking
-
Wash the potatoes and cut into medium dice.
Put in a saucepan, cover with cold water and add ½ tsp salt.
Bring to the boil then turn down to a medium simmer. Cook until completely tender but not falling apart (approx. 12 - 15 min).
Drain over a bowl or jug to collect the cooking water then leave the potatoes in the sieve or colander for a few minutes to allow any surface water to evaporate.
Set the potato cooking water aside until it reaches room temperature. Meanwhile, mash the potatoes or put them through a sieve or ricer so they're smooth. Leave to cool.
-
Put the bread flour, 1½ tsp salt, and the instant yeast into a large mixing bowl and stir to combine.
Add the cold mashed potatoes and 250 ml of the cooled cooking water then start stirring with a silicone spoon to bring the ingredients together, gradually adding more of the cooking water as necessary to form a dough with no dry flour visible. Try not to make the dough too wet as the potato may release more water.
-
Cover the dough and leave to ferment at room temperature overnight.
Tip: the natural sugars in potato means the dough is likely to ferment more quickly, especially if the room is warm. If necessary, you can do the entire ferment in the fridge or leave it at room temperature for a few hours then put in the fridge overnight.
On the day of baking
-
The dough should have risen, spread out and be very bubbly. If not, leave a little longer.
Dust flour over your work surface, ideally covered with a silicone mat, and use a dough scraper to transfer the dough onto it. Fold over itself several times until smooth: add more flour as needed to prevent sticking.
Cover the dough with the upturned bowl and leave to rest for 10 minutes.
-
To help create structure: stretch and fold the dough by lifting up the top edge (think of it as 'north') then folding it into the middle. Repeat with the 'east', 'south' and 'west' sides. Add more flour as necessary to prevent sticking.
Repeat the process at least twice more until you have a plump piece of dough.
Tip: if the dough still seems wet or sticky, add more flour as you fold.
-
Sprinkle a generous amount of flour inside a lined banneton (or an improvised proving vessel such as a bowl lined with a tea towel).
Fold the dough again, this time shaping it to fit your proving vessel. Sprinkle the top with more flour then put it in the vessel with the rounded side facing DOWN. Dust the side now facing up with more flour.
Place in a large reusable polythene bag or cover it and leave in a warm place for approximately 30 - 45 minutes.
While it's proving: preheat your oven to 240°C / 220° Fan / Gas 9 / 475° F and put a lidded cast iron pot or Dutch oven on the middle shelf.
-
Check if the dough is ready to bake: gently insert a finger into the dough and see if the dough quickly or slowly springs back.
- If the dough springs back slowly and leaves an impression, it's ready.
- If it springs back immediately and doesn't leave an impression then prove another 5 - 10 minutes and check again.
-
When ready to bake, remove the pot from the oven and take off the lid.
Carefully flip the dough into the pot so the rounded side is now facing UP.
Use a sharp knife, razor blade or baker's lame to slash a cross on top of the dough (or make your own preferred pattern).
Put the lid on the pot, place in the oven and bake for 35 minutes.
-
After 35 minutes, reduce the heat to 220° C / 200° Fan / Gas 7 / 425°F.
Remove the pot from the oven, tip the bread out of it, then return the loaf to sit directly on the oven shelf.
Bake for a further 12 - 15 minutes or until the bread is cooked through: it should sound hollow when tapped underneath.
-
Place on a wire rack until completely cold before slicing.
Best eaten within 3 days or can be frozen.
Tip: slice before freezing so you can take out as much as you need without waste.
Recipe Notes
Equipment (further info and partner links in the accompanying blog post)
- You'll need a heavy, lidded pot or Dutch oven in which to bake the bread. It should have a capacity of at least 3.5 litres.
- To support the dough on its second rise or prove, you'll need a banneton/proving basket or a large bowl lined with a tea towel or other cloth.
- The no-knead potato dough is wetter and stickier than normal, so a dough scraper and silicone mat are recommended for removing from the bowl and for folding/shaping.