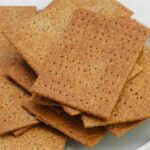
Homemade Rye Crackers
Thin, crunchy, and full of flavour, these easy Rye Crackers are inspired by Nordic knäckebröd.
Enjoy as a snack or simple cracker with cheese, pâté, dips, and spreads, or use as a base for open sandwiches piled with tasty toppings.
So that the crackers are crunchy rather than hard, roll the dough no more than 1 - 2 mm thick. For best results, read the accompanying blog post before starting the recipe.
Ingredients
- 150 g wholemeal rye flour
- 50 g white bread flour
- 1 tsp instant dried yeast (i.e. the type that does not need activating before adding to the flour)
- 1 tsp salt
- ½ tsp sugar
- 20 ml olive oil
- 100 - 120 ml warm water (see Recipe Notes)
Instructions
-
Put both flours, the instant dried yeast, salt, and sugar into a mixing bowl. Stir together then make a well in the middle.
Pour the olive oil into the well then gradually add 100 ml of the warm water, stirring as you do so, to start bringing together a soft dough that leaves the sides of the bowl clean. If it seems a little dry, add a little more of the warm water but the dough should not be wet.
Put the dough onto a clean work surface or silicone mat and briefly knead into a smooth ball.
-
Put the dough back in the bowl and cover with cling film, a tea towel, or put the bowl into a polythene bag.
Put in a warm place for 60 minutes or until lightly puffy when you gently press it: don't expect it to noticeably rise as, due to the rye flour, it won't.
-
While the dough is proving
Preheat the oven to 190° C /170° Fan /Gas 5 /375° F.
Cut two pieces of baking paper each 31 x 21 cm to fit the bases of shallow baking trays. Cook in two batches if you only have one suitably sized tray.
-
When the dough is ready, cut it in half (use scales for accuracy).
Take one of the pieces of the baking paper and place half the dough on it. Note that due to the olive oil in the dough, you shouldn't need to add any extra flour when rolling out unless you've made the dough too wet.
Roll out very thinly: no more than 1 - 2 mm or the crackers will be hard rather than crunchy. If you've cut the paper to the correct size, then rolling to this thinness should cover ALL of the paper and go just over the edges.
-
Neaten the edges of the dough with a knife or pizza wheel, guided by a ruler if necessary.
Cut the dough into 9 rectangles approximately 10 x 7 cm each (or your preferred shape and size), then slide the paper and crackers onto a baking tray.
Tip: not cutting all the way through the dough can prevent them curling up during cooking. However, they may break unevenly if you have to snap them apart after baking. See Step 7 for an alternative.
Prick each cracker all over with a fork.
-
Repeat with the remaining dough (or cook one tray first, then roll and cut the remaining dough).
-
Baking the crackers
Optional: to prevent the crackers curling during baking you can cover with a larger sheet of baking paper and put another tray (not too heavy) on top. Remove for the final 2 - 3 minutes.
Put the tray(s) in the oven and bake until cooked all the way through. This should take 15 - 20 minutes depending on how dark you'd like them, but check after 10 minutes as crackers at the edges and corners of the tray may cook much quicker (remove these to a cooling rack and return the rest to the oven).
If necessary, turn the crackers over for even cooking and/or swap which shelves the trays are on if cooking both at once.
-
When done, crackers should be left on the cooling rack until completely cold before storing in an airtight container.
Should keep for at least a month.
Recipe Notes
Knäckebröd. This recipe was inspired by the knäckebröd of Sweden and Finland. These are often cut into circles with a hole in the middle, originally so they could be threaded on a pole and dried out for long-term storage. However, it's much quicker to cut into squares or rectangles.
Warm water. The ideal temperature for yeast to work is 38 degrees Centigrade. If you don't have a thermometer then use water that feels just pleasantly warm to your finger. If in doubt, err on the side of cooler: the yeast will take longer to work, but that's preferable to killing it with water that's too hot.