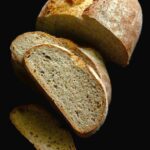
Light Spelt, Wholemeal & Rye Loaf
A tasty no-knead nutritious bread that avoids heaviness with a fifty-fifty blend of white and wholemeal flours. Almost as light as a one hundred per cent white loaf, but with the added nutty sweetness of wholemeal spelt, the goodness of strong wholemeal bread flour, plus a hint of tangy sourness from wholemeal rye flour.
Bake in a lidded pot or loaf tin. Baking on a tray not recommended.
Please read the accompanying blog post before starting for extra tips and step-by-step images to guide you.
Ingredients
- 325 g strong white bread flour
- 165 g wholemeal spelt flour (plus extra for dusting)
- 130 g strong wholemeal flour
- 30 g wholemeal rye flour
- 15 g (2 tsp) salt
- 7 g (1.5 tsp) instant dry yeast (i.e. does not require activating before adding to the rest of the ingredients)
- 475 - 500 g/ml warm water (see Recipe Notes)
Instructions
-
Put all the flours in a large mixing bowl along with the salt and instant dry yeast. Stir to mix.
Make a well in the middle and pour in approximately 250 ml of the warm water. Stir to start bringing the mixture together.
Gradually add more water, stirring as you go, until a dough has formed: there should be no dry flour visible, but the dough should be firm and not sloppy: see image in blog post for how the dough should look.
Cover the dough or place the bowl in a large reusable polythene bag and leave to ferment at normal room temperature until almost doubled and bubbly looking (approximately 1 - 1½ hours but will vary depending on room temperature).
-
Stretch the dough
With slightly wet hands, stretch and fold the dough (still in its bowl) by lifting up the top edge (think of it as 'north') then folding it into the middle. Repeat with the 'east', 'south' and 'west' sides.
Repeat the process twice more to get a plump, relatively round piece of dough. Turn over so the smooth side is facing up.
Cover again or place back in the bag and leave until it's risen and puffy again (approximately 1 hour, depending on room temperature).
Complete the next step during this time.
-
While the dough is proving
Preheat the oven with a shelf in the middle.
- For lidded pot/Dutch oven: 240°C / 220° Fan / Gas 9 / 475° F with the pot (lid on) on the middle shelf.
- For loaf tin: 220°C / 200°Fan /Gas 7 / 425°F. Optional: put a deep METAL roasting tin on the bottom shelf. This will later be filled with cold water to create steam and help the bread rise. DO NOT USE GLASS or it could shatter.
-
When the dough is risen and puffy again: sprinkle some spelt flour over your work surface, ideally covered with a silicone mat to reduce sticking, and transfer the dough onto it.
-
If baking in a lidded pot/Dutch oven
- Gently fold and shape the dough to fit a lined and floured banneton or other proving vessel. Try not to knock any air out of the dough.
- Place the dough into the banneton with the rounded side facing DOWN.
If baking in a loaf tin
- Grease a 900ml / 2lb loaf tin with butter then sprinkle with flour.
- Gently fold and shape the dough to fit the tin, trying not to knock any air out of the dough, and place it inside with the rounded side facing UP.
-
Cover again or place back in the bag and leave at room temperature until, when a finger is gently poked into the dough, it slowly springs back but leaves a slight indentation then it is ready to bake.
Important: spelt doughs can rise very quickly so start checking after 10 minutes. If the dough springs back quickly then it's not yet fully proofed: leave another 2 - 3 minutes and check again.
DO NOT over proof or the dough may slacken or not rise in the oven.
-
Bake the bread
Pot/Dutch oven
- Remove the pot from the oven and take off the lid. Carefully flip the dough into the pot so the rounded side is now facing UP.
- Use a baker's blade or sharp knife to slash the dough, put the lid back on and place in the oven. Bake for 35 minutes.
- After 35 minutes, reduce the heat to 220° C / 200° Fan / Gas 7 / 425°F.
Remove the pot from the oven, tip the bread out of it, then return the loaf to sit directly on the oven shelf.
Bake for a further 10 - 12 minutes or until the bread sounds hollow when tapped underneath.
Loaf tin
- Place the loaf tin on the middle shelf and straight away pour cold water from a jug into the hot tin on the bottom shelf. Immediately close the door. Bake for 30 minutes without opening the door.
- After 30 minutes carefully open the oven door (caution: lots of hot steam may billow out so keep your face, hands etc. out of the way) and remove the tin of water.
Take the loaf out of its tin and place back in the oven directly on the middle shelf. Cook for another 10 - 15 minutes or until the bread sounds hollow when tapped underneath.
-
Place on a wire rack until completely cold before slicing.
Best eaten within 3 days or frozen.
Tip: slice before freezing so you can take out just as much as you need without waste.
Recipe Notes
Water temperature
If you have a food thermometer, use water at 38 degrees Centigrade. If you don't have one, the water should feel pleasantly warm if you put a finger in it, not hot which could kill the yeast. If in doubt, err on the side of cooler.
Amount of water to use
Different flours absorb varying amounts of water, so it isn't possible to say exactly how much you will need. I recommend making up a 500 g/ml jug of warm water and add gradually, using only as much as necessary to make a firm but not sloppy dough with no dry flour visible. Be guided by the image in the blog post.