Bloomer Bread (no-knead, overnight recipe)
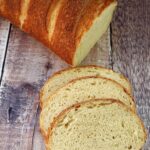
A classic English loaf, baked to a deep golden brown. The distinctive diagonal slashes along its length help make it extra crusty.
Based on a simple white dough, my overnight, no-knead method means it's even easier - and tastier - to make at home.
Ingredients
- 600 g white bread flour plus extra for dusting
- 2 tsp salt
- 1.5 tsp instant dry yeast i.e. does not need activating before adding to the rest of the ingredients
- 400 ml water approximately: see Instructions
Instructions
The night before you want to bake the bread
-
Put the flour, salt and instant dried yeast into a large mixing bowl and stir together.
Gradually add the water, stirring with a sturdy silicone spoon or spatula as you do, to bring the ingredients together into a wettish but not sloppy dough (see image in the blog post for how it should look). You may not need all the water, or you may need a splash more. Stir well so there are no dry bits of flour.
Cover the dough and leave overnight or 12 - 14 hours.
Tip: If the room is warm, or if you'd like a longer rise for convenience or to allow more flavour to develop, you can put the dough in the fridge for up to 24 hours. Bring the dough back up to room temperature before proceeding with the recipe.
On the day of baking
-
The dough should have risen, spread out, and look bubbly. If not, leave a little longer.
Lightly flour a work surface or silicone mat and scrape the dough onto it.
Fold the dough over itself several times until it's a smooth ball.
Lightly pat out to flatten the dough a little, then fold into thirds i.e. bring one side into the middle, then pull the other side up and over it. Turn the dough then fold into thirds again, in the opposite direction this time. This folding helps to give structure to the dough.
Cover with the upturned bowl and leave to rest while you complete the next step.
-
Take a large, shallow baking tray, ideally non-stick, and dust well with flour. Tip: if your tray isn't non-stick, smear butter over it first, then dust with flour. Set aside.
Preheat the oven to 200°C / 180°C Fan / Gas 6 with a shelf in the middle and a deep roasting tin on the bottom shelf (later, this will be filled with cold water to create steam and help the bread rise).
-
Pat or roll the dough into a rectangle approximately 22 x 14 cm. With a longer side facing you, tightly roll up then pinch to seal the ends. Aim for an even, square-ended shape, tucking in the sides and ends underneath if necessary.
Carefully transfer to the floured baking tray.
-
Place the tray in a large polythene bag or cover with cling film or a wet tea towel. Set aside at normal room temperature for 30 - 40 minutes. Do not overproof or the dough my slacken and spread out.
After 30 minutes, check that the dough is proofed:
If, when a finger is gently poked into the dough, it slowly springs back but leaves a slight indentation then it is ready to bake.
If the dough springs back quickly then it's not yet fully proofed: leave another 5 -10 minutes and check again.
-
When ready to bake, take a sharp knife or bakers lame and cut 5 or 6 deep, diagonal slashes along the length of the dough.
Brush water into the slashes (this encourages them to open more).
-
Put the tray on the middle shelf of the oven then pour cold water from a jug into the hot roasting tray on the lower shelf. Immediately close the door.
Bake for 30 minutes.
-
After 30 minutes carefully open the oven door (caution: lots of hot steam may billow out so keep your face, hands etc. out of the way) and remove the tray of water.
Take the tray with the bread out of the oven then place the bread back in, this time directly on the middle shelf and with its underside facing up.
Bake for another 8 - 10 minutes or until the bottom of the loaf sounds hollow when tapped.
Place on a wire rack until completely cold before slicing.
-
Best eaten within 2-3 days or can be frozen.
Tip: slice before freezing so you can take out just as much as you need without wastage.