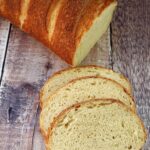
Bloomer Bread (no-knead, overnight recipe)
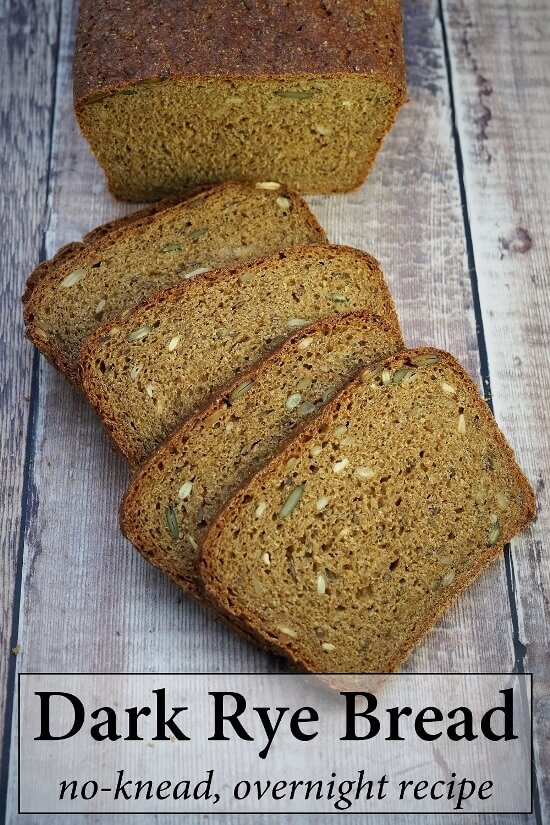
Bloomer Bread is a classic English loaf. Baked to a deep golden brown, the distinctive diagonal slashes along its length help make it extra crusty. Based on a simple white dough, my overnight, no-knead method means it’s even easier – and tastier – to make at home.

Jump to Recipe
WHAT IS BLOOMER BREAD?
Bloomer Bread is a thick, crusty loaf with diagonal slashes along its length. Although there are similar shaped baton breads in other European countries, bloomer is its English name. It’s commonly said that the loaf gets its name from being allowed to ‘bloom’ in the oven as it’s not constrained by a tin. But I’m with Elizabeth David on thinking this highly unlikely. As she points out in English Bread & Yeast Cookery (a must-have for anyone interested in bread making and its history), there are many loaves baked in this way, so that doesn’t make it unique at all.

More sensible I think is her suggestion that, as the term ‘bloom’ has been used by bakers to describe the sheen, a good crumb, or good flour, Bloomer Bread may have earned its name from one of those traits. Since reading that, I also discovered online a 1937 advert saying the loaf ‘derives its strange name from the sheen of its rich nutbrown crust’. Which seems fairly conclusive to me.
SIMPLE BUT TASTY CRUSTY BREAD
Despite its distinctive appearance, there’s nothing particularly special in the ingredients for Bloomer Bread. It’s a standard white dough containing just strong bread flour, salt, yeast, and water. But I think its shape and the way it’s baked gives it rather special qualities. Firstly, all those cuts along the top make for more crust and a crustier crust. Secondly, the thick loaf with its squarish rather than pointed ends means you get more evenly sized slices than some other loaves. Which is great for sandwiches, toast, and, to me, just more convenient.

But another reason I love it is down to nostalgia. Growing up in the 1970s and 1980s, Bloomer Bread was what we ate. Bought from the local shop, delivered fresh by the bakery that morning, it was crusty, deep brown, and wrapped in a sheet of tissue paper. On the other hand, I have to say that my homemade bloomer is better! Without the additives that were surely in that bread industrially produced by the infamous Chorleywood Process, the long, overnight fermentation of my version develops great flavour.
OVERNIGHT, NO-KNEAD BLOOMER BREAD
Virtually all my homemade bread is made by an overnight, no-knead method. Admittedly, it takes a bit more planning as you have to mix up the dough the day before you want to bake. But I think making bread this way is much easier to fit into most peoples’ routines. And, of course, you can forget all that vigorous kneading.
So, you may ask, is it really possible to get Bloomer Bread with a light but chewy crumb and crunchy, crispy crust without kneading? Well, the answer is, yes! It’s thanks to a wetter than usual dough combined with a long first fermentation (sometimes called first rise, proof, or prove). Together, these promote the development of gluten which is conventionally achieved by kneading. And it’s gluten which gives bread its rise and structure.
As I’ve explained above, Bloomer Bread is made with a regular white dough. However, because it’s proved without the support of a banneton or tin, and baked on a tray rather than in a tin, Dutch oven or similar, I make a couple of changes to my standard no-knead loaf. I make the dough a little less wet and introduce a few seconds of folding. Together, these changes give it more structure, meaning it’s less likely to spread outwards when unsupported.
As I hope you can see from the images, we still get the lovely open crumb you’d hope to achieve with a kneaded loaf.

If you’re ready to start Jump to Recipe.
But I recommend you read on for more tips and step-by-step images.
EASY BLOOMER BREAD DOUGH
Because the long first fermentation needs to be 12 – 14 hours at room temperature, it makes sense to mix up the dough the night before you want to bake the bread. If you want to extend the time even further, perhaps for convenience or just to get more flavour development, you can ferment the dough in the fridge for up to 24 hours.
To make the dough, you simply stir together 600 grams of strong white bread flour, 2 teaspoons of salt, and 1.5 teaspoons of instant dried yeast. Note that for my method, you must only use dried yeast that is labelled ‘instant‘, ‘fast‘, ‘easy blend‘ or similar. Dry yeasts that need to be activated in liquid before adding to the flour won’t work for this recipe.

To bring the dough together, we stir in water. You don’t need to heat it, straight from the tap is fine. Approximately 400 ml should be enough to create a wettish but not sloppy dough. However, as different flours absorb different amounts of liquid, you may need a little less or a splash more.
Now cover the bowl with cling film or a wet tea towel, or pop the whole thing in a reusable polythene bag, and leave on the work surface. If the room is particularly warm, you can put in the fridge instead, as mentioned above. Just bring it back to room temperature before proceeding with the next steps.
THE NEXT DAY
By the morning, as well as rising upwards, the dough will probably have spread out and may look very bubbly on top. But don’t worry. This is perfectly normal with wetter, overnight doughs.

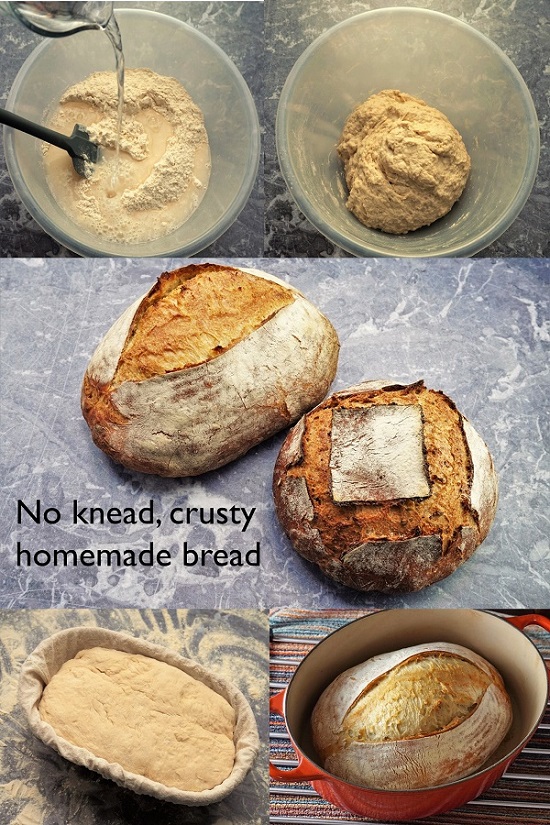
When you start to scrape the dough onto a lightly floured work surface (a silicone mat and dough scraper are good for this), you should see a complex network of gluten strands.
SHAPING THE DOUGH
Amazingly, just a few seconds of folding the dough over itself is enough to transform it into a smooth ball. Next, we introduce those folds which will help give your Bloomer Bread more structure. All you do is lightly flatten the dough then fold into thirds: lift up and bring one side into the middle, then lift the other side up and over it. Now give the dough a quarter turn and do exactly the same thing again.

To make folding into the classic bloomer shape easier, leave the dough to relax a few minutes. While it’s resting there’s a couple of jobs you can be doing.
- Preheat your oven to 200°C / 180°C Fan / Gas 6. Position a shelf in the middle, but also put a deepish roasting tray on the lowest shelf to heat up. When the bread goes in, you’ll pour cold water into the hot roasting tray. This creates steam which delays the forming of a crust, meaning your bread can rise for longer.
- Dust a large baking tray, ideally non-stick, with plenty of flour. If it isn’t non-stick, first grease with butter then dust with flour.
To form the bloomer shape, roll or pat out the dough into a chunky rectangle approximately 22 x 14 centimetres. With a long side facing you, roll it up as tightly as you can. When you get to the end, pinch the dough together to seal it.

What you’re aiming for is an even, almost square-ended shape. Tuck in the sides and ends if necessary, then carefully transfer to the prepared baking tray. For the loaf above I accidently gave it a ‘waist’ when it should be even along its length. Thankfully though, it didn’t greatly affect the shape of the finished loaf.
SECOND RISE, SLASH & BAKE
The dough now needs a second rise of 30 – 40 minutes. This can be done at normal room temperature unless it’s particularly cold. What we don’t want is for it to overproof as the dough will go slack and spread out. The best way to test whether a dough is ready to bake is to gently poke a finger into it. If the dough slowly springs back but leaves a slight indentation, then it’s ready. But if the dough springs back quickly then it’s not ready. If necessary, leave a little longer and check again.

When it’s ready to bake, you’ll need a sharp knife or baker’s lame to make diagonal slashes along the length of the dough. The purpose of slashing dough is so that, as it rises, it breaks where we want it to and not just randomly. In the case of Bloomer Bread, the multiple cuts mean more surface area for its dark, crispy crust to form. To encourage the slashes to open up further, I brush them with water just before putting in the oven.

As soon as the loaf’s in, pour cold water into the hot roasting tray underneath. Immediately close the door and bake for 30 minutes. After this time, carefully open the door, keeping your face and hands out of the way as lots of hot steam may billow out. Remove the tin of water and also the loaf on its tray. Then return the loaf back to the oven, this time directly on the middle shelf and with its underside facing upwards.

Bake for another 8 – 10 minutes or until the bottom of the loaf sounds hollow when tapped. Place on a wire rack until completely cold before slicing.
HOMEMADE BLOOMER BREAD
Although I’ve been baking bread for over thirty years, it’s only recently that I’ve perfected my Bloomer Bread recipe. And I find myself making it more and more often. Like my other white loaves made using a long fermentation, the extra time makes for a full flavour. Even with a no-knead method, I also get a lightly open crumb with good chew. But I particularly love the bloomer’s attractive, deep brown, crunchy crust.

Just seeing a chunky, square-ended bloomer makes me think of simple but classic sandwiches like cheese and onion, ham and tomato, or maybe Homemade Potted Beef. Or how about spread thickly with butter and lemon curd or Homemade Strawberry Jam?
Bloomer Bread should keep for 2 – 3 days and is also great toasted. After the second day, I freeze any that’s left, slicing it first so I can defrost as much as needed without waste.
Have you made my Bloomer Bread? Leave a comment and rating to let me know what you thought.
Bloomer Bread (no-knead, overnight recipe)
A classic English loaf, baked to a deep golden brown. The distinctive diagonal slashes along its length help make it extra crusty.
Based on a simple white dough, my overnight, no-knead method means it's even easier - and tastier - to make at home.
Ingredients
- 600 g white bread flour plus extra for dusting
- 2 tsp salt
- 1.5 tsp instant dry yeast i.e. does not need activating before adding to the rest of the ingredients
- 400 ml water approximately: see Instructions
Instructions
The night before you want to bake the bread
-
Put the flour, salt and instant dried yeast into a large mixing bowl and stir together.
Gradually add the water, stirring with a sturdy silicone spoon or spatula as you do, to bring the ingredients together into a wettish but not sloppy dough (see image in the blog post for how it should look). You may not need all the water, or you may need a splash more. Stir well so there are no dry bits of flour.
Cover the dough and leave overnight or 12 - 14 hours.
Tip: If the room is warm, or if you'd like a longer rise for convenience or to allow more flavour to develop, you can put the dough in the fridge for up to 24 hours. Bring the dough back up to room temperature before proceeding with the recipe.
On the day of baking
-
The dough should have risen, spread out, and look bubbly. If not, leave a little longer.
Lightly flour a work surface or silicone mat and scrape the dough onto it.
Fold the dough over itself several times until it's a smooth ball.
Lightly pat out to flatten the dough a little, then fold into thirds i.e. bring one side into the middle, then pull the other side up and over it. Turn the dough then fold into thirds again, in the opposite direction this time. This folding helps to give structure to the dough.
Cover with the upturned bowl and leave to rest while you complete the next step.
-
Take a large, shallow baking tray, ideally non-stick, and dust well with flour. Tip: if your tray isn't non-stick, smear butter over it first, then dust with flour. Set aside.
Preheat the oven to 200°C / 180°C Fan / Gas 6 with a shelf in the middle and a deep roasting tin on the bottom shelf (later, this will be filled with cold water to create steam and help the bread rise).
-
Pat or roll the dough into a rectangle approximately 22 x 14 cm. With a longer side facing you, tightly roll up then pinch to seal the ends. Aim for an even, square-ended shape, tucking in the sides and ends underneath if necessary.
Carefully transfer to the floured baking tray.
-
Place the tray in a large polythene bag or cover with cling film or a wet tea towel. Set aside at normal room temperature for 30 - 40 minutes. Do not overproof or the dough my slacken and spread out.
After 30 minutes, check that the dough is proofed:
If, when a finger is gently poked into the dough, it slowly springs back but leaves a slight indentation then it is ready to bake.
If the dough springs back quickly then it's not yet fully proofed: leave another 5 -10 minutes and check again.
-
When ready to bake, take a sharp knife or bakers lame and cut 5 or 6 deep, diagonal slashes along the length of the dough.
Brush water into the slashes (this encourages them to open more).
-
Put the tray on the middle shelf of the oven then pour cold water from a jug into the hot roasting tray on the lower shelf. Immediately close the door.
Bake for 30 minutes.
-
After 30 minutes carefully open the oven door (caution: lots of hot steam may billow out so keep your face, hands etc. out of the way) and remove the tray of water.
Take the tray with the bread out of the oven then place the bread back in, this time directly on the middle shelf and with its underside facing up.
Bake for another 8 - 10 minutes or until the bottom of the loaf sounds hollow when tapped.
Place on a wire rack until completely cold before slicing.
-
Best eaten within 2-3 days or can be frozen.
Tip: slice before freezing so you can take out just as much as you need without wastage.
RELATED RECIPES

As a retired resort sous-chef ex-pat living in a small town 80 miles away from Las Vegas, if my American wife and I want fresh baked bread, I have to do it myself.
Loved the bloomer recipe, it came out almost perfectly. But to get that beautiful glossy brown finish, I think that I’ll have to brush some egg wash on top next time.
I just sent away for a nice enameled cast iron Dutch oven and a sourdough starter kit. Looking forward to trying your recipes for those loaves. Thanks for the inspiration. Stephen Claridge.
Thanks so much for taking the time to comment and for your 5-star rating of my recipe, Stephen! Very glad it turned out so well and hope you have success with my other recipes too: do let me know.
Can i bake this bread on a dutch oven
Thanks for your interest in my recipe, Michelle. Yes, you could bake this bread in a Dutch oven although I suppose it wouldn’t strictly speaking be bloomer bread then because it’s the shape and the fact that its baked without support that makes it distinctive.
But the dough is basically the same as for my standard crusty bread which I bake in a covered pot, so you could follow this recipe instead if you like: https://moorlandseater.com/crusty-homemade-bread-with-no-kneading/ It’s one of my older posts and needs updating, but the recipe is sound! Obviously you could still shape it as per the bloomer bread.
Do let me know how it goes if you try it!
Made a soft and tasty bread with a good chewy crust. Definitely one to make again. It’s a great hint to brush the slashes with water too.
I’m wondering if you’re working in a kitchen that’s heated or not? When the weather’s mild here we don’t heat the house, but that means the kitchen could be 15 degrees C – which naturally affects the rising times. I’m also curious what the height of your cooked loaf is? Just to know if I could /should tweak what I’m doing.
Great to hear you enjoyed this bread and will be making it again!
My kitchen is unheated most of the time and always unheated overnight i.e. during the first rise of the dough, so may not be that different to yours.
I couldn’t say how high my loaf is as don’t have one to check, but it’s not one of my tallest – baked without support it does spread a little. Be sure not to over proof on the second proof as the dough can go slack and spread out more. Hope this helps!