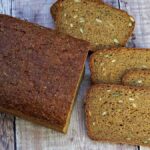
Dark Rye Bread (no-knead, overnight recipe)
Full-flavoured with a light tangy sourness, Dark Rye Bread is firm without being heavy. Cut thinly, it's perfect for Scandinavian-style open sandwiches.
For this no-knead, overnight recipe, you'll start the bread one or more days before you plan to eat it. But the hands-on time is remarkably small. Allow the first long fermentation to start developing the flavours, then do them justice by giving the finished loaf an opportunity to mature for a couple of days. You'll be rewarded by great tasting, healthy rye bread.
Please read the accompanying blog post before starting the recipe.
Ingredients
- 50 g rye flakes (can be replaced with more rye flour)
- boiled water from a kettle (see instructions for amount)
- 2 tbsp molasses
- cold water (see instructions for amount)
- 400 g wholemeal rye flour (plus extra for dusting)
- 150 g strong white bread flour
- 75 g mixed pumpkin, sunflower and flax/linseeds
- 2 tsp salt
- 1.5 tsp instant dried yeast (i.e. the kind that does not require activating before use)
- knob of butter (for greasing a bread tin)
For the glaze
- 25 ml cold water plus extra (see instructions)
- 5 g wholemeal rye flour
Instructions
The evening before you bake the bread
-
If using the rye flakes, put them in a heatproof bowl and pour over enough boiling water to cover. Stir, then set aside to soak and cool.
-
Put 100 ml of boiling water in a jug and stir in the molasses until dissolved.
Add enough cold water to make up to 300 ml and set aside.
-
In a large mixing bowl, stir together the rye flour, white flour, the seeds, salt, and instant yeast.
Thoroughly drain the soaked rye flakes and stir into the mixture.
-
Pour the contents of the jug into the mixing bowl and use a sturdy silicone spoon or spatula to start bringing the ingredients together.
Add extra cold water as needed, adding just a little at a time, to form a wettish but firm dough (see image in blog post for how it should look) with no visible bits of dry flour.
-
Cover the dough or place the bowl in a large reusable polythene bag and leave overnight or 12 - 14 hours.
Tip: If the room is warm, or if you'd like a longer rise for convenience or to allow more flavour to develop, you can put the dough in the fridge for up to 24 hours. Bring the dough back up to room temperature before proceeding with the recipe.
On the day of baking
-
Grease a 900g / 2lb loaf tin with butter, sprinkle with rye flour and shake out any excess.
-
The dough should have risen, spread out, and look a little bubbly. If not, leave longer.
Lightly flour a work surface, ideally covered with a silicone mat to minimise sticking, and scrape the dough onto it.
Fold the dough over itself several times until smooth, at the same time shaping it to fit the length of the loaf tin: try not to add much more flour but only just enough to prevent sticking.
Put the dough in the prepared tin, pressing it down and into the corners. Place in a large polythene bag or cover with cling film or a wet tea towel. Set aside somewhere warm for 30 - 45 minutes or until it almost reaches the top of the tin.
-
While the dough is proving
- Preheat the oven to 180°C / 160°C Fan / Gas 4 / 350° F with a shelf in the middle and a deep roasting tin on the bottom shelf (this will be filled with cold water later to create steam and help the bread rise: DO NOT USE GLASS or it could shatter).
- Make the glaze: put the 25 ml of cold water and 5 g of rye flour in a small saucepan over medium heat and whisk as it comes to boiling point and thickens to a smooth paste. Leave to cool.
-
Check that the dough is proofed
If, when a finger is gently poked into the dough, it slowly springs back but leaves a slight indentation then it is ready to bake.
If the dough springs back quickly then it's not yet fully proofed: leave another 5 -10 minutes and check again.
-
When the dough is ready, thin the glaze to the consistency of single cream by whisking in a little more cold water. Brush the top of the loaf with a generous amount.
-
Place the loaf tin in the oven then pour cold water into the hot roasting tin in the lower part of the oven. Immediately close the door.
Bake for 30 minutes.
-
After 30 minutes carefully open the oven door (caution: lots of hot steam may billow out so keep your face, hands etc. out of the way) and remove the tin of water.
Take the loaf out of its tin, brush over another layer of the glaze, then place back in the oven directly on the middle shelf.
Cook until the top is dark brown, and the bottom of the loaf sounds hollow when tapped (approximately a further 45 minutes i.e. 1hr 15 min in total).
-
Leave to cool on a wire rack.
When the bread is completely cold, wrap it well in foil and place in a tied polythene bag or airtight container. Leave for at least 1 day and up to 3 days before slicing thinly.
Best eaten within 4 days or toasted. Can also be frozen.