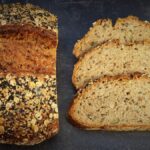
Multigrain Seeded Bread (no knead, overnight recipe)
A tasty, wholesome loaf with four different bread flours plus oats and seeds that requires little hands-on time and no kneading. Simply stir up the dough the night before and the next day just shape, prove, and bake.
Customize your loaf by swapping in your favourite bread flours and seeds.
Ingredients
- 50 g rolled or porridge oats
- 150 ml boiling water from a kettle
- 150 g wholemeal bread flour plus extra for dusting
- 150 g malted/granary flour
- 150 g white bread flour
- 100 g wholemeal rye flour
- 100 g mixed sunflower, pumpkin, flax, black and white sesame seeds
- 2 tsp salt
- 1.5 tsp instant dried yeast see Recipe Notes
- 325 - 375 g/ml cold water see Instructions
For the topping
- 1 tbsp rolled oats
- 1 tbsp mixed black and white sesame seeds
- 1 egg white beaten with a splash of water
Instructions
The night before you want to bake the bread:
-
Put the oats in a heatproof bowl and pour over the boiling water. Set aside to soak and cool while you gather the rest of the ingredients.
-
In a large mixing bowl, stir together all the flours, the seeds, salt and instant yeast.
-
Drain and discard any excess water from the soaked oats then stir them into the mixing bowl ingredients: if the oats clump together then use your fingers to separate them.
-
Pour approximately 300 g/ml of the cold water into the mixing bowl and use a sturdy silicone spoon or spatula to start bringing the ingredients together.
Add more water as needed to form a wet but not sloppy dough (see image in blog post for how it should look), stirring well so there are no dry bits of flour.
-
Cover the dough and leave overnight or 12 - 14 hours.
Tip: If the room is warm, or if you'd like a longer rise for convenience or to allow more flavour to develop, you can put the dough in the fridge for up to 24 hours. Bring the dough back up to room temperature before proceeding with the recipe.
On the day of baking:
-
The dough should have risen, spread out, and be very bubbly with a well developed network of gluten strands underneath (see blog image). If not, leave a little longer.
-
Lightly flour a work surface and scrape the dough onto it.
Fold the dough over itself several times until it comes together into a smooth, round ball. Add more flour if needed, but only just enough to prevent sticking to the work surface.
-
Dust a round proving basket with flour: if you don't have one then line a bowl with a clean tea towel and dust well with flour.
Transfer the ball of dough to the basket or tea towel lined bowl, placing it so the rounded top is now underneath.
Cover and leave to prove in a warm place for approximately 30 - 45 minutes.
While it's proving:
- preheat your oven to its highest setting and put on the middle shelf a cast iron pot or Dutch oven with its lid on.
- stir together the oats and seeds for the topping.
-
Check if the dough is ready to bake: gently insert a finger into the dough and see if the dough quickly or slowly springs back.
- If the dough springs back slowly, leaving an impression, then it's ready.
- If it springs back immediately and doesn't leave an impression then leave to prove for longer and check again.
-
When ready to bake, remove the pot from the oven and take off the lid.
Carefully flip the dough from its proving basket or bowl into the pot so that the rounded side that was underneath is now on top.
Add the topping (work quickly so the pot stays hot)
- Brush a layer of beaten egg white over the top of the dough.
- Use a sharp knife, razor blade or baker's lame to cut a slash across the top of the dough.
- Sprinkle over the seed and oat mix then very gently press down to help them stick: try not to let any fall into the slash.
- Brush over another layer of egg white.
-
Put the lid on the pot and place in the oven.
Immediately turn the heat down to 240°C / 220° Fan / Gas 9.
Bake for 30 minutes without removing the lid.
-
After 30 minutes, reduce the heat to 220° C / 200° Fan / Gas 7.
Remove the pot from the oven, tip the bread out of it, then return the loaf to sit directly on the oven shelf.
Bake for a further 15 minutes or until the bread is cooked through: it should sound hollow when tapped underneath.
-
Place on a wire rack until completely cold before slicing.
Best eaten within 2-3 days or can be frozen.
Tip: slice before freezing so you can take out just as much as you need without wastage.
Recipe Notes
Instant Dried Yeast: For this recipe, it's important that you only use dried yeast that is labelled 'instant', 'fast', 'easy blend' or similar. Check the pack to ensure it does not require activating first but can simply be added to the flour along with the other ingredients.
Equipment:
- You'll need a heavy, lidded pot or Dutch oven in which to bake the bread. It should have a capacity of at least 3.5 litres.
- The no knead dough is wetter than normal so a dough scraper is recommended for removing it from the bowl and for folding/shaping it.
- If you don't have a banneton/proving basket, use a large bowl lined with a clean tea towel, well floured.