Jam and Cream Biscuits
Jam and Cream Biscuits are a homemade version of the British favourite. Two buttery biscuits sandwiched together with vanilla buttercream and fruity jam, finished with a sprinkle of sugar. Simple but delicious biscuits and perfect with a cuppa – whether you’re a dunker or not!

Jump to Recipe

When I was a child there were always packets of biscuits in the house. Nothing fancy, just your everyday Rich Tea, Digestives, Ginger Nuts and the like for dunking into a mug of tea. But at Christmas there’d be a tin of posher ones. Pink wafers, crunch creams, thick shortbread covered in chocolate and wrapped in foil and, my favourite, Jam ‘n’ Creams. These are two plainish biscuits sandwiched together with buttercream. The top layer has a hole in the middle with sticky raspberry jam peeping out, sprinkled with sugar.
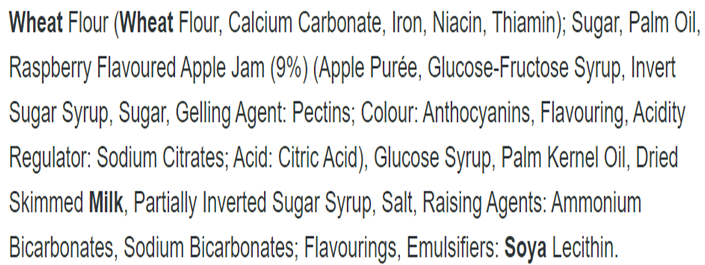
There’s still something about that combination I love. So, on the odd occasion I buy a packet of biscuits rather than making my own, it’s almost always Jam ‘n’ Creams made by the same company. But biscuits aren’t what they used to be. The current list of ingredients is almost incomprehensible. Understandably, such biscuits are now considered an ultra-processed food.
So I thought I’d make my own delicious Jam and Cream Biscuits with simple, everyday ingredients.

You’ll find full instructions in the recipe card at the end. But I recommend you read the whole blog post for extra tips and step-by-step images.
HOMEMADE JAM AND CREAM BISCUITS
One of my early blog recipes was for a basic biscuit dough you can flavour how you like. This allows you to make an infinite variety of tasty biscuits. With just self-raising flour, salt, butter, sugar, and beaten egg, I decided to use it for my Jam and Cream Biscuits too. Crisp, buttery and light, it was just right.

All you do is rub butter into the sifted flour and salt, stir in the sugar, then add enough of the beaten egg to make a firm dough. So it’s easier to handle, chill the dough in the fridge for 45 minutes or so before rolling out.
ROLLING & CUTTING OUT
Due to the relatively high butter content, I keep one half of the dough chilled in the fridge while I roll and cut the other. I roll the dough thinly: 2 – 3 mm. You could roll it a little thicker for a chunkier biscuit. Just be aware you may need to bake for longer.
My recipe makes approximately 24 sandwich biscuits if you use a 5-centimetre cutter. So, to make a top and a bottom for each one, you’ll need a total of 48 circles. I use a fluted cutter to replicate the wavy edges of the original biscuits.

You’ll need to cut a hole in the middle of half the biscuits. These will be the top layer where the jam peeps out. I don’t have a cutter small enough for this, so use a piping nozzle. Gather up all the little circles you cut from the middle, plus the rest of the dough scraps, and re-roll to make more biscuits.
CHILLING AGAIN
Jam and Cream Biscuits cook quickly, so I prefer to cut them all out before starting the baking. That way, I can keep a close eye on the batch in the oven rather than being distracted by rolling and cutting the next.
I recommend you keep the cut-out biscuits on their baking trays in the fridge until ready to bake. Chilling the biscuits before baking firms up the butter so they’re less likely to spread in the oven. This means those nice, fluted edges should stay intact.

If you want to replicate the curved lines radiating from the central hole of the original biscuits, then chilling should also help with that. To create the lines, I use the edge of a piping bag collar.
BAKING & COOLING
The biscuits should take 9 – 12 minutes to get cooked through and lightly golden. But ovens do vary so check before then. My old oven cooks quite unevenly (I really must get around to buying a new one) so I turn the trays around halfway through.

Don’t worry if the biscuits seem a little soft. They will firm up more as they cool. So they don’t break, I leave the cooked biscuits on the tray for a minute or two, before carefully transferring to a wire rack. They should be completely cold before you add the buttercream and jam filling.
FILLING JAM AND CREAM BISCUITS
For the vanilla buttercream, you beat together soft butter, sifted icing sugar, and vanilla extract. Amounts to generously fill all 24 sandwiched biscuits are given in the recipe card. Once made, chill the buttercream in the fridge to firm a little before using. If it’s gone too firm, briefly beat too soften again.
If you want to use a piping bag to neatly add the buttercream to the bottom layer you can. But I just spread it with a knife. Turn the biscuit over so the flat side that was on the baking tray is now uppermost. Pipe or spread on a good layer, then gently press on top a holey biscuit.

While the original biscuits contained raspberry jam (I see the modern, ultra-processed version has ‘raspberry flavoured apple jam’), I prefer strawberry. For the biscuits in this post, I used some of this year’s Homemade Strawberry Jam. Because it’s soft set, I reduced it a little by briefly bubbling in a small saucepan. Once cool again, the jam becomes thicker and so less likely to run off the biscuits.

Pipe or spoon a blob of jam into the hole then, to replicate the look of the original, sprinkle over a little caster sugar.
Tip: If you prefer that the jam doesn’t stand proud of the hole, then leave a space in the centre of the buttercream layer, fill it with a small amount of jam, then place the top biscuit on.
STORING & SERVING JAM & CREAM BISCUITS
Stored in an airtight container, I’ve found that Jam and Cream Biscuits stay nice and crisp for three days. But they’ll still taste good up to five days if you don’t mind the biscuits being softer. If you want to freeze the unbaked biscuits that should be fine. If cooking from frozen, just give them a little extra time in the oven.

I was so pleased with how these biscuits turned out. They have all the buttery flavour I remember plus that perfect filling combination of soft buttercream and fruity jam. Also, no ultra-processed ingredients and no nasty palm oil.
Although I’m not much of a tea drinker, when I have proper homemade biscuits like these, I do love something to dunk them in – I am British after all! Happily, I can tell you that homemade Jam and Cream Biscuits pass the dunk test perfectly without crumbling or disintegrating.

If you’ve made this recipe, I’d love to know what you thought. Please leave a comment and rating.


Jam and Cream Biscuits
An easy homemade version of the British favourite. Two buttery biscuits sandwiched together with vanilla buttercream and fruity jam, finished with a sprinkle of sugar.
Perfect with a cuppa, whether you're a dunker or not.
It's recommended you read the accompanying blog post before starting the recipe.
Ingredients
For the biscuit dough
- 225 g self-raising flour (plus extra for rolling out)
- 1 pinch salt
- 150 g cold butter (diced)
- 100 g caster sugar (plus extra for sprinkling)
- 1 small egg
For the filling
- 100 g soft butter
- 175 g icing sugar sifted
- 1 tsp vanilla extract
- firm strawberry or raspberry jam (see Recipe Notes if your jam is soft set)
Instructions
-
Make the biscuit dough
Stir the flour and salt together then sift into a mixing bowl.
Rub in the butter until you have a mixture that looks like fine breadcrumbs.
Stir in the sugar.
Gradually stir in enough of the beaten egg to make a firm dough: you probably won't need all the egg.
Gently knead the dough into a ball, flatten slightly, then wrap in foil or cling film and chill in the fridge for at least 45 minutes.
-
Preheat your oven to 180°C /160°C Fan /Gas 4 /350° F.
Grease some baking trays or line them with baking paper. The mixture makes approximately 48 circles (i.e. 24 sandwiched biscuits) so you may need to cook in batches.
-
Cut out and chill the biscuits
When ready to bake, unwrap the dough and cut it in half. Re-wrap one half and return it to the fridge.
Put the other half on a lightly floured work surface and roll out thinly: approximately 2 - 3 mm (you can roll thicker for a chunkier biscuit but may need to increase the cooking time).
Using a 5cm fluted cutter, stamp out circles of dough. In the middle of HALF of them, cut out circles 1.5 - 2 cm in diameter. These will be the tops of your sandwiched biscuits, with jam peeping through the holes you made.
Tip: the end of a piping bag nozzle is approximately the right size to make the holes if you don't have a suitably sized cutter.
Put all the cut-out biscuits onto the prepared trays, leaving a little space between them. Gather the small circles you removed from the holes plus all the scraps and re-roll to make more biscuits, again cutting out the middles of half of them, until the dough is used up.
As you fill each tray, transfer to the fridge to chill while you make more: chilling means the biscuits are less likely to spread when baking.
-
Optional
Using the edge of a piping nozzle or similar, make decorative curved lines all the way around the holes (see images in blog post for how they should look).
-
Bake the biscuits
Put the tray(s) in the oven until cooked through and lightly golden (approx. 9 - 12 min). Watch them carefully as they can quickly burn and if your oven cooks unevenly turn the trays around halfway through.
When done, leave the biscuits on the trays for a minute or two, then carefully transfer to a wire rack and leave until completely cold.
-
Make the buttercream
For the buttercream, beat the butter then beat in the sifted icing sugar and the vanilla extract until soft and light.
Put in the fridge to chill a little.
-
Fill and sandwich the biscuits
Generously spread or pipe buttercream on the flat side of each base biscuit (i.e. those biscuits without a hole).
Put a top biscuit on each one, press down lightly, then spoon or pipe a small blob of jam into the hole in the middle.
Sprinkle with a little caster sugar.
Tip: If you prefer that the jam doesn't stand proud of the hole, then leave a space in the centre of the buttercream layer, fill it with a small amount of jam, then place the top biscuit on.
-
Stored in an airtight container the biscuits should stay crisp for 3 days. They will taste good for up to 5 days although the biscuits will be softer.
Unbaked biscuits can also be frozen. Allow longer to bake if cooking from frozen.
Recipe Notes
Jam. If your jam is soft set, you can thicken it (so it doesn't run off the biscuits) by briefly bubbling in a small saucepan, cooled before using.
RELATED RECIPES


Can you use store bought jam?
Yes you can! Just be sure to use a firm jam so it doesn’t run off the edges of the biscuits.