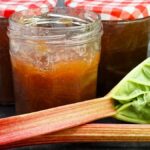
Rhubarb & Vanilla Jam
This simple but delicious jam can be made with either early, bright red rhubarb or later greener rhubarb. The colour won't be the same, but both taste good.
Lovely on scones, bread and butter, yogurt, porridge or in cakes and desserts.
Ingredients
- 750 g rhubarb weight after trimming
- 750 g jam sugar (i.e. sugar containing pectin) see Recipe Notes
- 1 lemon juice only
- 2 tbsp vanilla extract see Recipe Notes for alternatives
Instructions
-
Put 3 small saucers in the freezer; they'll be used to quickly cool teaspoons of jam to find when setting point has been reached.
-
Wash 3 medium jam jars and their lids (plus a smaller jar and lid in case you end up with extra jam) in hot soapy water. Rinse then leave to drain.
-
Wash the rhubarb and chop it into 2 - 3 cm chunks.
Put into a large, heavy, wide saucepan along with the jam sugar and the squeezed juice of the lemon.
Switch on the heat to medium-low and stir occasionally while the sugar slowly dissolves. Complete the next step while the sugar's dissolving.
-
Sterilize the jars and lids.
Put the drained jars and lids on a baking tray in the oven at its lowest setting.
Turn off the oven when the jars and lids are hot but leave them inside until you're ready to pot the finished jam. If they cool before the jam is ready, switch the oven on again.
-
When the sugar has completely dissolved stir in the vanilla, turn up the heat to maximum and bring to a boil (putting a lid on will speed this up, but take the lid off as soon as it boils).
With the lid off, keep at a fast, rolling boil until setting point is reached (10 - 30 min) - see next step for how to test for this.
-
Test for setting point (see Recipe Notes for clues on when to start testing)
Take the saucepan off the heat.
Flake test: Take some jam on a wooden spoon, cool it a little, then let it fall off the edge of the spoon. If the final bits of jam come together into 'flakes' rather than running off in a stream, proceed to the Crinkle/Cold Saucer test. If it doesn't flake, boil for another 2-3 minutes then test again.
Crinkle/Cold Saucer test: Take one of the cold saucers from the freezer, put a teaspoon of jam on it to cool. When it's cold, gently push the jam with your finger. If it wrinkles and doesn't run back into the gap you made, then setting point has been reached. If not, boil for another 2-3 min then test again.
-
For safety reasons, the jam and jars must be hot at the potting up stage (at least 85°C)
When setting point is reached, take the hot jars from the oven and pour or ladle the hot jam into them.
Protecting your hands with a cloth, screw on the lids and leave to cool. When the jars are cooler, it should be possible to tighten the lids a little more.
Once the jars are completely cold press down on the middle of the lids. If they don't spring back with a popping sound, then you have an airtight seal. Label the jars and store in a cool, dark, dry place.
Don’t have an airtight seal? Go to the Troubleshooting section at the end of my Jam Making Beginner’s Guide.
-
In properly sterilized jars, the jam should keep for a year in a cool, dark place. Once opened, store jars in the fridge and use within a few weeks.
Recipe Notes
Jam sugar. Rhubarb is low in pectin so, to get a good set, sugar labelled 'jam sugar' is recommended for this recipe. Note that packs labelled 'preserving sugar' do not contain pectin and aren't recommended.
Vanilla. The vanilla extract can be replaced with vanilla paste, a whole vanilla pod, or the seeds scraped from a pod. Remove the vanilla pod before potting up the jam.
When to start testing for a setting point. It's not possible to say how long a jam will take to reach setting point, but there are signs that suggest you should start testing for it:
- The surface of the jam will look glossy and shiny instead of foamy.
- There will be a slow 'plopping' of the jam rather than fast bubbling.
- The sides of the pan may have a build-up of thickened, sticky, jam.
Using a thermometer. It is often said that jam sets at 104.5 degrees Centigrade. However, factors such as the amount of pectin can make this unreliable. Therefore, if you have a thermometer you can use it, but I recommend backing this up with the Crinkle/Cold Saucer test as described in the instructions.
Read more about the theory and practice of homemade jam in my Beginner's Guide to Jam Making.