Corned Beef & Potato Pasties
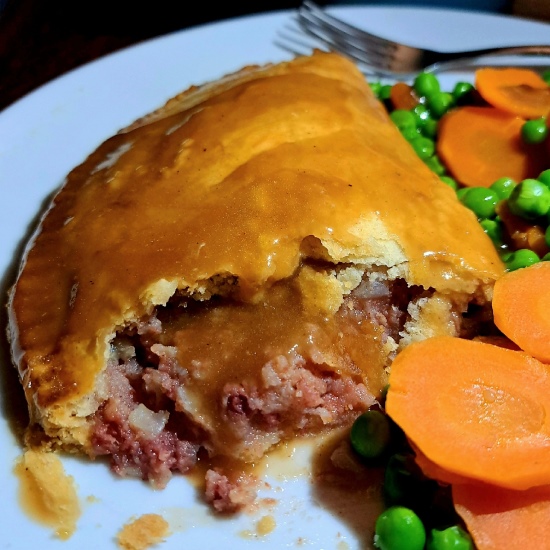
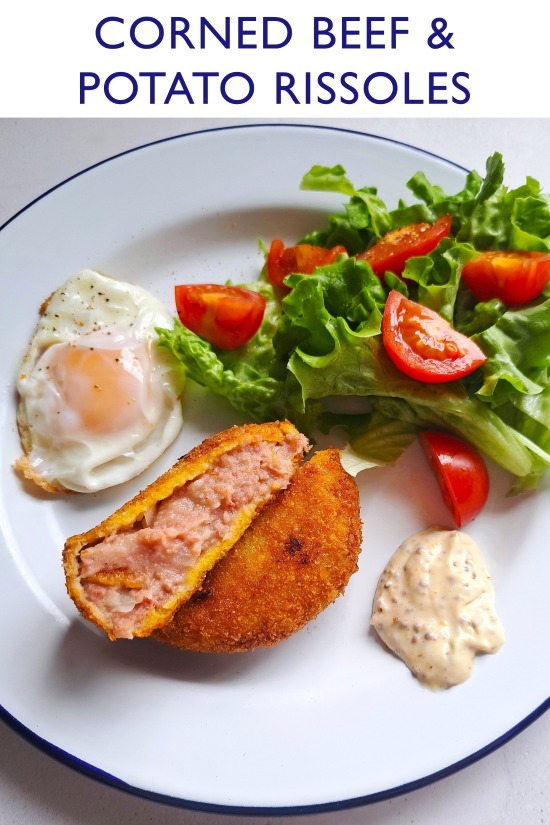
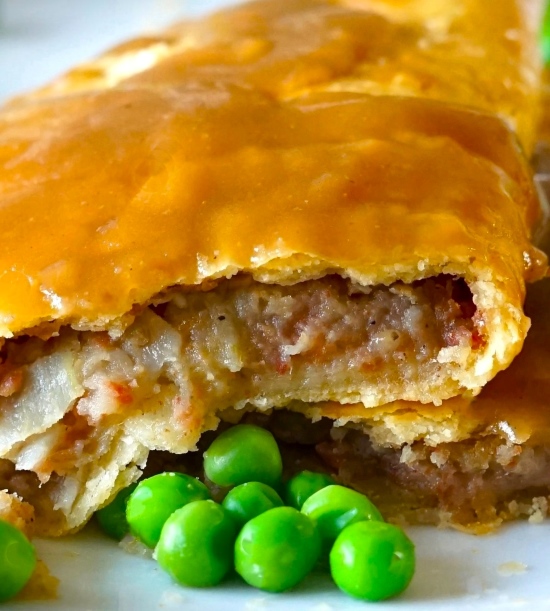
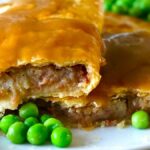
Corned Beef & Potato Pasties are a British favourite. Simple, budget-friendly but oh so tasty. Crisp shortcrust pastry filled with tinned corned beef mashed with cooked potatoes and onions makes for perfect comfort food served with gravy and veg.

Jump to Recipe
Growing up in the 1970s and early 80s, I was the youngest child in a family with seven children. With little money to spare, meals were based around economical ingredients cooked simply. This usually meant small portions of cheaper cuts of meat bulked out with lots of potatoes and other carbs like bread or pastry.
One of my favourite weeknight dinners, or occasional lunch on chilly Saturdays, was Mum’s homemade Corned Beef & Potato Pasties.
By adding the everyday staples of potatoes, onion, flour, lard, and butter, she could stretch a can of corned beef to feed all of us. Nothing was wasted either: she saved the potato and onion cooking water and used it to make gravy to pour over.
For Saturday lunch we’d have just a pasty and gravy. Instead of knife and fork, we’d eat it with a spoon to scoop up all that gravy. On weeknights there’d be simple veg too like frozen peas, carrots or cabbage.
Despite all the food experiences I’ve had since, I still love Corned Beef & Potato Pasties. And I make them almost exactly as Mum did all those years ago. Not because I’m big on nostalgia. But because they taste so good. Warming and comforting, a humble pasty really can be wonderful.
You’ll find ingredient amounts and detailed instructions in the recipe card at the end. But I recommend you read the rest of this post first for tips and step-by-step images.
WHAT IS CORNED BEEF?
The type of corned beef you need for making pasties is found in cans. The rectangular tins with sloping sides with key attached are familiar enough here in Britain. But you might be surprised to learn that inside isn’t, strictly speaking, corned beef. That’s because real corned beef is salt beef which is salt cured beef brisket (the ‘corned’ bit refers to the corns or grains of salt used). Cut thinly, it’s a deli classic you’ll find in sandwiches like a Reuben.
The beef in tins, while salted, isn’t brisket. As you might expect from a product used for thrifty meals, it’s likely to contain all sorts of cheap cuts. These are cooked, minced or shredded, and set with gelatine.
A product of the industrial revolution, corned beef was originally called Bully Beef, possibly from the French for boiled beef: bouef bouilli. It was an important part of soldiers’ rations and eventually became a staple for working class Britons.
Eaten occasionally, I think tinned corned beef can still play a role in creating budget-friendly meals like Corned Beef & Potato Pasties. Well-flavoured, a little really does go a long way.
MAKING THE FILLING FOR CORNED BEEF & POTATO PASTIES
Because the filling needs to be cold when it goes into the pastry, you should get started on that first.
While some people add extra veg like carrots, I prefer to keep it classic with just corned beef, potato, and onion. For 6 large or 8 smaller pasties you’ll need:
- 1 standard tin of corned beef. These usually weigh 340 grams.
- Potatoes. Use any floury variety suitable for mashing e.g. King Edward, Maris Piper, Rooster. You’ll need 500 grams after peeling.
- Onions. Don’t skimp as these add lots of savoury flavour. Use 1 very large or 2 medium – large.
- Salt & Pepper. Use black or white pepper, whichever you prefer, but add plenty!

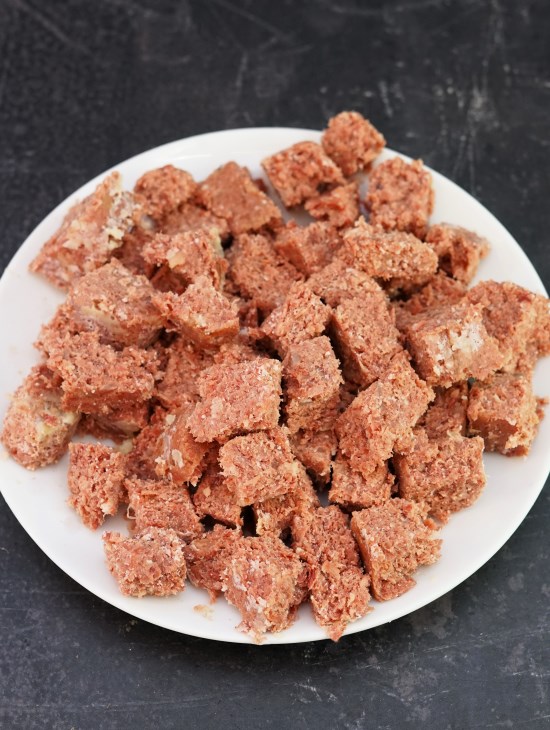
We start by chopping the potatoes and onions into rough chunks and putting them into a roomy saucepan. Cover well with cold water, add salt, then bring to the boil. Turn the heat down and simmer until the potatoes are just tender. Drain in a colander but remember to catch the cooking liquor if you’re going to make gravy! I like to leave the veg in the colander for a few minutes to make sure it’s nice and dry. While that’s happening, you can open the tin of corned beef and roughly chop it.
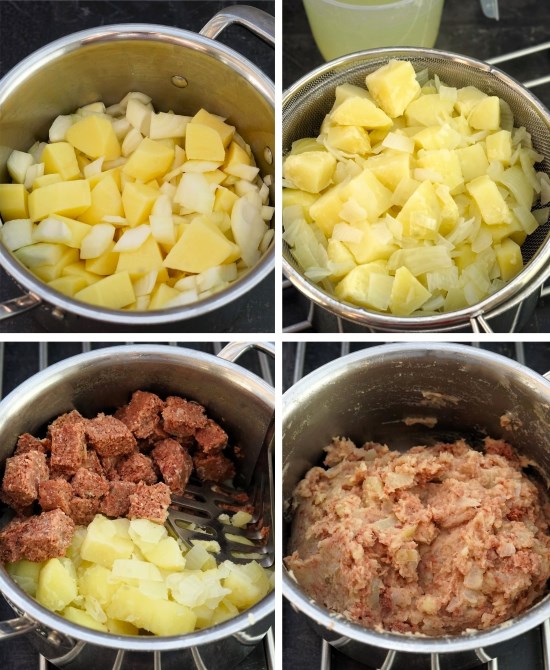
As the meat has plenty of fat, you don’t need to add butter when mashing with the potatoes and onions. It’s up to you whether you mash until completely smooth or leave the filling a little chunky.
Now we add lots of pepper, tasting as we go. Check there’s enough salt too – some brands of corned beef are less salty than others. Finally, transfer the filling to a clean container, leave it to cool, then pop in the fridge until it’s completely cold. You can do this up to 24 hours in advance if you like.
NEW: THE SAME FILLING CAME BE USED TO MAKE CRISPY COATED CORNED BEEF RISSOLES
HOMEMADE SHORTCRUST PASTRY
While a tasty corned beef filling might have drawn you to these pasties, don’t underestimate the pleasure of the light, crispy and crumbly shortcrust pastry! Even if you haven’t made it before, I hope you’ll have a go rather than buying ready-made. It honestly is easy, even if made by hand.

With a food processor though, it’s even quicker. I’ve given instructions for both in the recipe card at the end.
Just as Mum did, I use half lard and half butter for my Corned Beef & Potato Pasties. I think this gives the best combination of crispness and flavour. Also, with lard currently about a third the price of butter, it will save you a little money.
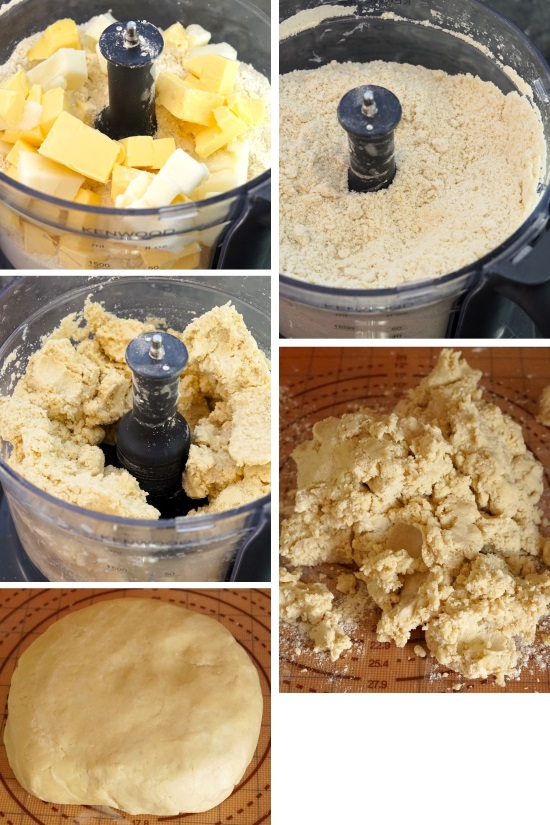
Whether you make by hand or in the processor, the principle is the same. Mix the fat with the flour (‘rub in’ if by hand) until evenly combined, then you gradually add cold water until a dough starts to form. To bring it together into a smooth ball, you very gently and briefly knead it.
So you can easily roll out the dough, you’ll need to chill it in the fridge. Thirty minutes is usually fine. But you can make the dough up to a day in advance if you prefer. You can also freeze it.
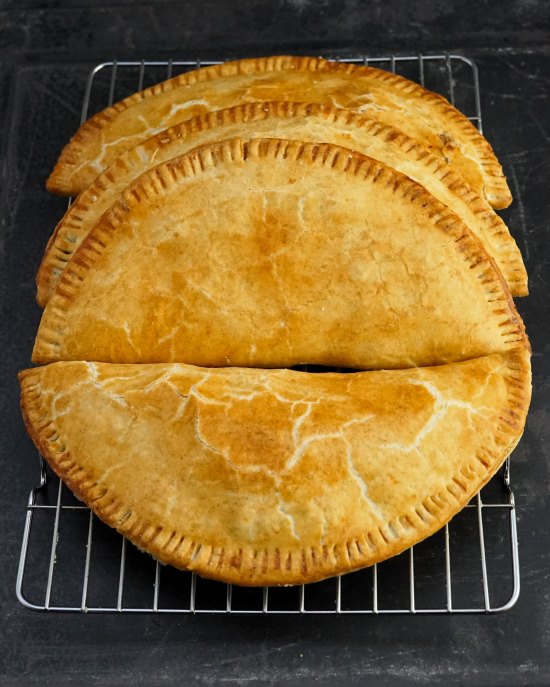
SHAPING & BAKING THE PASTIES
I usually make 6 large Corned Beef & Potato Pasties which means rolling each piece of pastry into a circle 24 centimetres in diameter. If you want 8 smaller ones, make your circles 20 centimetres. If you’re rubbish at rolling perfect circles, do as I do: roll to the approximate size then use a suitably sized plate, bowl, saucepan lid or similar to cut around.
Next, place one sixth (or eighth) of your cold filling on one half of a circle. You can perhaps see that I fold the circle in half to find the middle, then lay it flat again. Be sure to leave a bare edge all around: brush this with beaten egg to help the pastry stick when you pick up and fold over the other half of the circle.
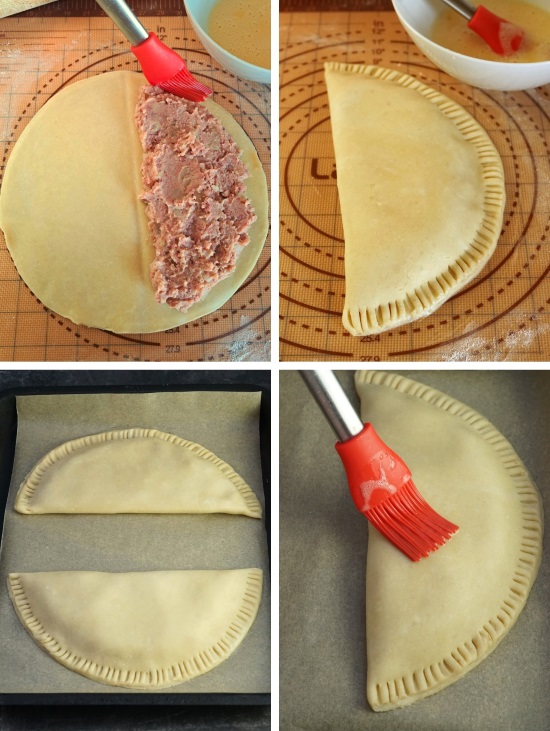
If you want a traditional crimped join (either on the side or along the top) then pinch the edges together instead. Mum always did this, but I prefer not to have a big wodge of pastry – Mum’s sometimes took a great deal of gravy to soften it! So I just press down all the way around then go round again with the tines of a fork. Place the pasties on non-stick baking trays or line the trays with paper.
If you’re not ready to bake yet, you can put the pasties in the fridge or even freeze them. Just before putting into the preheated oven, take the remaining beaten egg and brush over each pasty. This will help to seal the edges further and give the pastry a glossy shine.
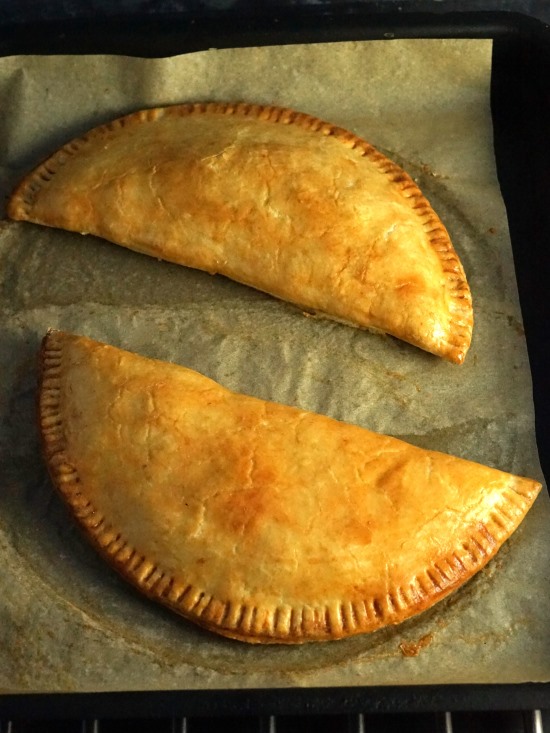
The pasties should take approximately 25 minutes to cook. At the 20-minute mark I brush on another layer of the beaten egg then pop them back in the oven until the pastry is crisp and golden, the filling piping hot.
When the pasties are ready, it’s best to leave them a few minutes before lifting off the trays – with thinnish pastry, they can be quite delicate at first.
SERVING & STORING CORNED BEEF & POTATO PASTIES
While you could eat these tasty pasties just as they are, I think that plenty of gravy poured over is the icing on the cake, so to speak. Just like Mum used to, I save the potato and onion cooking liquor and use that for my base, flavoured with a couple of stock cubes. I make a roux with fat saved from a Sunday roast plus flour. Or you could just cheat with some gravy granules.
To go with the pasties, I choose simple veg like boiled sliced carrots and frozen peas. As the pasties are already quite filling with both potatoes and pastry, you probably won’t need anything else. However, I have been known to cook a few chips in the air fryer to eat alongside, covered in more gravy!

I hope you’ll try my rather retro Corned Beef & Potato Pasties, including making your own pastry. Budget-friendly, but so tasty, I think it’s worth making the full batch even if you’re a smaller household. Whether you freeze the pasties before baking or after, it’s great to know you’ve something warming and comforting tucked away for an easy, satisfying dinner.
If you’ve made this recipe, I’d love to know how it went, so please leave a comment and rating.
Corned Beef & Potato Pasties
A British favourite: simple, budget-friendly but so tasty. Crisp shortcrust pastry filled with tinned corned beef mashed with cooked potatoes and onions.
Perfect comfort food served with gravy and veg.
Ingredients
For the filling
- 500 g potatoes, peeled (weight after peeling)
- 2 large onions
- salt to taste
- 340 g tinned corned beef (i.e. 1 standard tin)
- black or white pepper to taste
For the shortcrust pastry
- 460 g plain flour
- 1 tsp salt
- 115 g butter
- 115 g lard (can be replaced with more butter)
- 6 - 8 tbsp iced water
- 1 small egg, beaten (for sealing and glazing)
Instructions
Make the filling
-
Chop the peeled potatoes into chunky bite sized pieces and put into a large saucepan.
Roughly chop the onion and put it in the pan with the potatoes.
Cover with cold water and add 1.5 tsp of salt.
Bring to a boil then turn down the heat and simmer until the potatoes are just tender.
Drain the potatoes (tip: you're going to make a gravy save the cooking water and use as a base for your stock) then leave in a colander to dry while you complete the next step.
-
Open the can of corned beef and roughly chop it.
-
Wipe out the saucepan and tip in the potatoes and onion along with the chopped corned beef and ¼ tsp pepper.
Use a potato masher to break down and combine the ingredients: you can leave it chunky or mash until completely smooth if preferred.
Taste and add more salt or pepper if needed.
Transfer to a suitable container, cover and set aside until cool, then put in the fridge until completely cold. Can be stored in the fridge for up to 24 hours.
Make the shortcrust pastry
-
Using a food processor
Put the flour, salt, butter and lard into the food processor and whizz until the mixture looks like very fine breadcrumbs.
With the motor still running add iced water, 1 tbsp at a time, until the mixture starts coming together.
Making by hand
Stir the flour and salt together in a bowl. Rub in the butter and lard so that the mixture resembles fine breadcrumbs.
Add 3 tbsp of cold water and stir it in with a round bladed knife. Continue adding tablespoons of water and stirring until the mixture starts coming together.
-
Turn out onto a lightly floured surface then very gently and briefly knead just enough to make it into a smooth ball of dough.
Flatten slightly then wrap in cling film or foil and chill in the fridge for at least 30 minutes. Dough can also be frozen.
Make the pasties
-
Line two or three baking trays with baking paper.
Preheat the oven to 180°C / 160° Fan / Gas 4 / 350° F.
-
Divide the dough into 6 equal pieces (or 8 for smaller pasties), using scales for accuracy. Shape each piece into a ball.
-
On a lightly floured surface, roll out the first ball into a circle approximately 24 cm in diameter (or 20 cm if you're making 8 smaller pasties): use a suitably sized plate, bowl, or saucepan lid as a template to cut around and get a neat circle.
Put ⅙ (or ⅛) of the filling on one half of the circle, leaving a 2 cm bare edge. Brush the edge with a little of the beaten egg then bring over one side of the dough to cover the filling and create a semi-circular pasty.
Press the edge down well to seal, then repeat with the tines of a fork (dipped in flour if they stick) to seal further and create a pattern. Alternatively, use your fingers to crimp the edge instead of using a fork.
Transfer to a baking tray then repeat the process with the remaining balls of dough and filling.
Tip: pasties can stored in the fridge and cooked later, or frozen at this stage.
Bake the pasties
-
Brush the pasties with beaten egg, put in the oven, and bake for 20 minutes.
-
Take the trays out of the oven and brush the pasties with another layer of beaten egg.
Return the pasties to the oven and cook for a further 5 - 8 minutes or until the pastry is cooked, crisp and golden brown and the filling is piping hot.
-
Leave the pasties on the trays for a few minutes so the pastry firms a little then serve with gravy and vegetables.
If not serving straight away, cool then store in the fridge for 2 days or freeze (defrost before reheating).
Reheat at 180°C / 160° Fan / Gas 4 / 350° F until piping hot (approx. 20-25 min) or heat in the microwave for 2 minutes and put in the oven for 5 - 8 minutes to crisp up.
RELATED RECIPES

My late mummy used to make these for me as it was one of my favourite home comforts. Thank you so much for such a perfect recipe, you have made my heart feel full. They were just like hers <3
Oh you are most welcome and thank you so much for your lovely comment.
Delish! Just love a pasty so decided to make some . I made small ones as I’m entertaining this week. Thought they would be handy for snacks and picnics.
I cooked some to taste and have frozen a batch.
Question? Do I defrost before baking or do I cook them from frozen please ? TIA
So glad you found them delish!
You can either defrost or cook from frozen. Frozen will obviously take longer, but exactly how long will depend on what size and thickness you made them. Possibly 5-10 minutes extra, but check by inserting a metal skewer that it’s hot before serving.
Making these today and will also freeze some. Under Step 3 of Baking The Pasties it says to defrost before reheating 😊
Hi, I was interested to read your recipe as it is something I love. My mum used to make them but didn’t cook the onion, she then put the mixture into pastry lined mince pie tins, covered with a lid of pastry then baked.
We then ate them cold for a picnic lunch. She also called them pasties.
Many thanks for your comment Bryony. It’s interesting that your mum made them in mince pie tins for a picnic lunch, because I’ve been thinking of those little tins for different cold pies as well! I really must get around to trying it.
I want real Corned Beef not canned. How to use that instead plwas
Hi Linda. Thanks for your interest in my recipe! It would be exactly the same: just substitute in the same weight of fresh corned beef.
It’s a sweepingly inaccurate statement to say they are a favourite. In my 70 years living in many parts of the UK, I only ever heard of Cornish pasties, or meat pies, and never corned beef pasties – which is really a pie or turnover.
Put “corned beef pasty” into a search engine and you’ll find lots of results and recipes – including on BBC Food! You can also buy them in UK supermarkets and chain bakeries (e.g. Wrights in the region I live). To my knowledge, they are never called turnovers. Corned beef pies are made, but these tend to be large ones for slicing into portions, not an individual serving like the pasty.
I was brought up in North Yorkshire and a cornbeef pastie or pie if you had to feed a number of people was a very popular goto meal if you were hard up. They were delicious often served with nice warm omion gravy. I have lived in NZ for over 30 yrs, and I definitely feel like making some now. Thank you.
Hope you enjoy it!
Not so much a comment — although the finished product looks delicious! — but a question: No holes or slits in the pastry to vent steam? Have you ever had any problems with not putting any in the pasty?
Hi. No, I’ve never vented any of my pasties (probably because my Mum never did!) and don’t have problems. But there’s no reason you shouldn’t if you’d rather.