Corned Beef Rissoles
Corned Beef Rissoles are simple, economical comfort food: a soft filling of canned corned beef mixed with cooked potatoes and onions with a crispy golden breadcrumb coating. Great for a weekend breakfast or brunch with eggs or try them as a homely dinner with baked beans and coleslaw.

Jump to Recipe
When I really fancied corned beef pie the other week, I made extra filling because I knew exactly what I wanted to do with it. Crispy on the outside, soft in the middle, Corned Beef Rissoles. And I’m so glad I did. Because they were a brilliant lunch the next day, topped with a fried egg, served with a salad garnish and a dab of mustard mayo.

But I think they’d make a great weekend brunch too. Or maybe a comforting dinner with baked beans and homemade coleslaw.
WHAT ARE RISSOLES?
I wish I could think of a better name than rissoles for these tasty morsels. I’ve seen supermarkets selling products featuring savoury fillings in a breadcrumbed coating as ‘crispbakes’. But I’ve stuck with the old-fashioned name of rissoles.

There’s some disagreement about where the word rissole comes from. Some say it’s from the French réchauffés or ‘reheated’. Others that it’s from rissoler: to redden or brown. Either way, it amounts to the same thing: cooked and chopped meat, usually mixed with a binder of some kind, and fried.
In Britain, rissoles were traditionally made with leftover meat, often from a Sunday roast. This made them a popular choice for dinner on Mondays. While associated with making ends meet during the Second Word War, rissoles go back further than that, with Mrs Beeton including several recipes in her 1861 Book of Household Management.

But thrifty folks can use almost any cooked meat in a rissole, hence the old joke, ‘What are rissoles made of? Ear holes, eye holes, and ar$€ holes’ 😄. After the industrial revolution, canned corned beef became a staple for working class Britons and found its way into rissoles. While not all rissoles are fried in breadcrumbs, tinned corned beef is soft when heated and a crispy coating stops it spreading.
CORNED BEEF RISSOLES
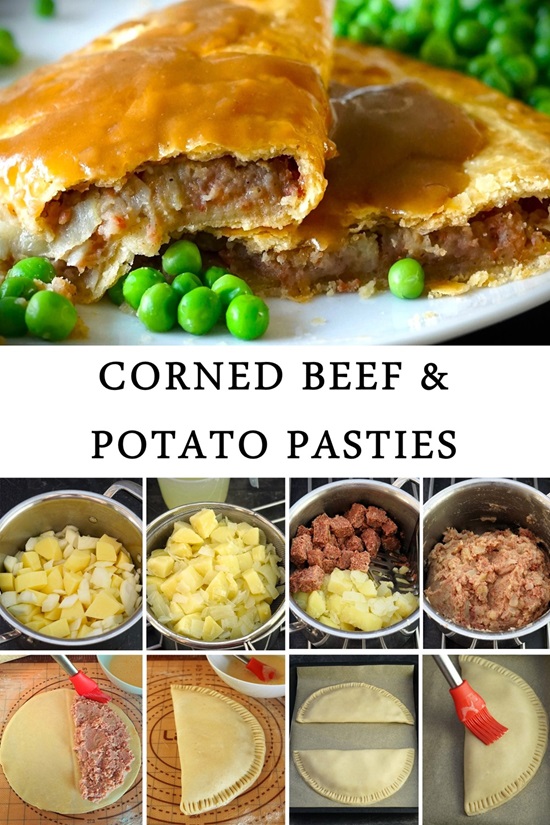
So convenient, I always keep a tin of corned beef in the cupboard. Okay, it’s not the healthiest food (nor especially cheap these days) but a little goes a long way. Well-flavoured, it’s often eked out with potatoes, onion, and in the form of pies and pasties, pastry too.
Growing up in the 1970s and 80s, one of my favourites was Mum’s corned beef, potato and onion pasties. My filling for Corned Beef & Potato Pasties is still exactly the same as Mum’s from all those years ago. Not because I’m big on nostalgia. But because it so simple and satisfying. And I’ve used that same filling for my Corned Beef Rissoles.

Rather than repeating how to make the filling in this post, in the recipe card at the end I’ve included a link to the pasties. If you made the full amount of filling, that would give you approximately 12 rissoles. However, as that’s quite a lot, I’ve suggested you make a half batch.

All you do is boil together potatoes and onions until soft and then drain very thoroughly. Cubes of corned beef are then added to the cooked potatoes and onions. You can either mash them all together like I do or just stir for a chunkier texture. Be sure to leave the mixture until completely cold before forming into patty shapes.
DOUBLE FLOUR-EGG-CRUMB
To keep the corned beef, potato, and onion filling together, and to create a delectable crispy outside, we give it an egg and crumb coating. The fancy French term is to pané. All that means is we first lightly coat the patty in flour, then beaten egg, then breadcrumbs.
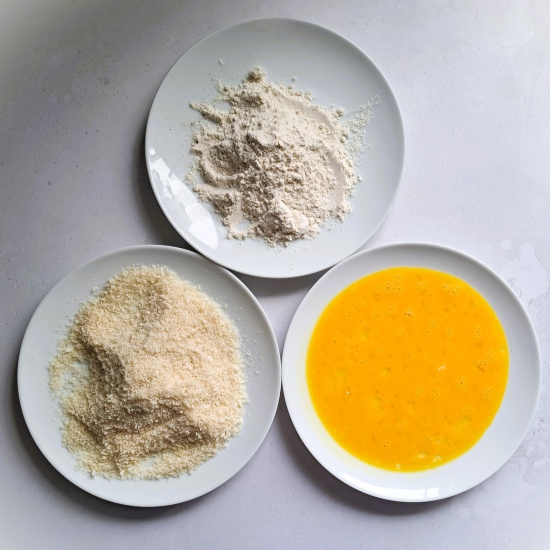
Start by putting plain white flour in a shallow bowl or plate, a beaten egg in another, and some fine breadcrumbs in a third. I like to season the flour and crumbs with a little salt and pepper too. Tip: instead of throwing away stale bread, whizz into crumbs and freeze.
Now take one of the patties and turn it over in the flour until completely covered. Next dip it in the egg, again carefully turning so it’s completely covered. Finally, transfer to the breadcrumbs and cover in crumbs, pressing lightly so they stick. If you can, it’s much quicker and less messy if you only use one hand when dealing with the egg layer and keep the other dry.

As each patty is floured, egged, and crumbed, place it on a clean tray or board then repeat with the rest. Because tinned corned beef is particularly soft, you MUST put A SECOND coat of flour, egg, and crumbs on each patty. If you skip this stage, the filling will almost certainly start to escape when you fry the rissoles.

After the second coat, it’s worth chilling the Corned Beef Rissoles in the fridge for 30 minutes. This helps to set the exterior before you start frying.
COOKING & STORING CORNED BEEF RISSOLES
I fry my rissoles in a mixture of sunflower and olive oil. But almost any oil suitable for shallow or deep frying should be fine. I cook them in batches using a smallish, deepish non-stick frying pan that will fit two or three without crowding.
Put enough oil in the pan to come at least halfway up the side of the rissoles. This should ensure the breadcrumb forms a good seal. Heat the oil to medium-high, and don’t put the rissoles in until a few breadcrumbs thrown in sizzle immediately. Cook until a crispy, deep golden brown coating forms, carefully turning regularly. Each batch should take around 6 – 8 minutes.

Keep the cooked rissoles warm on a baking tray in a low oven while you cook the rest. Alternatively, drain on a wire rack lined with kitchen paper to absorb any excess oil and reheat as necessary later.
If you want to make up the Corned Beef Rissoles in advance, they should be fine in the fridge for up to a day. I don’t recommend freezing though as the potato and onion could become watery. When reheating, do it in a medium-lowish oven; too hot and the filling could start to come out.

I haven’t tried cooking them in an air fryer as I suspect the coating won’t crisp up enough to hold the filling. However, I don’t see why the fried rissoles couldn’t be gently reheated in an air fryer.
SERVING CORNED BEEF RISSOLES
I made the Corned Beef Rissoles you see in this post with the filling left over from the previous night’s corned beef pie. Despite the humble ingredients, my lunch felt like a real treat. The hot and soft, meaty and peppery filling surrounded by a perfectly crisp coating was a delight.

Add to that a perfectly fried egg, seasoned lettuce and tomatoes, plus wholegrain mustard stirred through mayonnaise, and I was in comfort food heaven. For a homely evening meal, I think they’d be great with baked beans and homemade coleslaw, plus chips too if you’re really hungry.
Although tinned corned beef isn’t as cheap as it used to be, when combined with potatoes, onions, and given a crispy coating it can make an economical and thoroughly enjoyable meal.
If you’ve made my Corned Beef Rissoles, do leave a comment and recipe rating to let me know how it went.


Corned Beef Rissoles
Simple, economical comfort food: a soft filling of canned corned beef mixed with cooked potatoes and onions with a crispy golden breadcrumb coating. Great for a weekend breakfast or brunch with eggs or try them as a homely dinner with baked beans and coleslaw.
It's recommended that you read the accompanying blog post before starting the recipe.
Ingredients
- Half batch of filling for Corned Beef & Potato Pasties see Recipe Notes
- 2 rounded tbsp plain flour
- 1 egg, beaten
- 60 g breadcrumbs
- salt and pepper
- oil for frying
Instructions
-
Divide the corned beef filling into 6, using digital scales for accuracy.
Roll into balls and flatten each into a round patty.
Patties can be chilled at this point if liked.
-
Put the flour in a shallow bowl or plate, the beaten egg in another, and the breadcrumbs in a third.
Season the flour and breadcrumbs with a little salt and pepper.
-
Take one of the patties and carefully turn it over in the flour until completely covered.
Now dip it in the egg, again turning so it's completely covered.
Cover in breadcrumbs, pressing lightly so they stick, before placing on a clean tray or board.
Tip: it's quicker and less messy if you can use just one hand when dipping in the egg and keep the other hand dry.
Repeat with the remaining patties.
Important: now put a SECOND coat of flour, egg, and crumbs on each patty. Skipping this stage means the soft filling is likely to come out when you fry the rissoles.
Recommended: chill the patties for 30 minutes after the second coating. Can also be made up to 1 day in advance and stored in the fridge.
-
Add enough oil to a small, deepish frying pan so that it will come just over halfway up the sides of the rissoles. Heat to medium-high: when hot enough, a few crumbs thrown in should sizzle immediately.
-
Fry the rissoles 2 or 3 at a time so they're not crowded in the pan. Carefully turn them regularly so that a crispy, golden brown coating forms (approx. 6 - 8 min per batch).
Rissoles can be kept warm in a low oven while you cook the rest, or transferred to kitchen paper to drain and reheated later.
-
Reheat gently in a medium-low oven or air fryer: filling may come out if overheated.
Freezing not recommended.
Recipe Notes
To make approximately 6 Corned Beef Rissoles you will need half a batch of the filling from my Corned Beef & Potato Pasties recipe, cooked, cooled and chilled in the fridge. For a chunkier filling you can stir the cooked potatoes, onions and corned beef together instead of mashing.
RELATED RECIPES