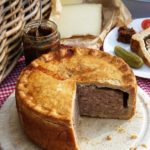
Picnic Pie
This Picnic Pie will look so impressive when you unwrap and cut into it at your outdoor feast. With its glazed shortcrust pastry and richly savoury filling of sausage meat, apples and onions, it’s bound to be the star of the show. But what your co-picnickers won’t guess is just how easy it was to make!

But, not just for picnics, the pie will keep for five days in the fridge. Making it perfect for packed lunches and even easy dinners when paired with salad. Make the day before you want to eat so the pie’s perfectly set and the flavours beautifully melded.

Disclosure: this post may contain affiliate links. If you buy via my links, I may earn a small commission at no extra cost to you.
Jump to Recipe

BRITISH PIES, HOT & COLD
Britain does love a good pie. Not just hot pies like classic steak and kidney, Minced Beef & Onion, or apple pie and custard. We also have a great tradition of cold pies, most famously the pork pie. And I should know. Although I now live in the Staffordshire Moorlands, I’m originally from Leicestershire, home of the very best pork pie: the Melton Mowbray pork pie.
The pastry case on the original pork pies was simply a way of making it easily transportable by agricultural workers and wasn’t meant to be eaten. This later developed into an edible crust with a jelly made from bone stock nestled between meat and pastry. The fantastic pie I want to share with you today is NOT a classic pork pie. But it does stand in that same tradition of a cold, portable pie with a hearty meat filling.

To simplify things, I’ve left out a jelly layer. But there’s no reason you can’t include one if you like.
PICNIC PIE FILLING
At the heart of my Picnic Pie is good quality, free-range pork sausage meat from a local butcher. If you can’t get sausage meat, use free-range sausages with a pork content of at least 72 percent. Please don’t use poor quality sausage or sausage meat as they won’t give the right flavour or texture. Did you know that one of Britain’s most popular sausages contains just 42% pork? That’s the minimum you can legally get away with and still call it a ‘pork’ sausage.
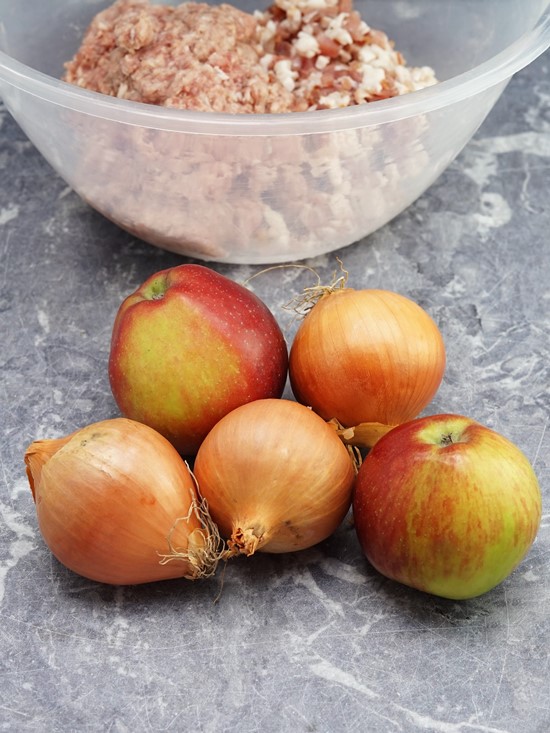
Also in my top-notch pie is free range streaky bacon for extra moistness and flavour. I like smoked but use unsmoked if you prefer. Alongside the meat, we have onions and apples.
To mellow the onion flavour, I first soften and brown it in a pan with a little olive oil and butter. Apples are a classic accompaniment to pork and give a sweet edge to the intensely savoury Picnic Pie. Not so much that it becomes overly sweet, but just enough to give a little tang.

Once you’ve grated the apple, give it a good squeeze to remove as much juice as you can. What you don’t want is apple juice seeping into the pie as it cooks, making it too wet. The only other ingredients you need for the filling are dried sage plus salt and pepper.
After you’ve cooked the onions, you simply mix all the filling ingredients together. Before building the pie, I always microwave or fry and taste a little of the filling to see if I need to adjust the seasoning. It would be a shame to not get the best flavour all for the lack of a little extra salt or pepper.
RICH SHORTCRUST PASTRY
While a traditional pork pie calls for a hot water crust made with lard, I encase my Picnic Pie in a rich shortcrust pastry that combines the benefits of both butter and lard. Butter undoubtedly provides good flavour. But lard allows the pastry to absorb the meat juice and fat more easily while remaining crisp on the outside.
I find this combination, bound together with cold water and a little beaten egg, makes a dough that’s easy to work with. Just make sure you chill it for an hour before rolling out.
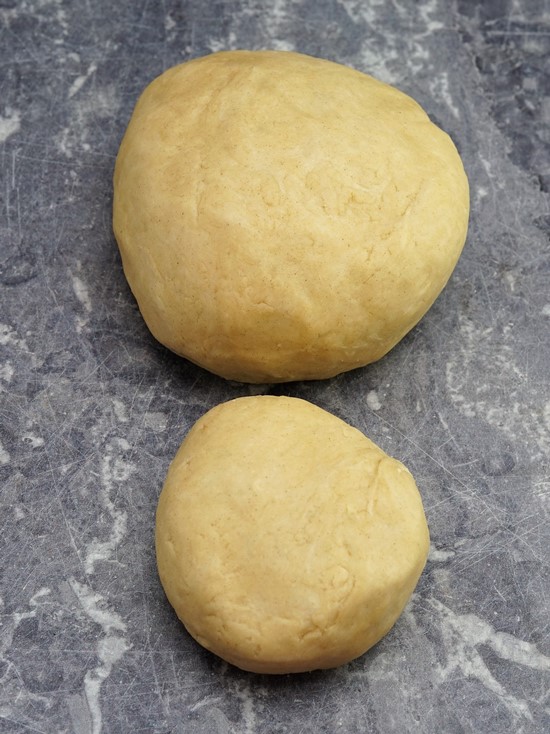
Because I’m rubbish as estimating weight, I use scales to divide the dough, Three quarters for the pie base, one quarter for the lid.
BUILDING THE PICNIC PIE
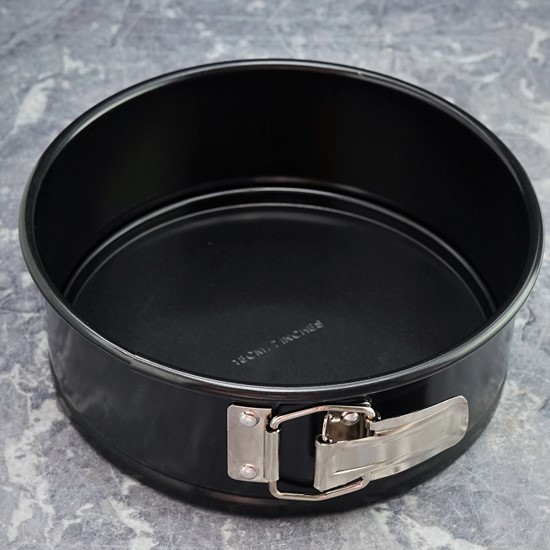
If you don’t already have one, I strongly recommend you get a deep, round springform cake tin in which to build and bake your Picnic Pie. My tin is perfect for the ingredient amounts shown in the recipe card. It’s 18 centimetres (7 inches) in diameter and 7 centimetres (2.5 inches) deep.
I butter the tin before lining with pastry. This makes it even easier to remove once cool. All you do then is roll out the large piece of dough so that it comes up just above the top of the tin. Then pile in the filling, pressing down so there’s no air pockets, and cut off the excess pastry.

When making the pastry, I hold back a little of the beaten egg and use some to brush the pastry edge before popping on the smaller piece of dough, rolled out to form a lid. After pressing down to seal, then going round, pinching the base and lid together, brush on more of the beaten egg for a glaze. Don’t use it all as we’ll add another layer shortly.
Poke one or two holes to let the steam out during baking, and you’re ready to put the Picnic Pie in the oven.
BAKING YOUR PICNIC PIE
My Picnic Pie will take a total of 2 hours to cook. Unless you want a puddle of pie juice and melted fat all over the bottom of your oven, place the tin on a baking tray. For the first 30 minutes, it’s cooked at a slightly higher temperature of 200 C, 180 C Fan, Gas mark 6. This is to set the pastry.

After 30 minutes, we turn the temperature down to 160 C, 140 C Fan, Gas mark 3 to gently cook the meat. At this point I give the pie another brush with beaten egg. This intensifies the glaze and allows you to cover any bits you missed first time around.
The pie will need 1½ hours at the lower temperature. Check now and then to make sure the pastry doesn’t get too dark. When there was still an hour to go, I put a foil cap on the pie to protect it. I removed it for the final 10 minutes of baking so that any trapped steam could evaporate.
COOLING & STORING
When the time is up, take the pie from the oven but don’t be tempted to take it from its tin. We need to let it set and cool a little first. On the other hand, you don’t want to leave it too long: any fat that’s escaped could harden and stick the pie to the tin.
Forty-five minutes to an hour resting is about right. Undo the clip on the springform tin and lift it off. Then carefully pick the still warm pie up off the base and transfer to a cooling rack until completely cold.

To make sure the pie is properly set, and to meld those great flavours, I think it’s best made the day before you want to dig in. So, I transfer the cold pie to a container in the fridge and leave overnight. If you don’t have a container big enough then wrap in foil and put on a plate in the fridge.
The Picnic Pie will stay happily in there for up to 5 days, so it’s perfect for making in advance.

SERVING PICNIC PIE
When I first made and cut into my Picnic Pie, I really didn’t know what to expect. Was the meat properly cooked? Would the filling be too dry? Too wet? Could the shortcrust pastry stand up to the hearty filling?
At the outset, I’d considered it a test-run and assumed there was bound to be some tinkering required. But I couldn’t believe just how good it was!

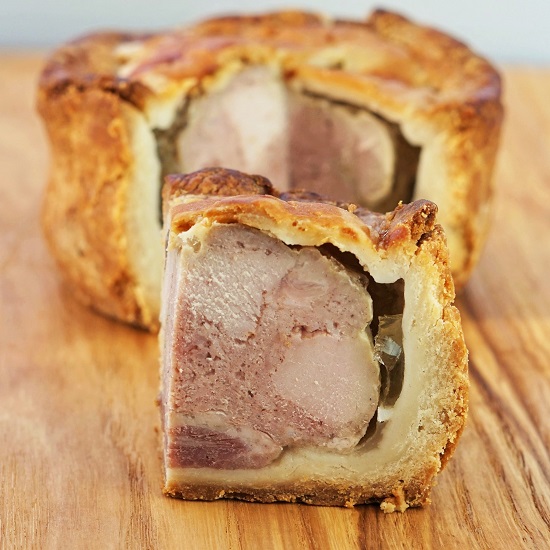
The pastry was wonderfully crisp on the outside and held the meat well. Where it had touched the filling, it had absorbed the flavourful juices in the traditional way, making it richly tender. And the filling? Incredibly good. Meaty, not too soft but not solid either. Intensely savoury, there was the flavour of good quality pork tempered by onions, a hint of sweetness from apple, plus herbyness from sage.
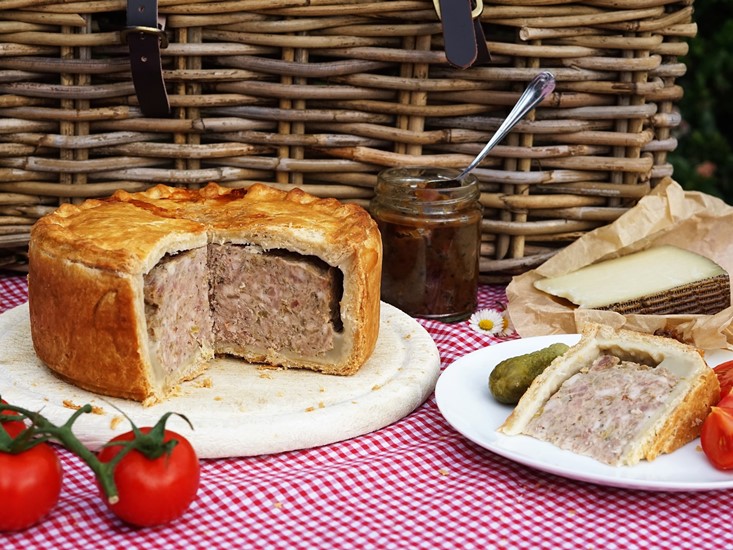
We straightaway had an impromptu picnic in the garden and ate slices of pie alongside pickles, homemade chutney, and cheeses.

It being the long Easter weekend, with some glorious weather, we were also out and about a lot and hunks of pie came with us. Generous slices also formed the centre of an easy evening meal, served with salad and boiled eggs. Finally, back at work, the remains of the pie made a rather special treat for other half’s packed lunch.

Whether you transport Picnic Pie to enjoy at your favourite beauty spot, eat at home or in a packed lunch, give it a try and I think you’ll be surprised. Not just at how good it tastes and how impressive it looks. But how incredibly easy it was to achieve.

If you’ve made this recipe, I’d love to know what you thought. Please do leave a comment and rating.

Picnic Pie
With its glazed pastry top and richly savoury filling of sausage meat, apples and onions, this easy Picnic Pie will be the star of any feast - indoors or out.
Ingredients
For the pastry
- 1 egg beaten
- 75 ml cold water
- 400 g plain flour plus extra for rolling out
- 1 tsp salt
- 100 g butter at fridge temperature
- 100 g lard at fridge temperature
For the pie filling
- 2 tsp olive oil
- 10 g butter
- 275 g onions weight before preparing
- salt and black pepper
- 2 tsp dried sage
- 200 g streaky bacon smoked or unsmoked
- 650 g sausage meat see Recipe Note #1
- 2 medium eating apples cored
Instructions
Make the pastry
-
Set aside 1½ tbsp of the beaten egg to use as a glaze later.
Add the remaining egg to the cold water and mix with a fork.
-
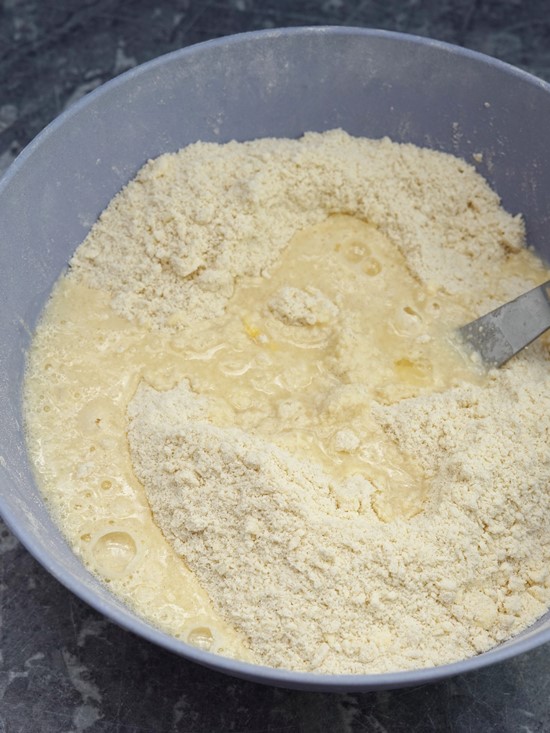
Sift the flour and salt into a large mixing bowl.
Coarsely grate the lard and butter into the flour, dipping them into the flour now and then to stop sticking to the grater. Rub the fats into the flour until the mixture resembles fine breadcrumbs.
Tip in the egg and water mixture and stir with a round bladed knife to start bringing the dough together then switch to your hands.
Transfer to a lightly floured surface and gently knead just enough to bring together into a smooth, elastic dough.
Cut off one quarter of the dough (use scales for accuracy) then briefly knead each piece into a smooth ball.
Wrap each dough ball in cling film and chill in the fridge for 1 hour.
Make the pie filling
-
Put the olive oil and butter in a frying pan over medium heat.
Skin the onions and chop finely.
When the pan is hot, tip in the onion and season with a little salt, a good grind of black pepper, plus the dried sage.
Cook, stirring often, until the onion is soft and starting to brown (12-15 min).
-
Remove and discard any rind from the bacon. Chop the bacon finely (or use a mincer).
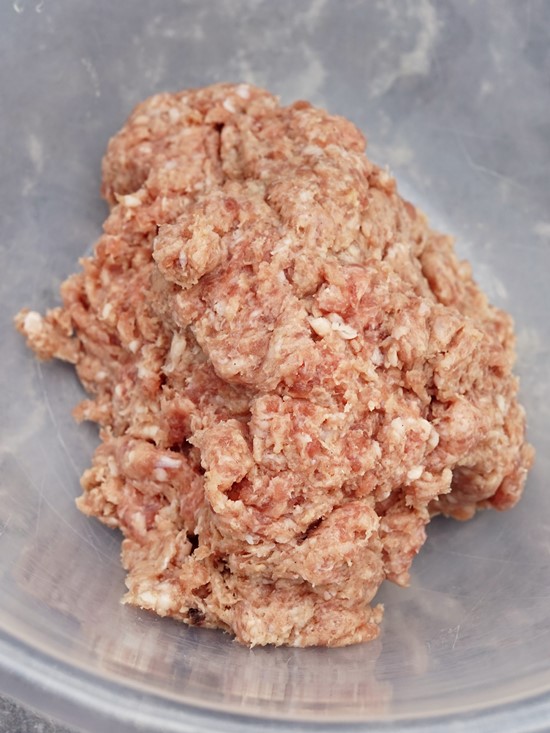
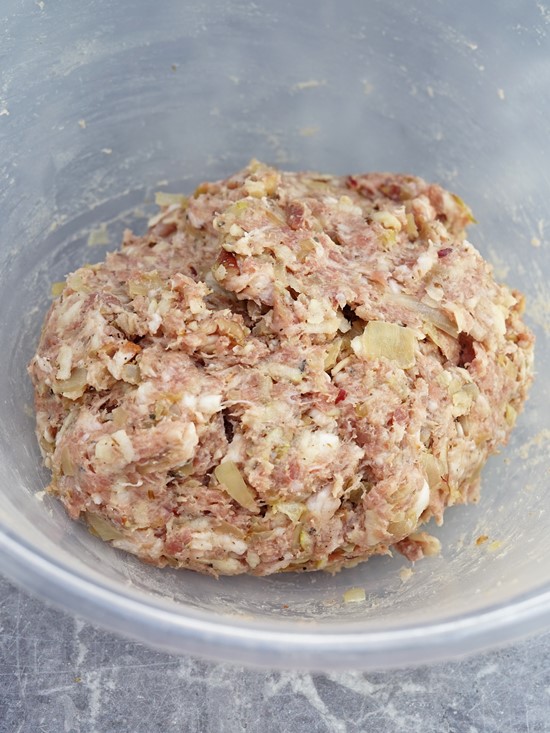
Put the chopped bacon and sausage meat into a large mixing bowl.
Grate the apple onto a plate or board then take handfuls and squeeze out as much juice as possible (apple juice in the filling will make the pie too wet).
Transfer the squeezed apple to the bowl with the bacon and sausage meat, along with the cooked onion and any fat from the frying pan.
Season again with a little salt and black pepper.
-
Mix the pie filling together so that everything is well combined: using your hands and squeezing the mixture together is best.
Recommended: take a teaspoon of the mixture, shape into a ball or patty and cook in the frying pan. Cool a little, then taste and add more seasoning to the mixture if needed.
Build the pie
-
Preheat the oven to 200 C / 180 C Fan / Gas 6.
Butter a round 18 cm / 7 in diameter springform cake tin that's 7 cm / 2½ in deep
-
On a lightly floured surface, roll out the large piece of dough so that it fits the tin and comes up just above the rim.
Pack the pie filling into the pastry case, pressing down to prevent any air pockets, and smooth the top.
Cut off excess pastry so that it's flush with the top of the tin.
-
Take the small piece of dough and roll into a circle 18 cm in diameter.
-
Brush a little of the reserved beaten egg on the pastry around the edge of the tin.
Place the circle of dough on top, press down to seal, then pinch together all the way around.
Brush all over with a light glaze of beaten egg (save the rest, you'll need it later), then poke one or two holes in the top of the pastry lid.
Bake the pie
-
Put the tin on a baking tray (to catch any escaping juices) and transfer to the oven.
Bake for 30 minutes.
Take the pie out of the oven and reduce the temperature to 160 C / 140 C Fan / Gas 3.
Brush with another layer of beaten egg then return to the oven.
Bake for a further 1½ hours.
Tip: if the pastry is browned before the time is up, cover loosely with foil. Remove the foil for the final 10 minutes of cooking.
Cooling and storing the pie
-
Take the pie out of the oven and put on a wire rack to cool, but do not remove it from the tin at this stage. Leave for 1 hour.
-
Unlock the spring on the tin and lift the sides off.
Carefully lift the pie off the base of the tin and place on the wire rack until cold.
-
Store in the fridge in an airtight container or wrapped in foil.
Best left until the next day before cutting into.
Should keep for 5 days.
Recipe Notes
Note #1 Instead of sausage meat, you could use 660-670 grams of good quality pork sausages: look for at least 75% meat. Remove their skins by slitting open with scissors and discarding.


Hi,
Thank you for your picnic pie recipe. Thought you might like some feedback. I followed the recipe in all aspects except I used a 17cm tin, I minced a mix of 750g free range pork and 200g gammon and I left out the apple (even though I often include it in pork burgers). The amount of meat and onion wqs spot on, but I found there was about 30% too much pastry – which is in my freezer for pasties, (bonus). Cooking time was spot on and the meat made its own little bit of jelly. (I live on the NW cpast of Scotland , can’t get a calf’s foot or trotter for jelly, so left it out as per the recipe). The pie looked great. I took French friends – who I usually cook French food or curries for – over to the Isle of Skye for a picnic and we had the pie with English mustard, homemade rowan and apple jelly, onion chutney, tomatoes, celery and English cheeses on a deserted beach in a bit of a gale :-)). Lovely day out.
Thank you so much for your detailed feedback, Krystyna! Your picnic sounds wonderful: I haven’t been to Skye for many years, but love those incredible beaches. Perfect!