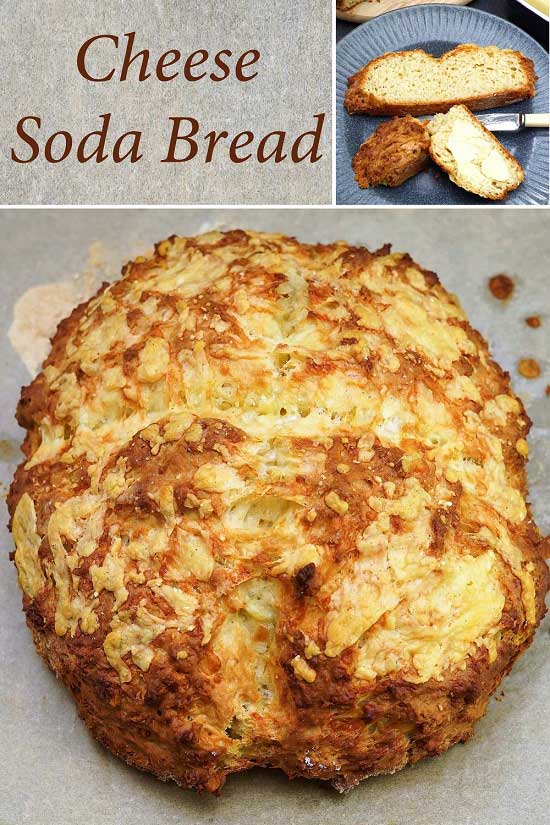
Cheese, Onion & Chilli Bread
Cheese, Onion & Chilli Bread is a great accompaniment to soups and stews. But it’s equally good sliced and made into sandwiches, especially toasted.
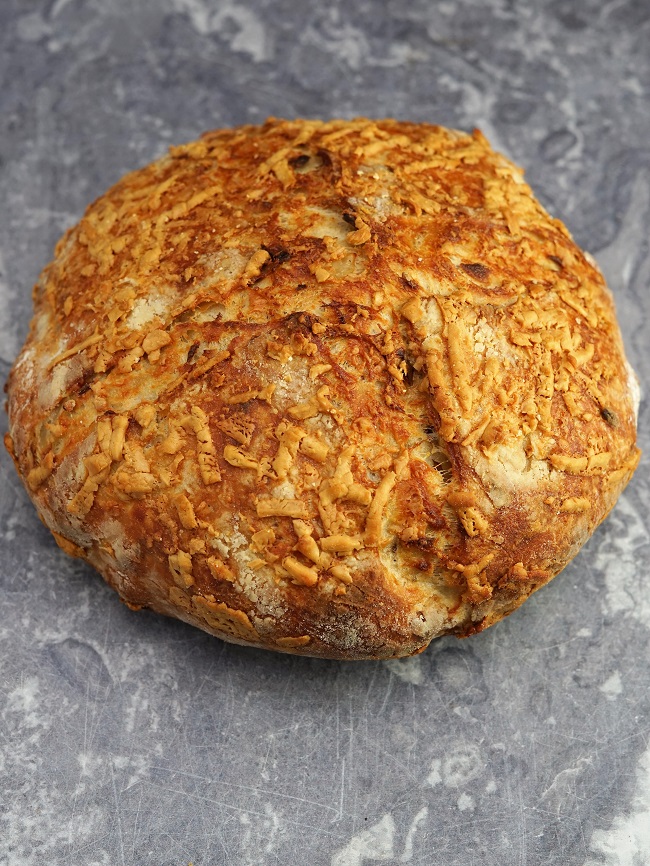
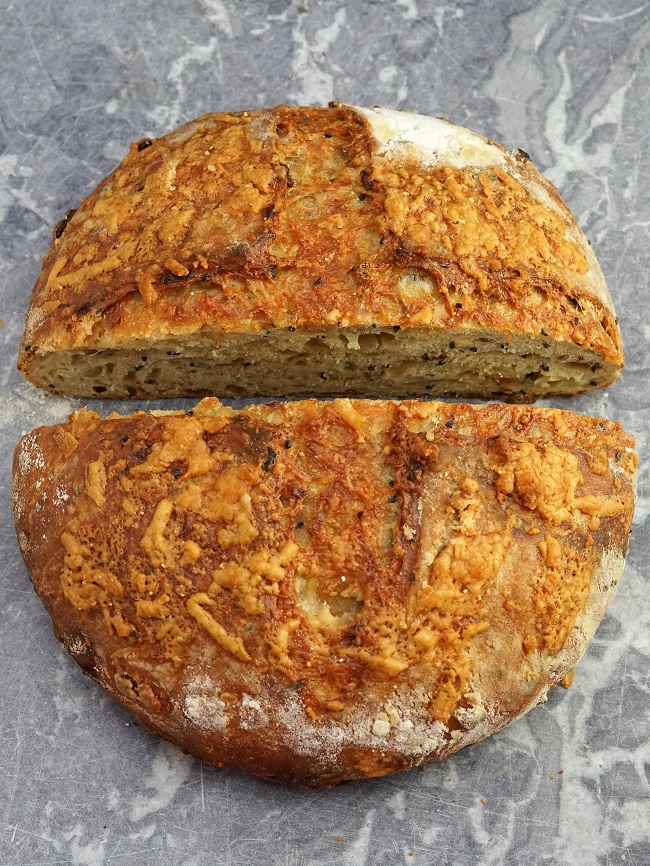
Using my no-knead, overnight method, and baking the bread in a covered pot, it’s easy to get a well risen, flavoursome loaf with a crunchy, cheesy crust.
You can make this bread using either instant yeast or a sourdough starter. Full instructions in the recipe card at the end of the post.
Jump to Recipe
I love experimenting with different flavoured breads. The range you can make is endless, limited only by your imagination.
My Roasted Onion Sourdough was one of my early experiments, developed not long after I’d perfected my no-knead sourdough method. The powerfully flavoured bread I want to share with you today is similar as it includes onions sweetened by slow cooking.
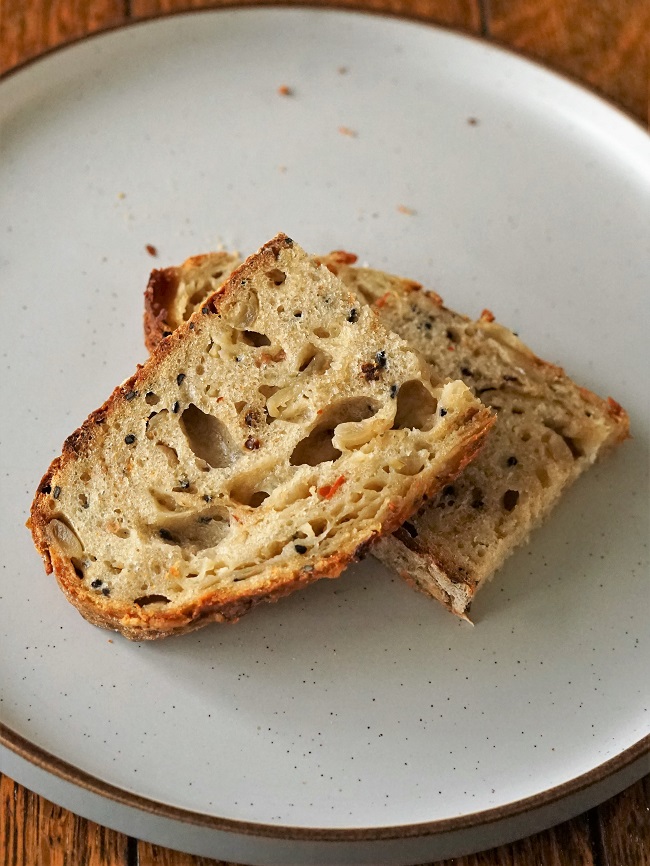
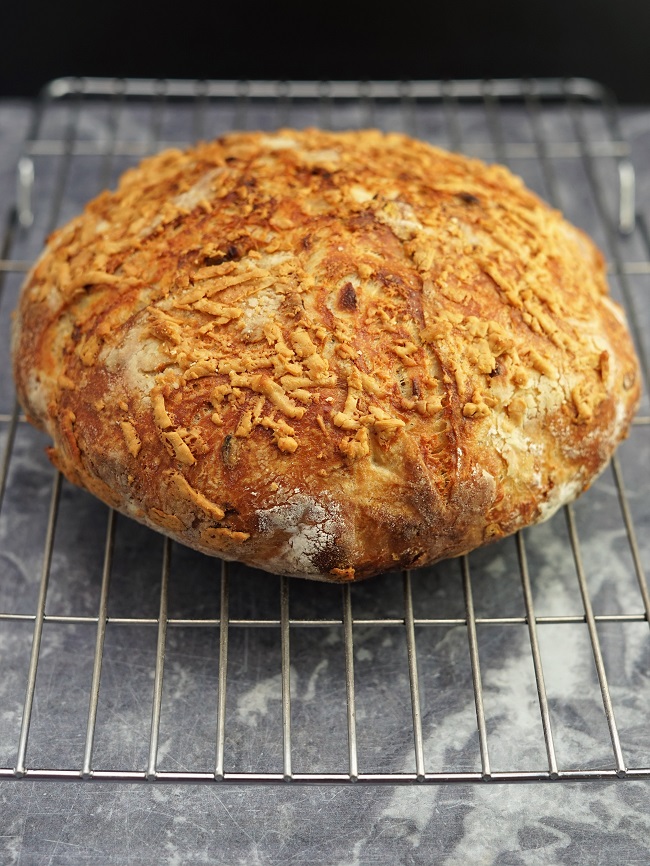
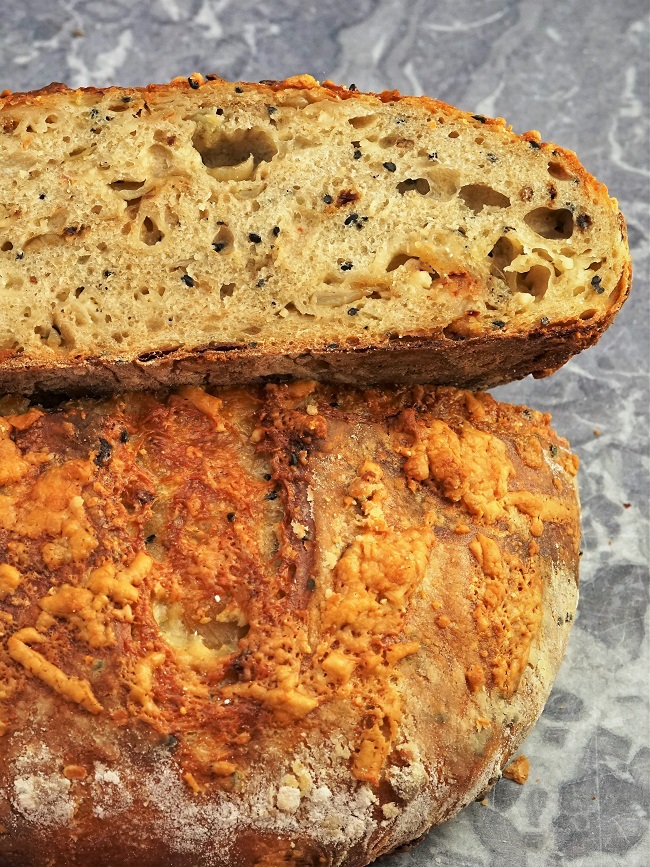
Also in there are nigella seeds, dried chilli flakes plus a generous amount of cheese.
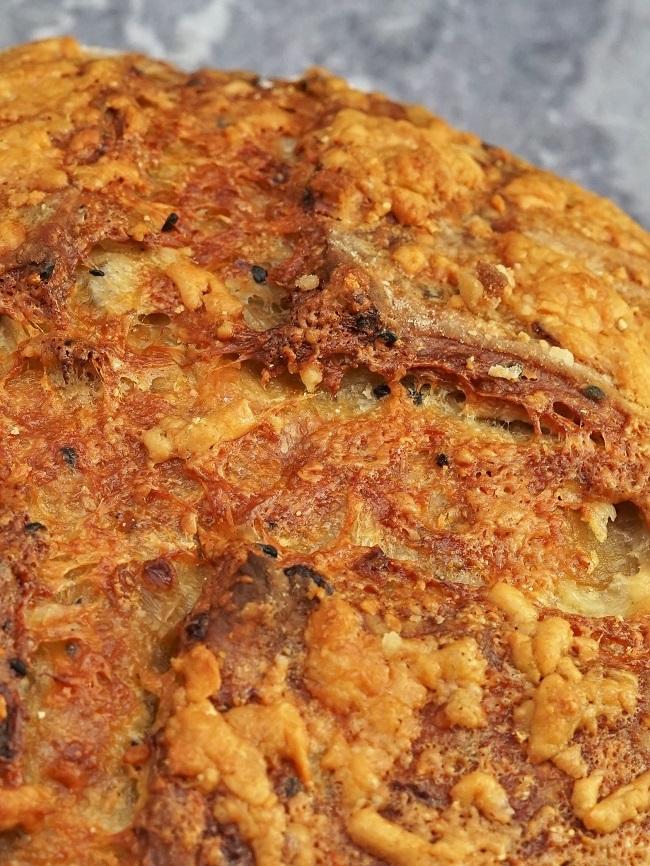
More cheese scattered over just before baking creates an appetizingly golden, molten crust on the bread.
But you don’t have to be a sourdough breadmaker to try this moist, flavoursome bread. In the detailed recipe card at the end of the post I tell you how to make Cheese, Onion & Chill Bread with either a sourdough starter or fast acting yeast.
NO KNEAD BREAD
Virtually all the bread I make these days is started the night before I’m going to bake it. Like this loaf, most of them don’t require kneading either. In fact, my dough starts off so wet that you’d have trouble kneading it even if you wanted to.
If you’re interested in the detail of why this unconventional method works, you can read my post about Crusty Homemade Bread here. But it’s not absolutely necessary as I do give full instructions in this post.
Briefly, kneading develops gluten. And gluten is a protein that helps bread rise. However, a wetter than usual dough, combined with a longer fermentation time, will also develop the gluten.
Additionally, my method of initially baking the bread in a very hot, lidded pot helps with the rise. That’s because the atmosphere in the pot becomes steamy and moist, allowing the dough to stay softer for longer. This prevents a crust forming too early which would stop the rising.
CHEESE, ONION & CHILLI BREAD
DAY 1
To make Cheese, Onion & Chilli Bread, the day before baking I first cook chopped onion, garlic, and some dried chilli flakes in olive oil.
Once cooled a little, I mix this with the flour, some nigella or onion seeds, salt, water, and either dried quick yeast or my recently fed sourdough starter. I combine everything by vigorously stirring with a spoon: no kneading, remember. It’s then covered and left overnight.
DAY 2
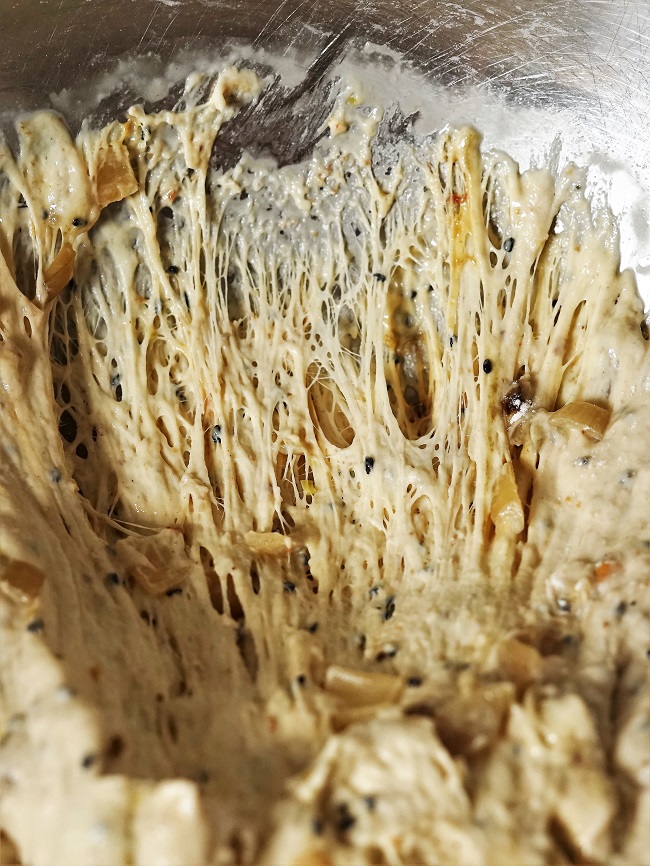
In the morning, we should have a well risen but still wet dough.

Scraping the dough onto a floured surface, you should see the well-developed gluten strands as per the earlier image and below.
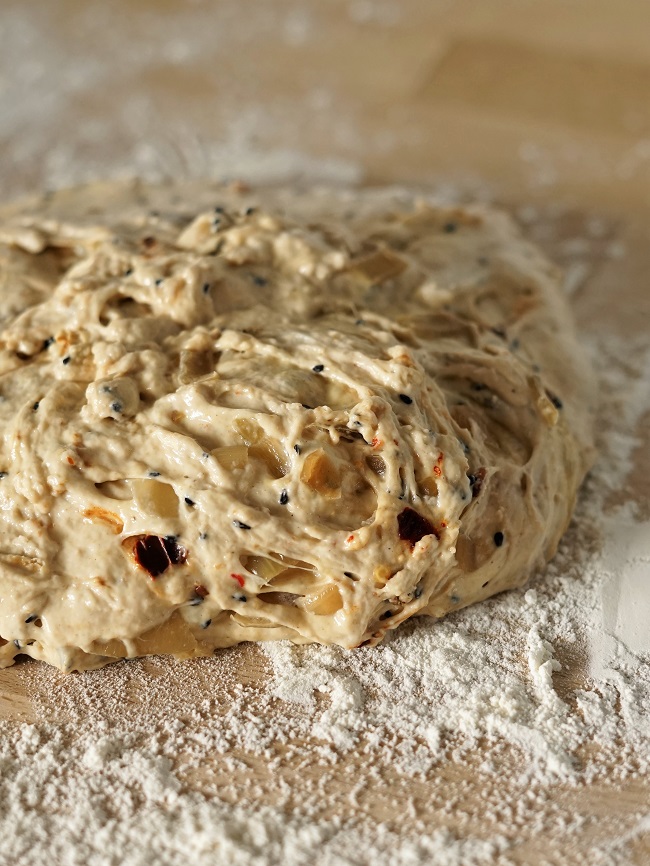
A few quick few folds (dusting well with flour to prevent sticking), and you’ll have a nice looking, plump dough.
The next step is to add most of the cheese. I use a mature cheddar, but any robustly flavoured cheese is fine.
I find the easiest way to incorporate the cheese is to first flatten out the dough a little then sprinkle the cheese over.
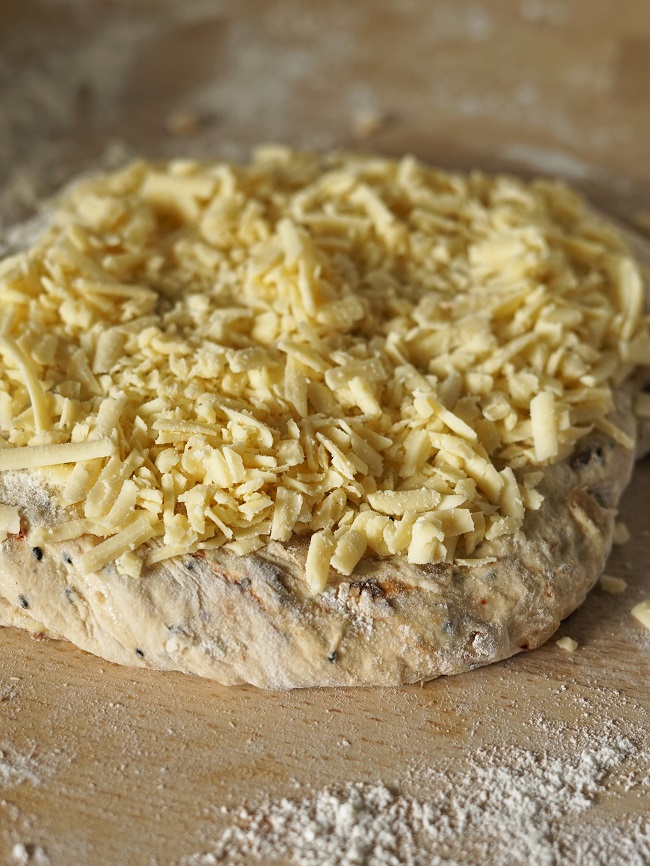
Lifting up one side of the dough, I fold it over the cheese. Then I just keep folding until the cheese is evenly distributed, shaping the dough into a ball as I go.

The dough then needs to prove, covered, in either a floured proving basket or cloth-lined bowl.
How long this takes will depend partly on whether you’ve used dried yeast or a sourdough starter and partly on the temperature of the room. As a general guide, a yeasted dough will need around 30 minutes and a sourdough 60-90 minutes.
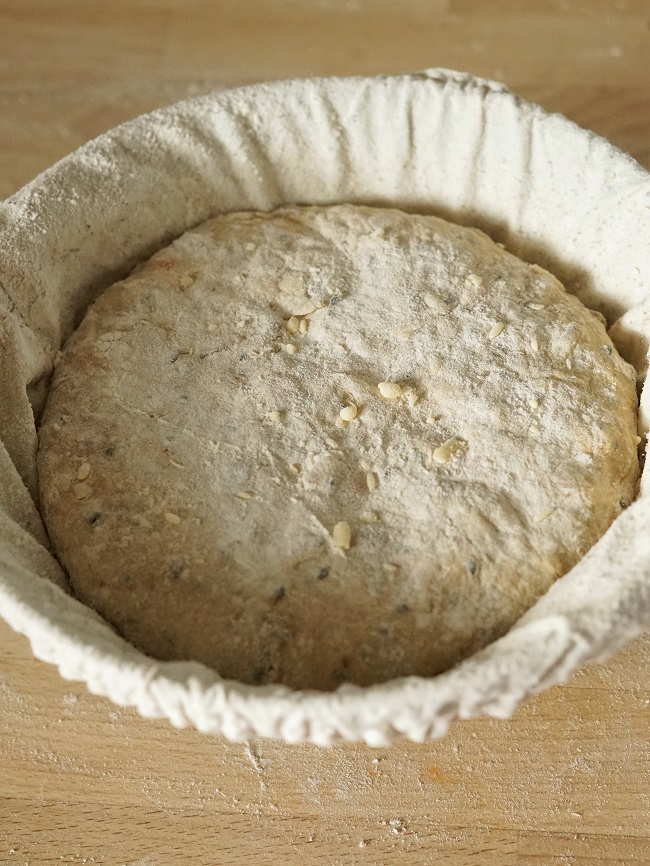
To test whether any dough is fully proved and ready to bake, I use what I call ‘the poke’ test. If the depression left by a finger pressed into the dough springs back slowly rather than quickly, but still leaves a slight indentation, then it’s ready to bake. However, if the depression springs back immediately then you need to leave it for longer.
BAKING THE BREAD
While the dough is proving, you’ll need to preheat your oven with a heavy, lidded cooking pot or Dutch oven inside.
When ready to bake, take the lid off the hot pot and carefully flip in the dough. Sprinkle with the rest of the cheese then slash a cross on top.

With the lid on, I pop the pot into the oven for 30 minutes.
After 30 minutes the bread is taken out of the pot and sat directly on the oven shelf to finish baking. This usually takes between 8-15 minutes, depending on whether I’ve used dried yeast or sourdough starter. When done, the loaf should sound hollow when tapped underneath.
The bread will smell wonderful, but it’ll be much better if you can leave it to cool a little before tucking in.
SERVING CHEESE, ONION & CHILLI BREAD
My favourite way of serving Cheese, Onion & Chilli Bread is alongside simple soups.
I loved it with the beautiful Celery Soup pictured below. Or try it with my Roasted Cauliflower Soup minus the croutons.

But you can also use it as you would other bread, in a sandwich. Hummus with crunchy veg like shredded carrot, chopped peppers and fresh red onion slices is particularly good.
While the bread should remain fine to eat for 2-3 days or can be frozen, I’ve found that if it’s gone a little stale it makes a sensational toasted sandwich. The buttered outsides go wonderfully crispy in the sandwich press of course. But here the cheese and onion in the bread caramelize and develop the flavour even more.
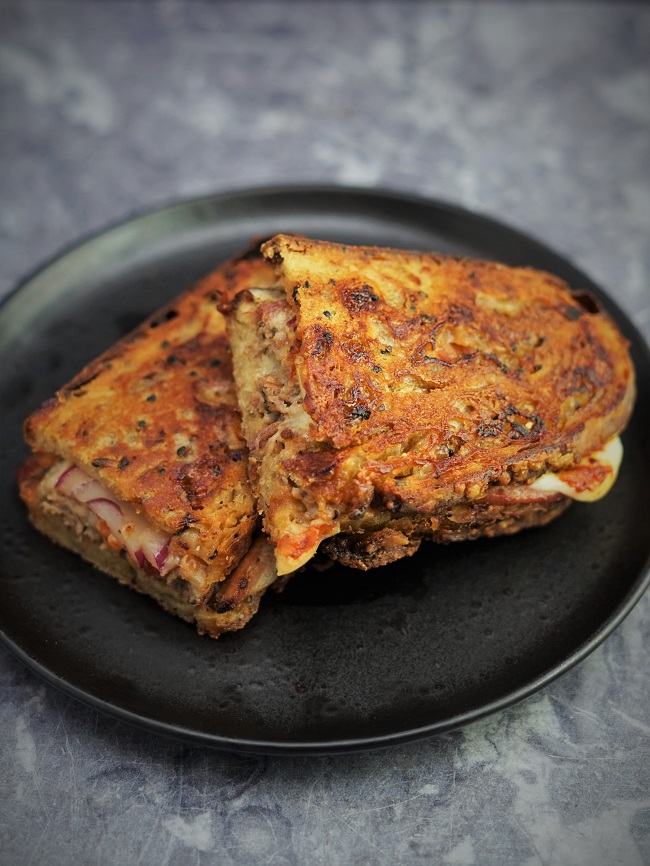
The toastie above is filled with leftover Bacon Wrapped Meatloaf and (echoing the ingredients in the Cheese, Onion & Chilli Bread) sliced Cheddar, onion, plus Smoky Tomato-Chilli Chutney.
I think this is a great tasting loaf that you can use as a springboard for your own creations.
Use different cheeses, vary the quantity or type of chillies to make it hotter, or cook fresh chillies along with the onion instead of using dried.
HAVE YOU MADE CHEESE, ONION & CHILLI BREAD?
LEAVE A COMMENT & DON’T FORGET TO RATE THE RECIPE
Cheese, Onion & Chilli Bread
A full flavoured, no-knead bread that's great with soups & stews, or try it as a toasted sandwich stuffed with more cheese.
Instructions for both dried yeast and sourdough starter are provided.
Ingredients
- 1 tbsp olive oil
- 1 large onion roughly chopped
- 2 cloves garlic finely chopped
- 1 tsp dried chilli flakes
- salt
- freshly ground black pepper
- 300 g strong bread flour plus extra for dusting
- 1 tsp onion seeds or nigella seeds optional
- 100 g mature cheddar cheese grated
For instant yeast version
- 1 tsp instant dried yeast
- 220 ml water
For sourdough version
- 40 g lively sourdough starter approx 40ml by volume
- 180 ml water
Instructions
The day before you want to bake the bread
-
Put the olive oil in a frying pan over moderate heat.
Add the chopped onion, garlic and dried chillies plus a little salt and pepper.
Fry until the onion is soft and golden, stirring often. If necessary, turn down the heat to stop it burning (12-15 min).
Take the pan off the heat and leave to cool a little.
-
Put the flour, 1 tsp of salt, plus the onion/nigella seeds if using, into a large bowl.
Stir in the contents of the frying pan, including any oil.
-
Using instant yeast:
Sprinkle the yeast into the flour mixture and stir in.
Pour in the 220ml of water.
Using sourdough starter:
Dissolve the starter in the 180ml of water.
Pour the mixture into the bowl containing the flour etc.
-
Stir to make a wet dough, making sure everything is well combined.
Note: different flours absorb different amounts of water. Add more water if the dough seems dry.
Cover the bowl and leave overnight or 12-16 hours.
On the day of baking
-
The dough, still quite wet, should be well risen and very bubbly. Leave a little longer if necessary.
-
Scrape the dough out of its bowl and onto a worktop well dusted with flour.
-
Fold the dough several times, dusting with flour to prevent sticking, until it comes together into a smooth ball.
Flatten out the dough a little then sprinkle over 75g of the grated cheese.
Fold it in half to cover the cheese, then keep folding until the cheese is distributed throughout the dough. Add more flour if needed to stop it sticking.
Shape the dough to fit a floured proving basket or a bowl lined with a floured tea towel and put it inside.
-
Cover the dough and leave until the depression left by a finger pressed into the dough slowly rather than quickly springs back. If it springs back immediately then leave to prove for longer.
Note: proving will take approximately 30 minutes for dough made with instant yeast and 60-90 minutes for sourdough. However, this will vary depending on, among other things, the temperature in your kitchen. It's best to test as above before baking.
-
While the dough is proving: preheat the oven to its highest setting and put inside a cast iron pot or Dutch oven, including its lid.
-
When ready to bake, remove the pot from the oven and take off the lid.
Carefully flip the dough from its basket or bowl into the pot.
Sprinkle the top with the remaining 25g of grated cheese.
Slash the top, replace the lid and put in the oven.
Immediately turn the heat down to 240C /220 Fan /Gas 9.
Bake for 30 minutes without removing the lid.
-
After 30 minutes, reduce the heat to 220C /200 Fan /Gas 7.
Remove the pot from the oven, tip the bread out of it, then return the loaf to sit directly on the oven shelf.
Bake for a further 8-15 minutes until the bread is cooked through (it should sound hollow when tapped underneath).
If necessary, reduce the oven temperature to stop the crust over browning before the bread is finished baking.
-
Place on a wire rack to cool before eating.
Use within 2-3 days, or can be frozen once completely cold.
MORE BREAD RECIPES


Can’t wait to try this bread, sounds fabulous!
If I double the recipe, am wondering if a 4 litre Dutch oven would be big enough…. and if baking time also needs to be doubled?
Hi Enid, thanks for your interest in my recipe! I regularly make breads using 600 g of flour (i.e. double the amount in this one) in a 4.2 litre pot and they’re fine. Obviously this one has add-ins and your pot is a little smaller, but I think you’ll probably be ok. I doubt the timing would change much: my larger loaves cook in about the same time as smaller ones in a covered pot. You could increase the initial 30 minutes to 35 then judge the final 8 – 15 minutes (ovens do vary anyway). Hope this helps!
I make your normal sourdough every week – it is my favourite recipe for a crusty loaf. I thought I would give this a go. It didn’t disappoint. Just as easy to make as the usual one. I used vegan cheese which worked pretty well. When I took it out of the oven it felt quite crispy but it softened as it cooled. I am guessing this is because of the cheese and onion. My husband declared it the best loaf I had made. I will cook a bit longer next time I think. It went perfectly with a rustic tuscan bean soup. Between three of us we ate a quarter each 🙂
Hi Adrienne,
Lovely to hear you’d tried this recipe and enjoyed it!
My understanding is that the crust goes softer as moisture inside the bread is transferred to the outside as it cools. As this is a moist bread due to the cooked onion and cheese, I would expect this to be more noticeable so I think your guess is probably right.
Baking the bread longer might make a difference. You could also, once it’s cooked, leave it in the switched-off oven for a while with the door slightly open.
You perhaps already know this, but you can re-crisp the crust on any bread by sprinkling a little water over it and popping in a medium oven for a few minutes. If the bread has already been cut into, protect the cut area with kitchen foil.
Thanks again for taking the time to give your feedback!