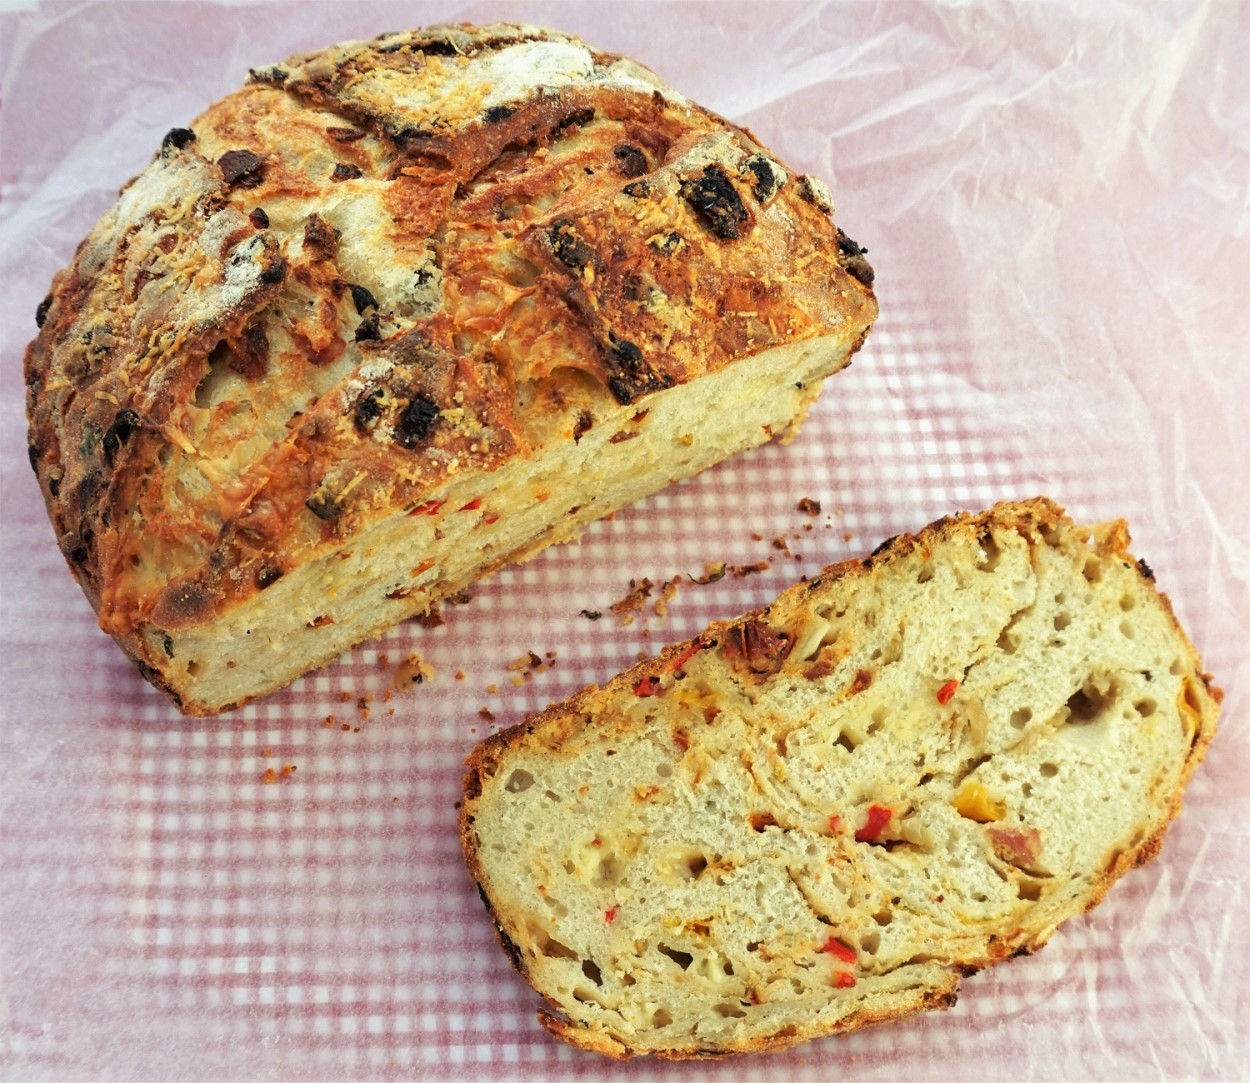
Picnic Bread with roasted vegetables, sun-dried tomatoes, salami & cheese
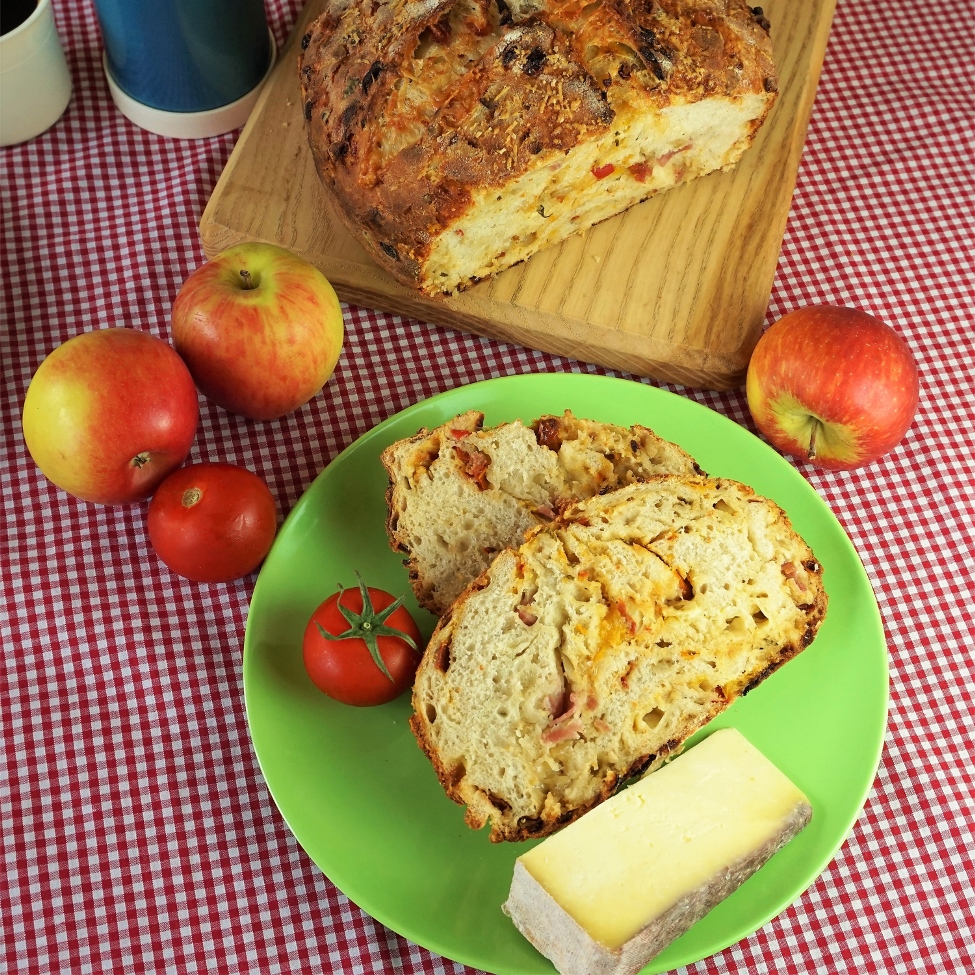
In this post, inspired by a favourite picnic food from the past, I create an easy recipe for homemade bread studded with roasted peppers, onions and garlic plus sun-dried tomatoes, salami, cheese and basil. This flavour-packed bread is great to take with you on a picnic, but it’s just as good at home – indoors or out – with salads, soups and more.
Wanting to create a recipe for National Picnic Week, my mind went back to one of the favourite things me my partner and I would take on picnics when we were first together. Living in the city of Leicester at the time, we often went on picnics, either off to a beauty spot specifically to have a picnic or, more often, taking food along to eat during and after one of our many walks in the Leicestershire countryside. We particularly liked High Leicestershire and would often start off from Tilton on the Hill which, bizarrely, is said to be the highest point before you reach the Urals on the edge of Siberia.
The thing we loved most was picnic bread, based on Pan Bagnat from the Provence region of France. We’d layer olive-oil roasted vegetables like peppers, onions, courgettes and aubergine along with cooked meats, cheese, olives and herbs between two halves of a crusty baguette or ciabatta and then wrap it up tightly in cling film and foil. We’d put a weight on top of it, usually a chopping board with some cans on top, and then refrigerate overnight. The rich flavours would meld together and the juices soak into the bread (pan bagnat means ‘wet bread’ in Provençal dialect) making the whole thing delicious. To eat, the loaf was unwrapped, cut into slices and wrapped again for the journey.
There’s only one problem: it’s a hell of a job to eat and you’re likely to go home from your picnic with olive oil and roasted vegetable juice all down your front.
So, wanting to create a more portable bread but with some of those same summery flavours, I decided to bake them into one of my homemade loaves. Most of the bread I make is sourdough, and that’s what you’ll see in the images here, but in the detailed recipe at the bottom of this post I’ve given instructions for making my Picnic Bread using either a sourdough starter or fast acting yeast.
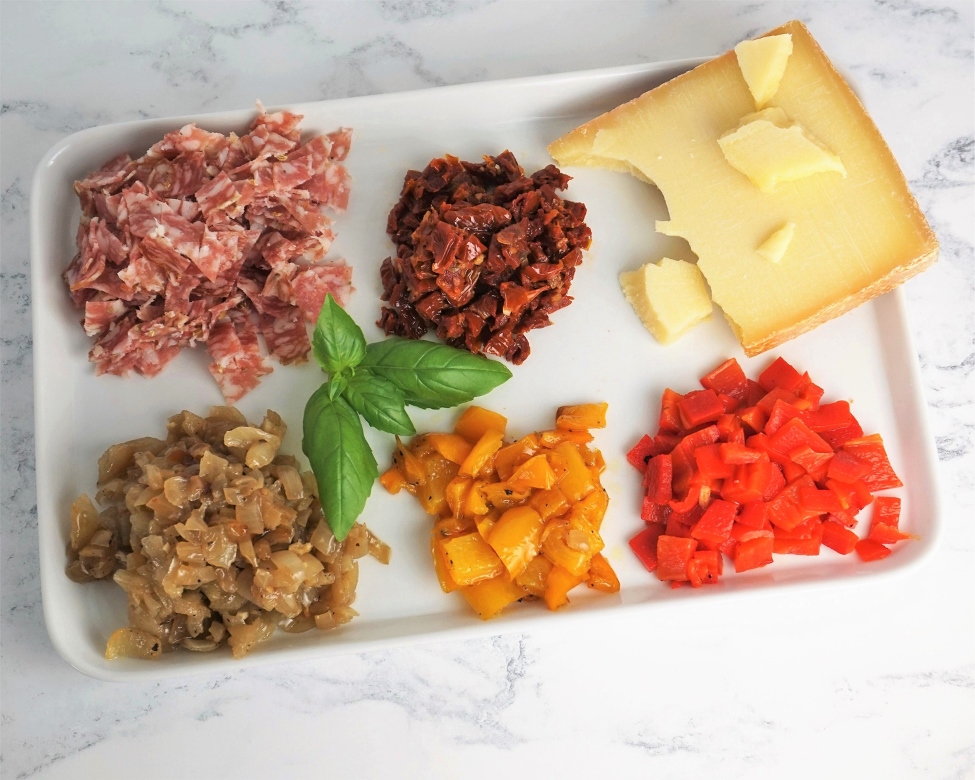
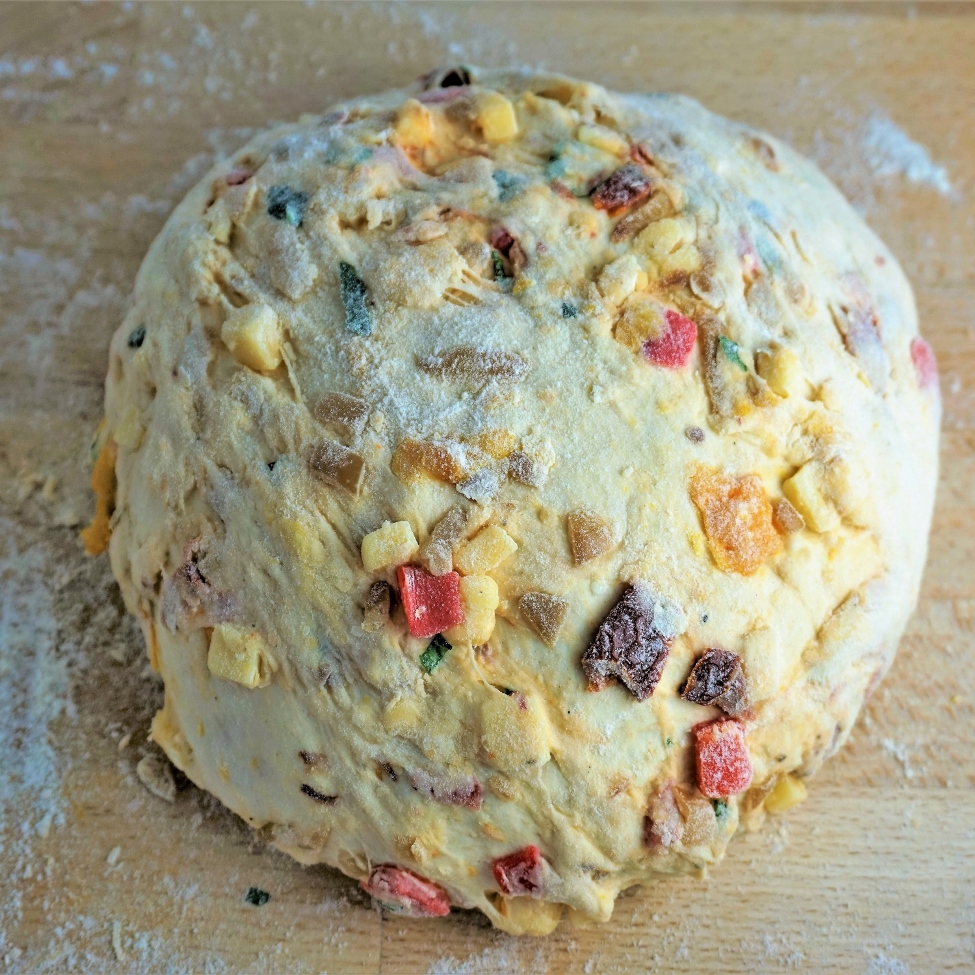
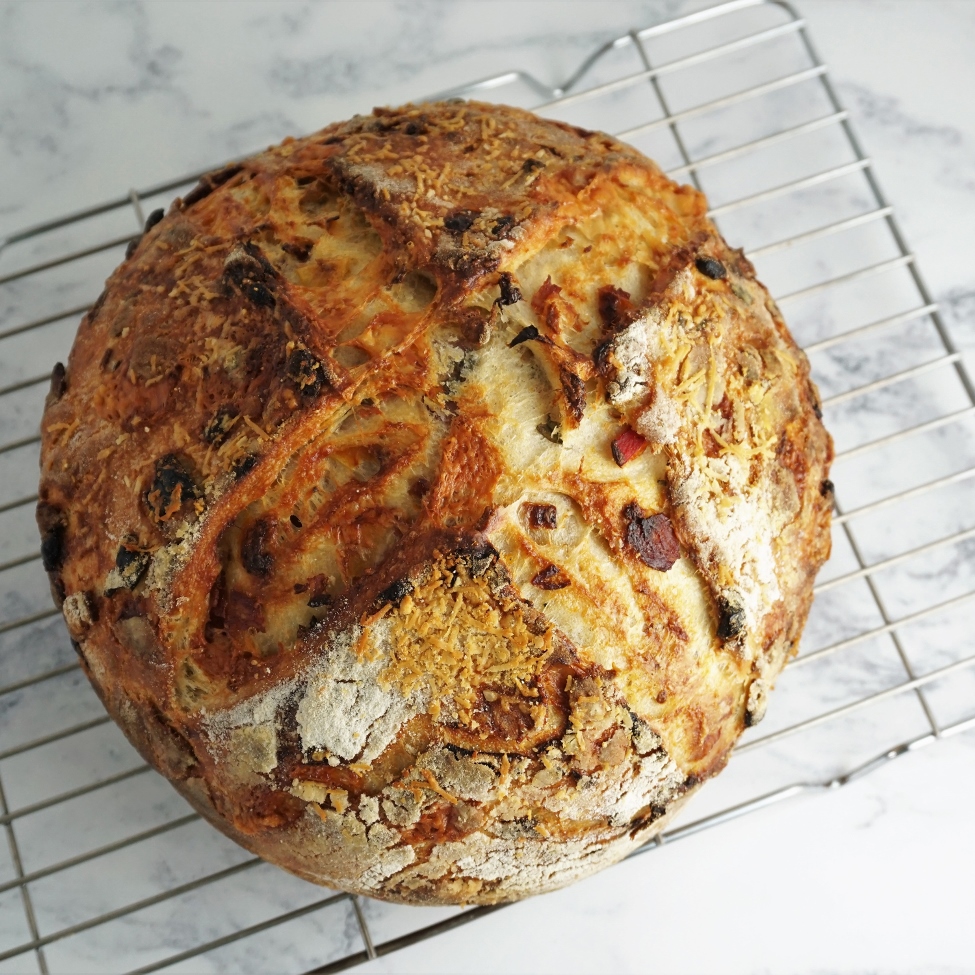
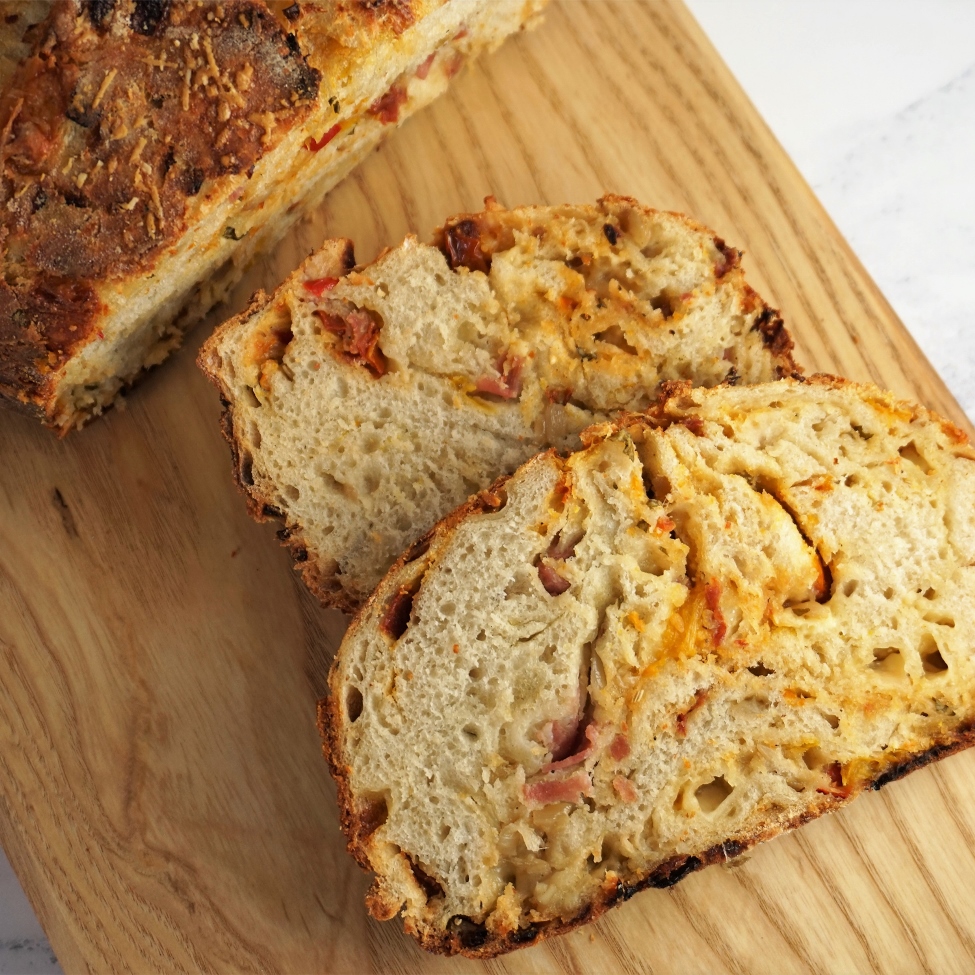
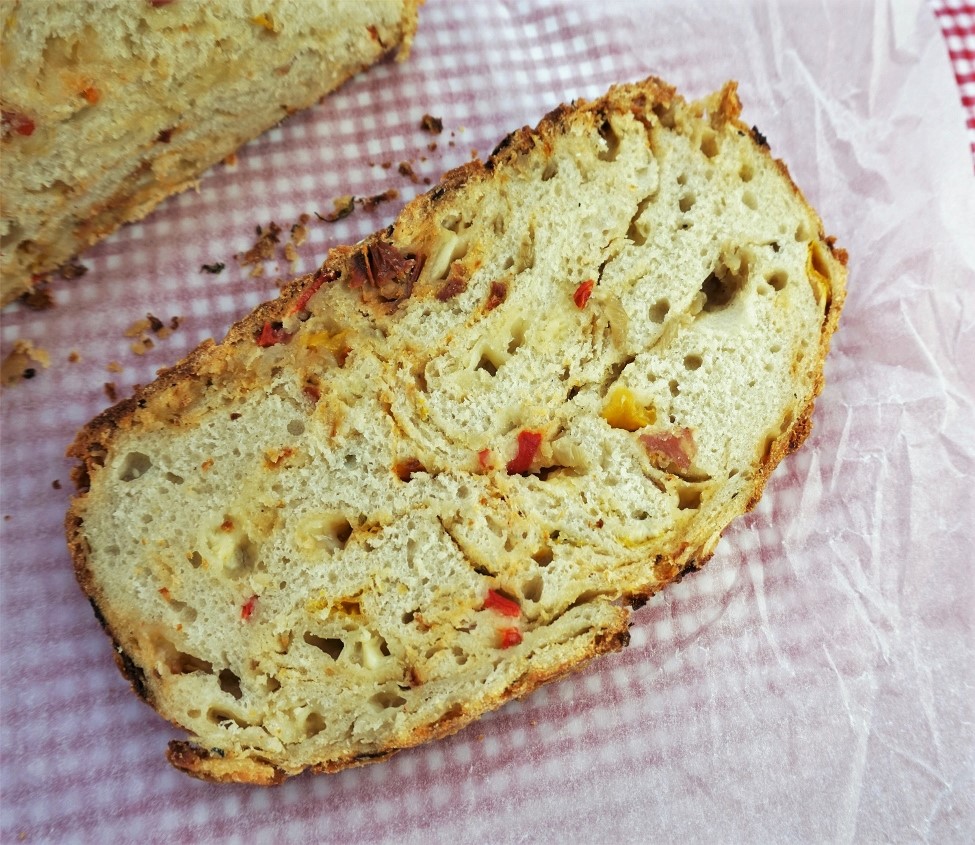
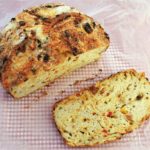
For the filling, I roasted some onion and garlic and, separately, half a large yellow pepper. I cheated a little and used roasted red peppers from a jar – I find them almost as good as roasting my own and they can even work out cheaper. I also added some fennel salami, my favourite salami and which I get from Pronto Deli in our wonderful local market town of Leek. I added some shredded basil too. In the image above you’ll see gruyère cheese which I cut into small dice along with some mature Cheddar – I happened to have the gruyère left from another recipe but you could just use all Cheddar if you like. I also added finely grated Parmesan cheese as I love it’s intense flavour, and I sprinkled a little of this over the top of the bread before it went into the oven too.
My no-knead, overnight bread
At the heart of my Picnic Bread is a simple but tasty homemade white loaf using my overnight, no-knead method where the bread is cooked in a heavy cast-iron pot or Dutch oven. On this blog you’ll find detailed posts about how to make bread using a sourdough starter and also using fast-acting yeast and I’d recommend you read one or both of those posts before starting on the Picnic Bread. The post which uses fast-acting yeast also has a handy video showing the basic steps. You don’t have to read those posts as I’ve given full instructions in the recipe at the bottom of this post but it will explain the method in more detail.
If you don’t want to go into the whys and wherefores, then all you really need to know for the Picnic Bread is that the basic dough (flour, water, salt, starter or yeast) is mixed the night before you want to bake the bread and left for 12-16 hours. The next day, the dough is shaped and left in a proving basket or tea-towel lined bowl; the proving time will depend on whether you’ve used fast-acting yeast (30 minutes) or a sourdough starter (60-90 minutes). The dough is then flipped into a very hot, preheated cast iron pot, slashed, and the lid put on. It’s baked for 30 minutes in the pot and then out of the pot, directly on the oven shelf, until cooked through.
Flavouring the picnic bread
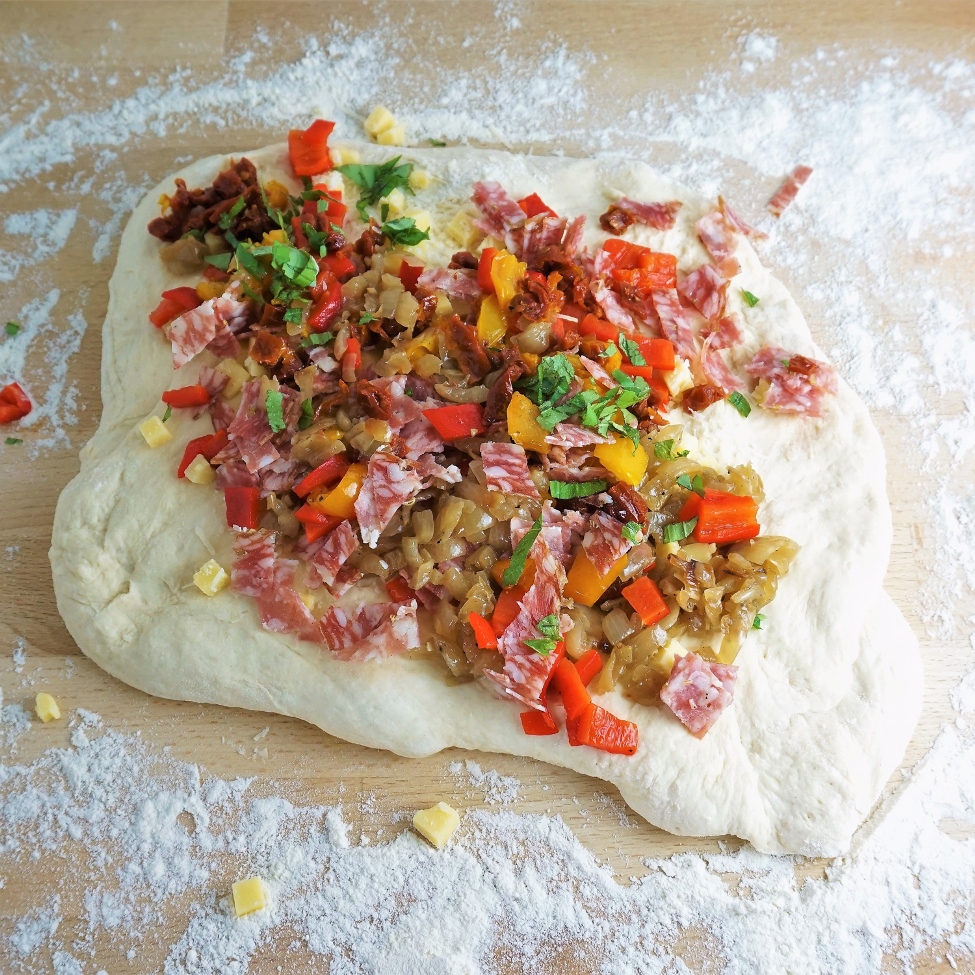
To get all those wonderful vegetables, tasty salami and cheese into the basic bread dough, we just need to add one extra step to my no-knead bread. After the overnight rise, the dough is flattened out onto a well-floured surface (it can get a little sticky!) and the prepared vegetables, salami, cheese and herbs scattered over the top. You then fold over the sides of the dough to cover the filling. If there’s a lot of ingredients to add then I sometimes do this in two stages.
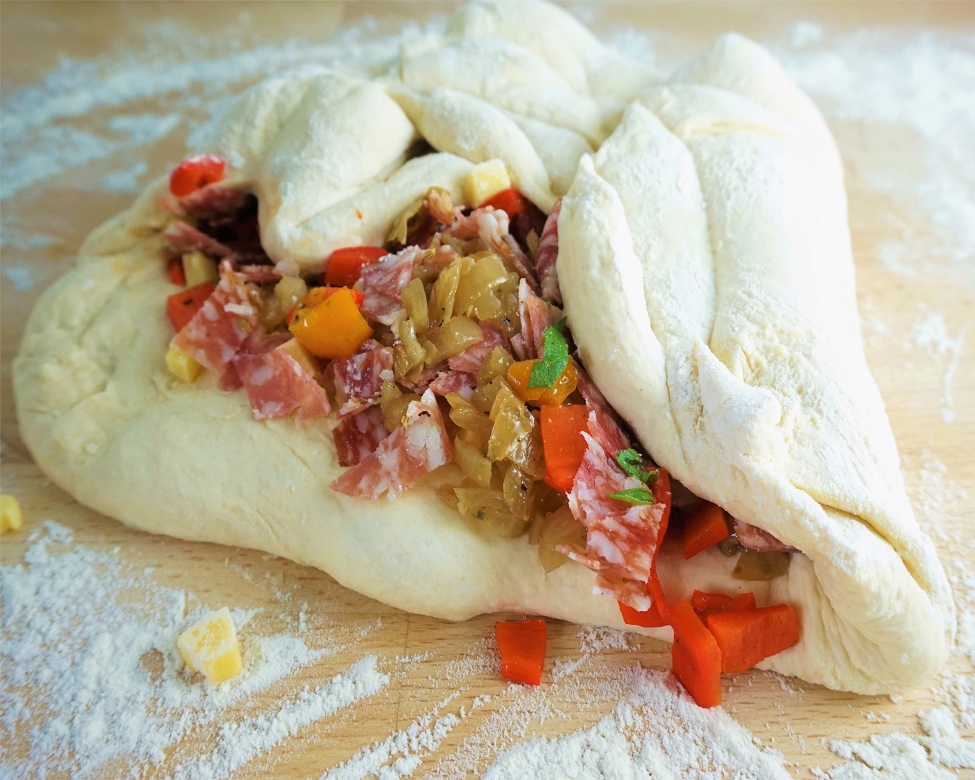
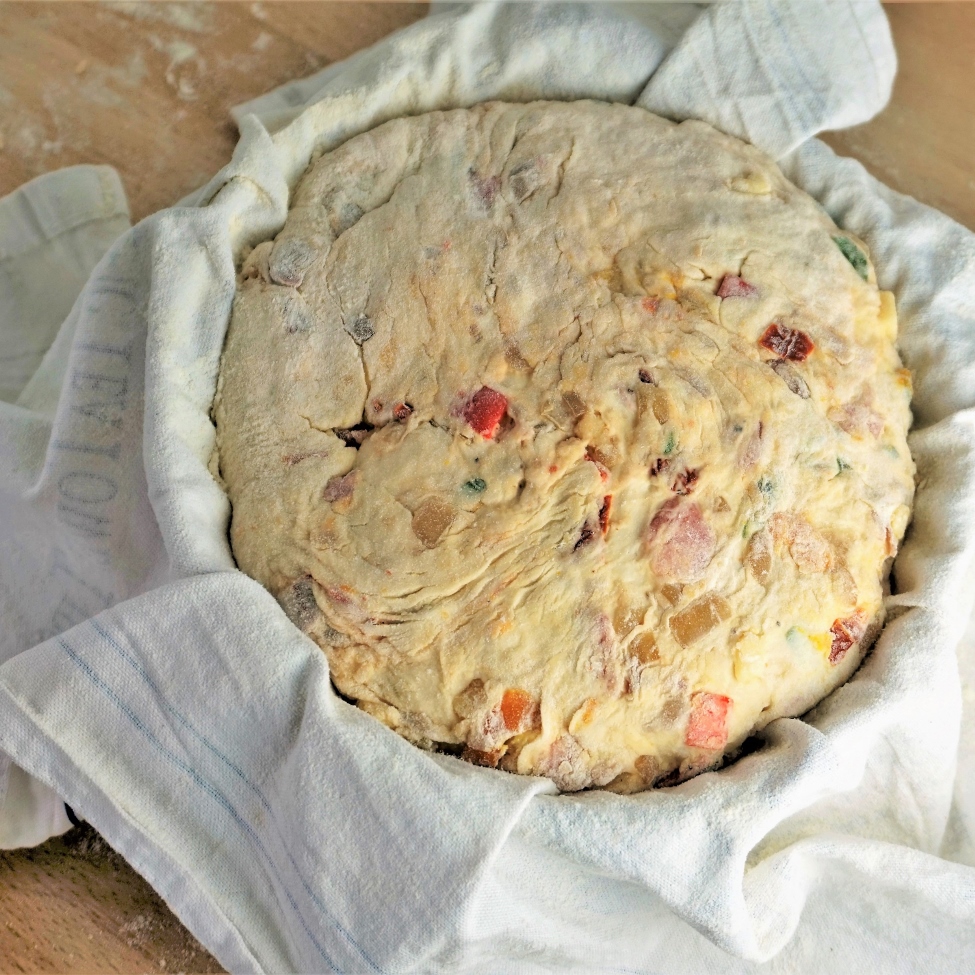
Keep folding until the filling is incorporated throughout the dough. When you’ve done that, work the dough into the rough shape of your proving basket or tea towel-lined bowl, and leave it on the work surface to rest while you flour the basket or bowl. Flip the dough in, cover with cling film or a tea-towel and leave to prove for 30 minutes for fast-acting yeast or, for sourdough starter, 60 minutes in warm weather, 90 minutes otherwise. Don’t expect the dough to rise a great deal during this time; it’s in the oven that it will have its final burst of growth (known as ‘oven spring’).
Baking the bread
While the dough’s proving, you should preheat your oven to 250C or as high as it will go, putting inside the cast iron pot or Dutch oven and its lid so that they get really hot too.
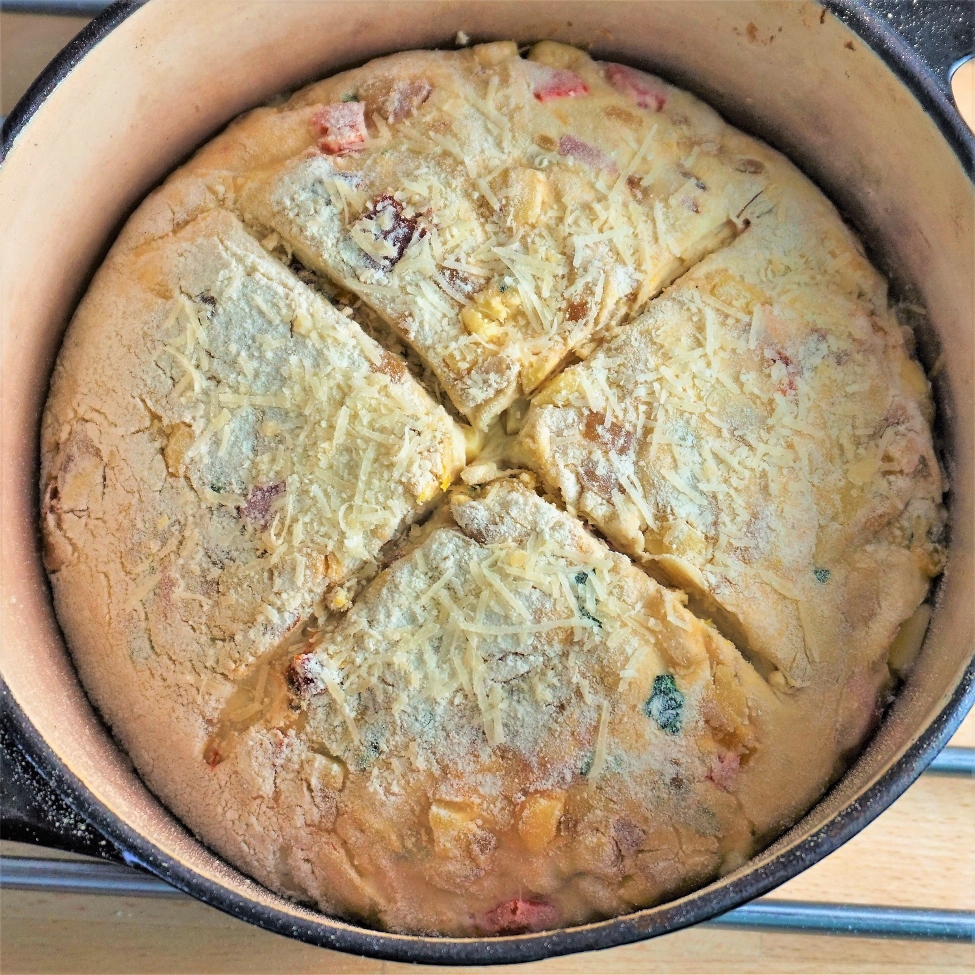
Once the proving time is up and the oven is seriously hot, turn the temperature down to 220C, carefully take out the pot, remove the lid and flip the dough into the pot, face down. Your loaf will most likely split somewhere as it rapidly rises, so slash the top to encourage it to split where you’d like it to. I like to use a lame or grignette blade to do this, but a very sharp knife will do. After slashing, quickly put the lid back on and place the whole thing back in the oven.
After 30 minute’s baking, the partially cooked loaf is taken out of the oven. Carefully take off the lid and inside you should see a fabulously risen loaf that’s starting to brown and will smell incredibly good.
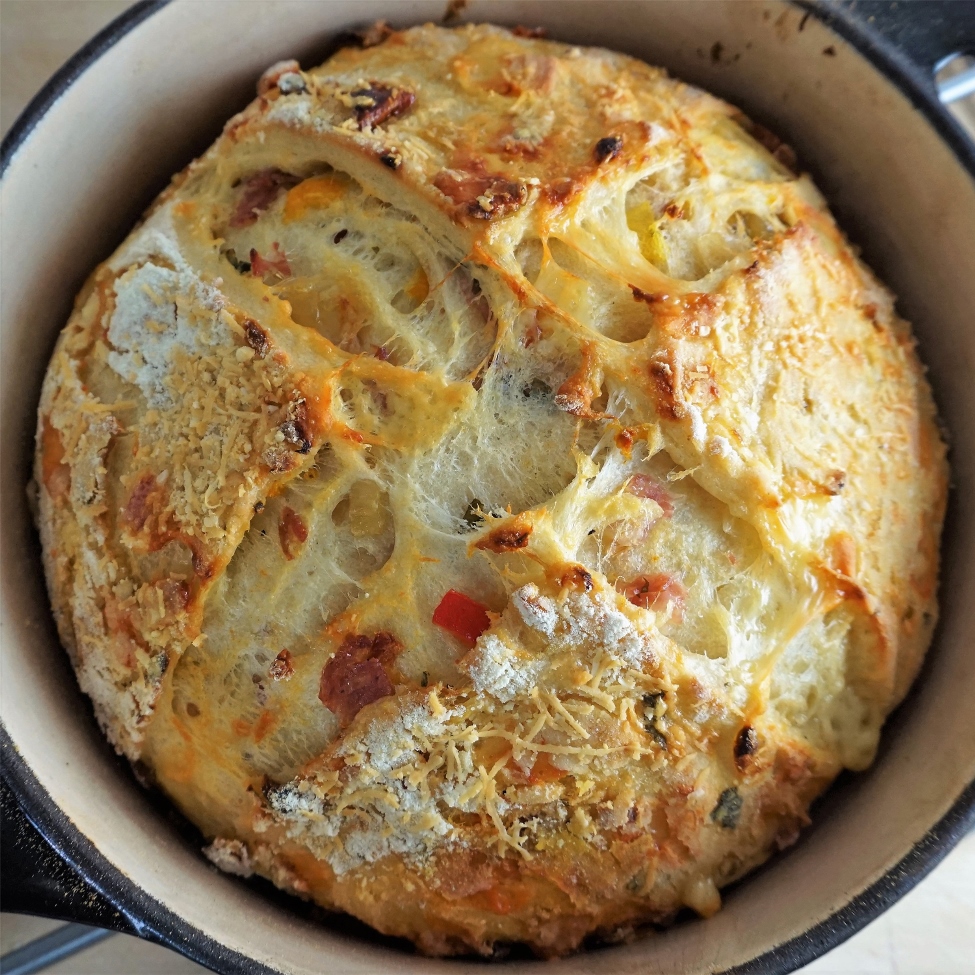
At this stage you need to take the loaf out of the pot and place it back in the oven, directly onto the shelf. With the Picnic Loaf, you may need to run a knife around the inside of the pot to help release the bread if the cheese has stuck the dough to the sides a little. After that, a good shake should get the loaf out of the pot.
Turn the temperature down to 200C and continue to bake for around 15 – 20 minutes, so that the loaf finishes cooking all the way through without over-browning. Turn the oven down to 150C if it’s browning too fast. When a loaf sounds hollow if tapped underneath, this usually means it’s cooked but as the Picnic Loaf is full of tasty goodies it’s a little denser so you’re unlikely to get that hollow sound. However, unless your oven temperature’s way off, the bread should be done in 50 minutes maximum.
When it seems cooked through, transfer the bread to a cooling rack. If eating at home, then my Picnic Bread is lovely served warm. Otherwise, leave to cool completely before packing with the rest of your picnic fare.
I love the texture and flavour of this bread. Because of the olive oil used to cook the vegetables, along with the fats from the cheese and salami, I think it’s more like focaccia than a regular crusty loaf. The crunchy crust is particularly good, having a toasted cheese flavour mingled with the wonderful sweetness of the vegetables’ juices which have concentrated and caramelized on its surface.
Uses & variations
Unusually, for someone who believes most things can be improved with plenty of butter, I don’t think the Picnic Bread really needs it, especially if you serve it with more cheeses and meats, pickles, salads and whatever else you like in your picnic.
If you’re not having a picnic, I think this bread would go well with so many meals – salads, soups, saucy pasta dishes etc. – and would be good cut into big hunks like focaccia.
If you like this Picnic Bread, then go ahead and experiment with different flavours:
- Anchovies instead of the salami would be a tasty nod to the original pan bagnat
- A few olives would be good
- Include different roasted vegetables such as aubergine, courgette or mushrooms
- Replace the basil with rosemary
- If you like heat, add a few fresh chillies to your roasting veg
- To take the bread into a Spanish direction, replace the salami with tiny dice of fried chorizo and use Manchego cheese
If you like this post you may also like: Roasted Onion Sourdough with Flaxseed & Toasted Bulgar Wheat

Picnic Bread
Ingredients
- 600 g bread flour plus extra for dusting
- 1.5 tsp salt
- Half a large yellow pepper, cut into small dice & roasted in olive oil until just soft use jarred roasted peppers if liked
- Half a large red pepper, cut into small dice & roasted in olive oil until just soft use jarred roasted peppers if liked
- 1 medium onion, chopped & roasted in olive oil until just soft
- 2 cloves garlic, finely chopped & roasted with the onions above
- 4-6 sun-dried tomatoes in oil, drained
- 4-6 slices salami cut into small squares
- 120 g cheese e.g. Cheddar, gruyere or a mixture grated
- 30 g Parmesan cheese finely grated
- Handful basil leaves shredded
Using fast-acting yeast
- 7 g quick, fast-acting dried yeast
- 460 ml water
Using sourdough starter
- 60 ml sourdough starter lively, refreshed approx 6 hours before
- 400 ml water
Instructions
THE NIGHT BEFORE YOU WANT TO BAKE THE BREAD:
-
Using fast-acting yeast:
Put the flour, salt and dried yeast in a large mixing bowl and gradually stir in all the water.
Using sourdough starter:Put the flour and salt in a large mixing bowl.
Dissolve the starter in the water and gradually stir it all into the flour and salt.
-
Use a rubber spoon or spatula to bring the mixture together into a rough, wet dough.
Cover with cling film and leave overnight or 12-14 hours.
ON THE DAY OF BAKING:
-
Scrape the dough out of its bowl onto a well-floured worktop and flatten out.
-
Scatter half the roasted vegetables, tomatoes, cheese (keep back a little of the Parmesan for sprinkling), salami and basil over the dough. Fold over the sides of the dough to cover the mix and flatten the dough again.
-
Scatter the rest of the filling over the dough, fold over the sides again and continue folding until the filling is incorporated throughout. You might need to flour the dough and your work surface several times to stop it sticking.
-
Form the dough into the approximate shape of a proving basket or tea-towel lined bowl. Cover and leave to rest while you dust the basket or tea-towel with plenty of flour to prevent sticking.
-
Flip the dough into the proving basket or bowl, cover with cling film or a tea towel and leave to rest: 30 minutes for dough with fast-acting yeast, 60-90 minutes for sourdough.
-
Pre-heat your oven to 250C, or its highest setting, with a heavy, lidded pot inside to heat up also.
-
When the proving time is up, reduce oven temperature to 220C, remove the pot from the oven, take off the lid and carefully flip the dough from the proving vessel into the pot.
-
Sprinkle the top of the dough with the reserved Parmesan, then slash the dough, replace the lid and put the pot back in the oven. Leave to bake for 30 minutes without removing the lid.
-
After 30 minutes, reduce the heat to 200C. Remove the pot from the oven, take the bread out of it (you may need to run a knife around the inside of the pot to loosen the bread) then put the bread back in, directly onto the oven shelf.
-
Bake for a further 15-20 minutes until the bread is cooked through. If necessary, reduce the oven temperature to stop the crust overbrowning before the loaf is finished baking.
-
When done, cool on a wire rack for a while. Either serve slightly warm or leave until completely cold before taking on your picnic, storing or freezing.