Venison, Mushroom and Bacon Pies
Venison, Mushroom and Bacon Pies are the perfect comfort food. Slow-cooked, fork-tender venison and earthy mushrooms in rich gravy with smoked bacon, baked in crisp golden pastry. Delicious served with mashed potato or chips, plus veg and extra gravy reserved from the filling.
Don’t have or like venison? The pies can be made in the same way with lean stewing beef.

Disclosure: this post may contain affiliate links. If you buy via my links, I may earn a small commission at no extra cost to you.
Jump to Recipe

Is there anything as comforting as a pie when you want a meal that’s warm, sustaining and delicious? Meat pie and gravy accompanied by potato (mash or chips are classics) will always be among my top picks. And if you make your own pies, I think the pleasure is even greater.
I’ve already posted plate pie, top crust only pie, bottom crust only pie, as well as pasties. So, I thought it was time I shared a recipe for some wonderful traditional individual meat pies: Venison, Mushroom and Bacon Pies.
Inside crisp shortcrust pastry the chunky filling is full of rich flavour. I also show you how to make extra gravy from the cooking liquor to serve with the pies. Now that’s comfort food!

If you haven’t made individual pies before, don’t worry. They really aren’t difficult. I admit the full instructions (you’ll find them in the recipe card at the end) do look lengthy. However, that’s because I’ve tried to give enough detail so that even a beginner should have success.
PIE MAKING BASICS
Stripped down to the essentials, the method for my Venison, Mushroom and Bacon Pies goes like this.
- Make the pie filling. Pretty much the same as making a meat casserole, except the gravy needs to be thicker. Leave to cool.
- Make the pastry. The simple shortcrust pastry can be made by hand or in a food processor. I’ve given instructions for both.
- Shape and bake the pies. Line 6 pie dishes with pastry bases, divide the cold filling between them and stick on the pastry lids.
- Bake the pies. Add a shiny glaze of beaten egg, then bake for 35 minutes.

Because the filling needs a couple of hours cooking to be perfectly tender and must be cold before we form the pies, I find it convenient to make the filling the day before. You can even make it further in advance and freeze if you like. The pastry needs to be chilled too. Thirty minutes is generally fine, although I usually get it done and out of the way in the morning then make the pies in the afternoon.
VENISON OR BEEF?
If you’re not familiar with game, venison is a great introduction. Although it can vary, the meat almost never has a strong game flavour. It’s often compared to good lean beef, and you can cook it in similar ways. If you’ve no objection to shooting, then venison is a good, ethical choice too. Most of it in the UK is ‘free range’ and not intensively farmed.
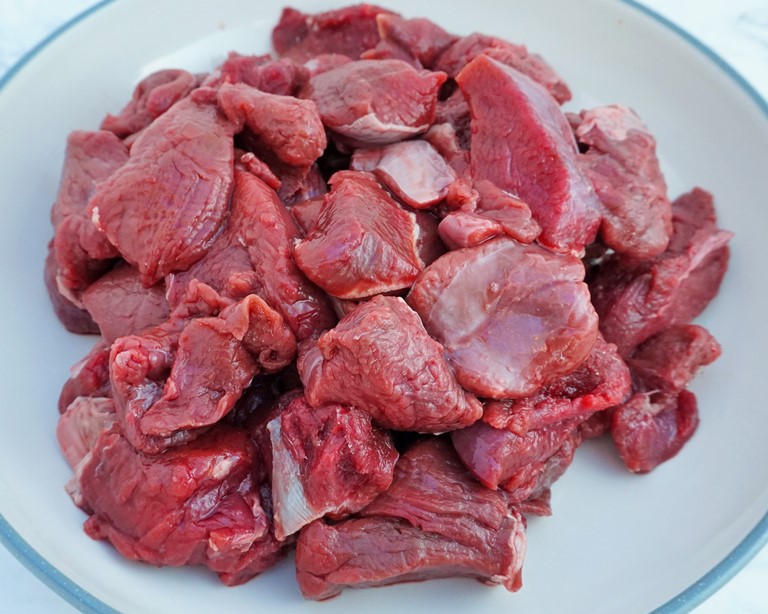
Butchers normally sell venison for stewing already cut into chunky pieces. As it’s a lean meat, I’ve never had to cut off any excess fat. If you can’t get venison, swap in stewing beef. Whichever you have, if the pieces are very big just cut into large bite sized chunks.
Because of the leanness, it’s usual to add extra fat when cooking venison, for example streaky bacon. I’ve used this lovely smoked pancetta, but you could swap in bacon lardons.
EQUIPMENT
Besides the usual kitchen paraphernalia like chopping knives, boards, spoons, rolling pin etc. there’s a couple of things you must have for this recipe.
- Lidded large casserole dish. Should be suitable for using on top of the stove and in the oven.
- 6 individual pie dishes. I use these foil pie dishes (affiliate link) which at the time of writing work out around 20p each. Although technically disposable, if handled carefully I find I can use them two or three times.
Not essential but highly recommended for this and lots of baking jobs is a silicone mat (affiliate link) to cover your work surface. They reduce sticking so you can use less flour when rolling out and make cleaning up easier too.
HOW TO MAKE VENISON, MUSHROOM AND BACON PIES
Rather than repeat what’s in the recipe card, here’s an outline of the method for making these wonderful pies.

MAKING THE FILLING
Just like making a casserole, the bacon and venison are first browned in oil. They’re set aside and the vegetables (onion, celery, garlic) that form the savoury base of the sauce added and softened. I like to add a little dried thyme for flavour, but you could leave out. Next, we stir in some plain/all-purpose flour which will thicken the filling. Beef stock is then gradually added (plus a splash of Worcestershire sauce if you have it) and bubbled for a few minutes. Finally, the browned bacon and venison are returned to the pot and the whole thing goes into the oven.
How long the venison takes to get lovely and tender can vary. But most likely 2 – 2.5 hours. During the final half hour, brown the mushrooms in a pan with a little butter and add to the casserole.
When it’s done, the filling should be transferred to a container and left until completely cold. However, I recommend making extra gravy to serve with the pies, so in the recipe card I tell you how to first strain off some of the sauce from the filling and store separately.
SHAPING THE PIES
First divide your pastry dough into 6 pieces for the bases and 6 smaller ones for the lids. For accuracy, I highly recommend using digital scales. Roll each piece for the bases so it comes all the way up the sides of the tins, but not so far that you need to cut any off. As a guide, in the recipe card I’ve given the dimensions of my tins, the approximate weight of the dough for the bases and lids, and the diameter of my base pieces.

Alternatively, you could roll out all the pastry and use cutters to stamp them out. But doing it my way means there’s no gathering of scraps and re-rolling. I find it’s quicker once you get the idea.

Dividing the cold chunky filling between the bases, it should come up to the top. Now brush some beaten egg all around the top edge of the pastry and put on the lids. Press all around to seal. I like to go around again, pinching between two fingers to create a wavy pattern.
BAKING & STORING
Before transferring to your oven preheated to the temperature shown in the recipe card, brush beaten egg over the lids. Then use a skewer, cocktail stick or similar to make two holes so the steam can escape.
After 20 minutes in the oven, I add another layer of egg for a deeper glaze (and reopen the steam holes if they’ve closed up) then return to the oven for another 15 minutes or so. You’ll know when the pies are done as the pastry should be crisp golden brown, the filling piping hot and just starting to bubble through the steam vents.
Take the pies from the oven, but if you’re planning to eat straightaway leave to sit for 5 minutes before attempting to take them from their tins.
If you’re going to store and eat at a later date, transfer to a cooling rack (still in their tins). When cold, you can put in the fridge or freezer. Venison, Mushroom and Bacon Pies can be reheated in the oven from chilled or frozen, details in the recipe card.
VENISON, MUSHROOM AND BACON PIES: DELICIOUS AND EASY
No one could argue that, start to finish, making individual pies with slow-cooked meat is a quick process. But the hands-on time isn’t as great as you might think. And the skills involved really aren’t that difficult with my detailed recipe card. So, plan ahead, get yourself organised and you’ll be enjoying some wonderful comfort food.

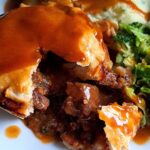
The soft venison in these pies is fork tender. No knife required! Smoky bacon or pancetta enhances the depth of flavour in the rich sauce and gravy. Add to that earthy mushrooms and crisp, golden pastry and you’ve something pretty impressive.
Chips and peas are a classic accompaniment to pies, but for my Venison, Mushroom and Bacon Pies I love mashed potato flavoured with a few chives plus sauteed greens. Finish with lots of that meaty gravy poured over, and you’ve a sensational dinner.

If you’ve made this recipe, I’d love to know what you thought. Do leave a comment and rating.

Venison, Mushroom and Bacon Pies
Individual pies with slow-cooked venison in a rich gravy (plus extra to serve with them) are incredibly delicious. Lovely with mashed potato or chips and veg.
Split the work by cooking the pie filling the day before so it has time to completely cool. Make the shortcrust pastry in the morning, chill it, then form the pies.
Ingredients
For the pie filling
- 500 g stewing venison, cut into large bite-sized pieces (can be replaced with stewing beef)
- salt
- black pepper
- 2 tbsp oil (e.g. light olive, sunflower)
- 120 g smoked streaky bacon, lardons or pancetta (roughly chopped)
- 1 large onion (skinned, roughly chopped)
- 2 stalks celery (finely chopped)
- 6 large cloves garlic (skinned, finely chopped)
- 1 rounded tsp dried thyme (optional)
- 50 g plain/all-purpose flour
- 500 - 1000 ml beef stock (see Recipe Notes for more info)
- 1 tbsp Worcestershire sauce or Balsamic vinegar (optional)
- 10 g butter
- 250 g mushrooms (cut into chunky pieces)
- 2 tbsp finely chopped parsley
For the pastry
- 400 g plain/all-purpose flour (plus extra for dusting)
- ¾ tsp salt
- 100 g cold butter (diced) plus extra for greasing
- 100 g cold lard (diced: can be replaced with more butter)
- 4 - 6 tbsp iced water
For the glaze
- 1 small - medium egg (beaten)
Instructions
Make the pie filling
-
Preheat your oven to 140° C / 120° Fan /Gas 1 /275° F.
Season the venison with salt and pepper then set aside.
-
Put the oil in a large ovenproof casserole dish (it will need a lid later) and put over medium-high heat.
When hot, add the chopped bacon, lardons or pancetta and cook until the fat is golden. Use a slotted spoon to remove to a large plate, leaving the fat in the casserole dish.
-
In batches, brown the seasoned venison in the casserole: don't crowd the pot or it will steam rather than brown. As each batch is done, transfer it to the plate with the bacon. Continue until all the venison is browned.
-
Reduce the heat to medium/medium-low then add the prepared onion, celery and garlic. Add a little salt, a good grind of pepper plus the dried thyme then stir around, scraping up any browned bits from the bottom of the casserole.
Cook for 8 - 10 minutes or until the vegetables are starting to soften and colour.
-
Add the plain/all-purpose flour and stir constantly for 2 minutes.
Take the casserole temporarily off the heat and gradually add approximately 250 ml of the stock, stirring constantly until smooth with no lumps of flour.
Stir in the remaining stock then put back on the heat.
Keep stirring until the gravy bubbles and thickens.
Add the Worcestershire sauce, taste and season with a little more salt and pepper.
-
Add the browned bacon and venison to the casserole, including any juices that have collected on the plate. Stir and bring back up to a simmer.
-
Put a lid on the casserole and transfer to the preheated oven. Cook until the venison is very tender: approximately 2 - 2 ½ hours.
Note: while this is happening complete the next step.
-
Put the 10 g of butter in a frying pan over medium heat.
When melted add the prepared mushrooms and season with a little salt and pepper. Cook for a few minutes, stirring regularly, until the mushrooms are lightly coloured and starting to soften.
When the venison is just tender stir the mushrooms and any pan juices into the casserole dish. Return to the oven for a further 15 - 20 minutes.
-
Use a slotted spoon to remove the pieces of venison, mushrooms, and bacon to a lidded container. Pour the remaining filling through a sieve and into a jug.
Transfer the contents of the sieve into the container with the venison and bacon. Stir in the chopped parsley along with all but 500 ml of the gravy in the jug.
-
Leave the filling and the extra gravy to cool then transfer to the fridge until completely cold.
Tip: once cold, can be stored for 24 hours or frozen.
Make the shortcrust pastry dough
-
Using a food processor
Put the flour and salt into the machine and briefly process to combine.
Put the diced butter and lard into the machine and process until the mixture looks like very fine breadcrumbs.
With the motor running add iced water, 1 tbsp at a time, until the mixture comes together into a smooth ball.
Making by hand
In a medium sized bowl, stir together the flour and salt.
Coarsely grate in the butter and lard: dip into the flour now and then to prevent sticking. Using your fingertips, rub the fat into the flour until the mixture resembles fine breadcrumbs.
Add 3 tbsp of cold water and stir in with a round bladed knife. Continue adding tablespoons of water and stirring until the mixture starts coming together.
Use your hands to bring together into a smooth ball.
-
Wrap in foil or cling film and chill in the fridge for at least 30 minutes.
Tip: pastry can be chilled for longer (or frozen) if more convenient.
Divide the pastry dough
-
Using digital scales for accuracy divide the dough into 6 pieces for the pie bases and 6 smaller ones for the lids. Roll into smooth balls.
Example: my pie tins have a diameter of approximately 10 cm across the top, 7.5 cm at the base, and a height of 3.5 cm. I divided the dough into 67 g pieces for the bases and 30 g pieces for the lids.
Alternative: roll out all the dough and stamp out rounds with suitably sized cutters. Re-roll the scraps.
Line the tins
-
Grease the tins with butter: melting and brushing it on is easiest.
-
Lightly dust flour over your work surface (ideally, cover it with a silicone mat first to reduce sticking and the need to add extra flour) and put one of the pieces of dough for the bases on it and flatten. Sprinkle lightly with flour and roll into a circle big enough to come all the way up the sides of a pie tin, but not so big that you need to cut any off.
Tip: for my tins I rolled the bases into approximately 13 cm circles.
Neaten the top edge by pressing down and smoothing with your fingers.
Repeat with the remaining dough for the bases.
Roll out the smaller pieces of dough into circles to fit on top then set aside.
Fill the pies
-
Divide the filling between the pie bases so it comes up to the top.
Brush some of the beaten egg around the top edge of the pastry then put on a pastry lid: gently press down to expel any air trapped underneath, then firmly press all around to stick it to the base.
Go all around pinching the edge between two fingers to seal.
Repeat with the remaining pies.
Tip: pies can be stored in the fridge until ready to bake or baked straight away.
Bake the pies
-
Preheat your oven to 180° C /160° Fan /Gas 4 /350° F with a shallow baking tray on the middle shelf.
-
Brush the tops of the pies with the remaining beaten egg.
Make 2 holes in the top of each one with a skewer, cocktail stick or similar to allow steam to escape.
-
Transfer to the oven and bake for approximately 35 minutes or until the pastry is crisp golden brown and the filling is hot and just starting to bubble a little through the steam vents.
Tip 1. If your oven cooks unevenly, turn the tray around after the first 20 minutes.
Tip 2. After 20 minutes you can add another layer of beaten egg for a deeper glaze.
-
When the pies are done, remove from the oven but leave for 5 minutes before carefully removing from their tins and serving with the reserved gravy heated in a saucepan on top of the stove.
Cooled pies can be stored in the fridge (in their tins) for 24 hours or frozen.
Reheating
-
Preheat oven to 180° C /160° Fan /Gas 4 /350° F.
Put the pies on a baking tray and cover with foil.
Bake until the filling is piping hot: approximately 30 minutes from chilled, 50 minutes from frozen. Remove the foil for the final 5 - 10 minutes to re-crisp the pastry if necessary.
Recipe Notes
Stock. The recipe assumes you'll want to make extra gravy to serve with the pies. If not, you can reduce the stock to 500 - 750 ml. If you don't make extra gravy then you don't need to separate at step 9 of making the pie filling: just transfer it to a container to cool.
RELATED RECIPES