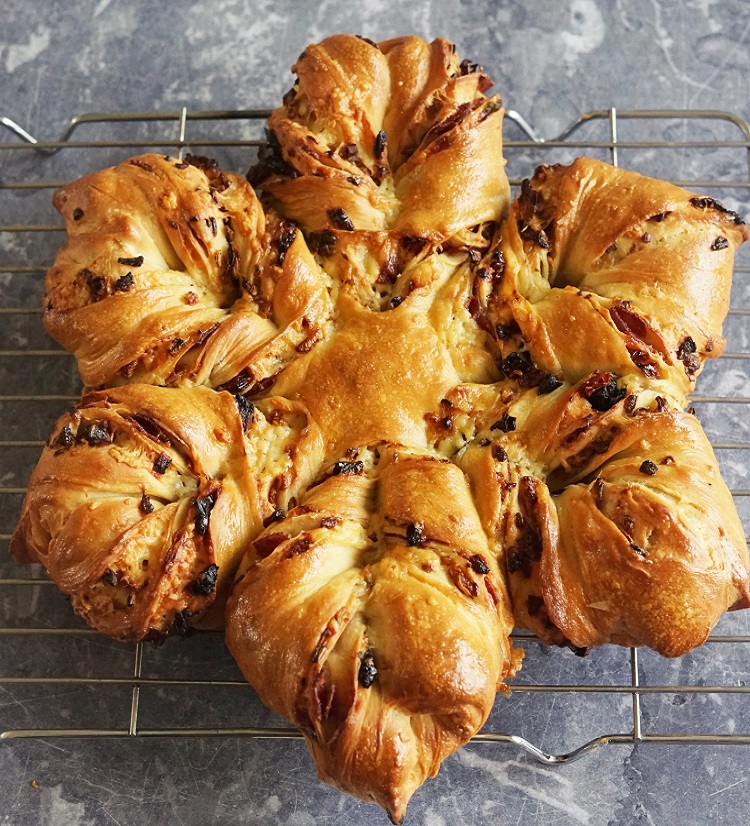
Savoury Tear & Share Star Bread
Savoury Tear & Share Star Bread looks impressive, but it’s actually not difficult to create. Filled with layers of sun-dried tomatoes, cheese, basil, salami, roasted onions and garlic plus fennel seeds, you won’t be able to resist pulling off a piece and eating it warm from the oven.
Jump to Recipe
Although I make virtually all the bread we eat at home, I don’t usually go in for fancy shaped breads. I’ve always thought flavour should come first and that’s what I tend to concentrate on. But I’ve been making bread for years now and am pretty happy with my no knead methods for crusty bread and sourdough loaves.
So isn’t it about time I started being a little more adventurous?
The Inspiration
The inspiration for this recipe came from The Great British Bake Off when I saw that shaping one of those intricate-looking star breads was actually quite easy. So, for bread week 2019 I chose the tear and share challenge. On the show, I was particularly impressed by Michael’s Keralan Star Bread.
Obviously I wasn’t expecting to create anything as beautiful as that. But I did think, however it turned out, my mixture of melting cheese, salami and other good things snuggled in freshly baked bread was going to taste very, very good.

Making the Dough
I decided that the base of my Star Bread would be my usual no-knead, overnight dough. Leaving the dough overnight not only gives you better flavour, but time does the work of developing the gluten (a protein which allows bread to rise) so there’s no-need-to-knead.
Besides my usual flour, salt, instant yeast and water I added an egg and some olive oil to make the dough a little richer.
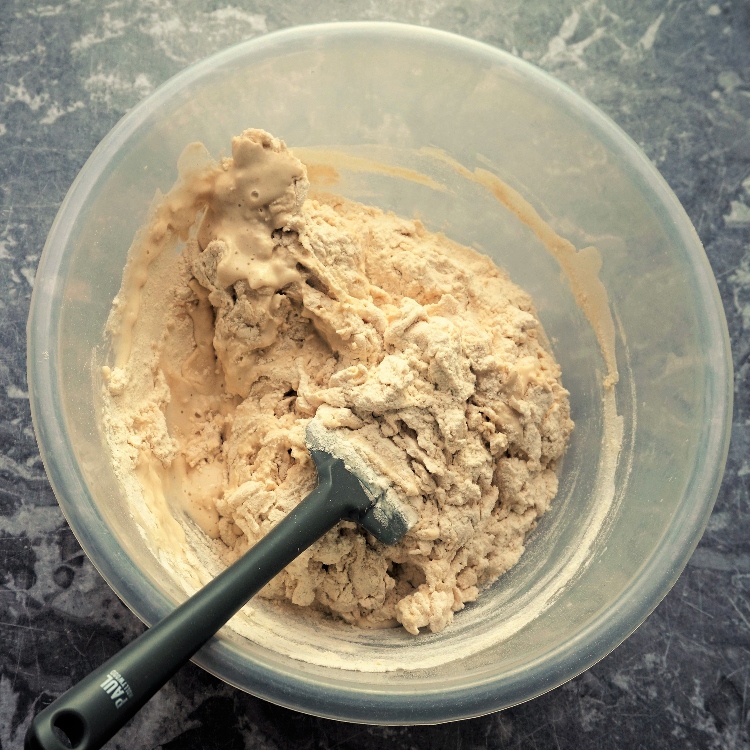
Because I make my own yogurt and strain some of it to make thick, Greek-style, I had some whey in the fridge. I use this in bread doughs so substituted this for some of the water. If you like, you can use all water, all milk or a mixture of the two.
To make the dough, all you do is stir the ingredients together. It’s quite a wet dough, so don’t even think about trying to knead it. You’ll get into a right old mess. When the dough’s come together, just cover it with a damp tea towel or cling film and leave it overnight.
The Fillings
For my Star Bread, I wanted some classic Mediterranean flavours. Not quite pizza, but heading that way. I chose three different fillings.
My first layer was chopped sun-dried tomatoes sprinkled with some torn fresh basil leaves. On top of that I sprinkled some grated Parmesan and little cubes of Cheddar.

I used these cheeses as they happened to be what I had in the fridge, but use any you fancy. I think mozzarella and goats cheese would be particularly good.
My second filling was salami. You could leave the slices whole, but I thought roughly chopping them would making cutting the bread easier.

My final layer was roasted chopped onion and garlic. To make sure they were nice and cold before putting them on the dough, I’d roasted them in a little olive oil the night before.
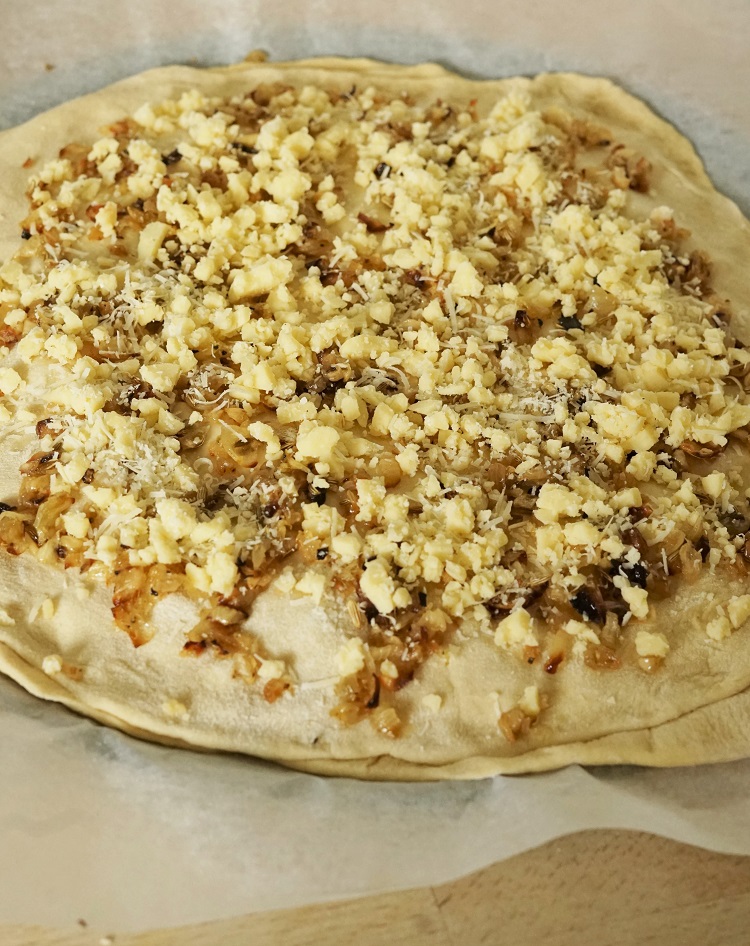
I included a few fennel seeds with the seasoning too as they’re one of my favourite spices. On top went more cheese.
Shaping the Star Bread
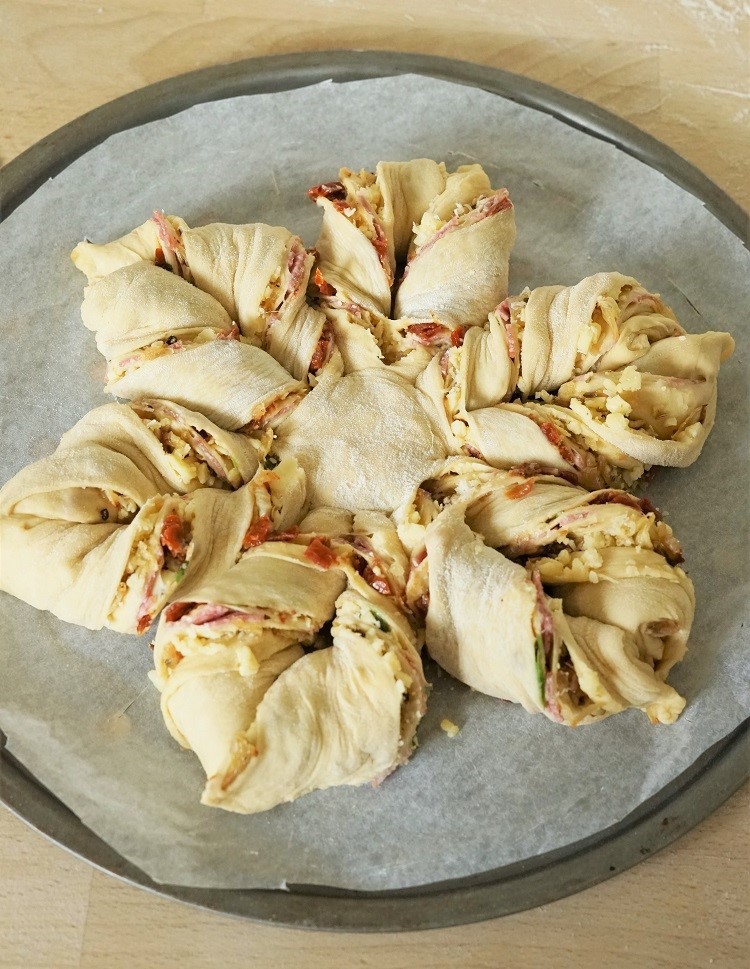
As I hope you can see from the images above, you make this Star Bread by layering four circles of dough with the three fillings in between them. I did this on a round baking tray with a piece of baking paper on it so the cooked bread was easier to remove later.
On top of the third filling went the fourth and last round of dough. Unless you’re an absolute expert at rolling out perfect circles of dough (clearly, I’m not), you’ll need to put a big plate, saucepan lid or similar over the stack of dough and cut around it to make a neat shape. See tip at the end of the post for using up the leftover trimmings: don’t waste them!

Next, you put a pastry cutter, glass or similar in the centre of your dough. This acts as a temporary guide to help you make the cuts needed to form the star or flower.
Use a sharp knife as you need to cut through all the layers. I cut my dough into 12 sections, but might try 16 next time for a more intricate final bread.

For the next stage, you lift up two adjacent sections at a time and twist them in opposite directions, turning over twice. It’s a bit nerve wracking at first as the dough stretches and the fillings start to peep out. But that’s what’s supposed to happen and when you’ve done a couple, you’ll be fine.
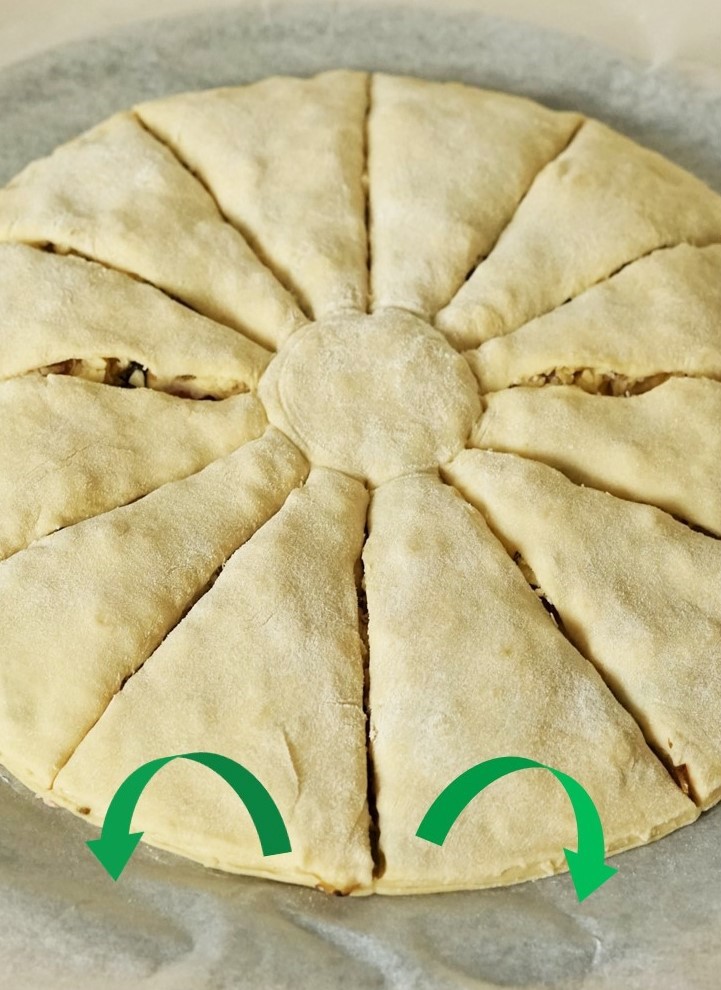
Once each pair’s been twisted, just secure them by pinching the ends together into a little point.
And that’s it. Now your Star Bread can be left to prove for another thirty or forty minutes while you preheat the oven.

Baking
Just before you bake the Star Bread, give it a brush with some beaten egg mixed with a little water. This will give it a nice gloss.
Then it’s into the oven for around 20-25 minutes. I’d check after about 15 minutes and lower the temperature a smidgen if you think the bread’s browning too quickly before it’s cooked through.

If you can bear it, cool the finished bread on a rack for a few minutes before tearing off a piece and eating.

I loved the combination of melting cheese, sweet roasted onion, meaty salami and slightly smoky tasting sun-dried tomatoes. But I’m already thinking up flavours, sweet as well as savoury, for my next Star Bread.
What flavours will you put in yours?
Tip for using up dough trimmings
I hate waste. So, having some dough trimmings from when I cut around my stacked layers, I made them into dough sticks while the Star Bread was proving.
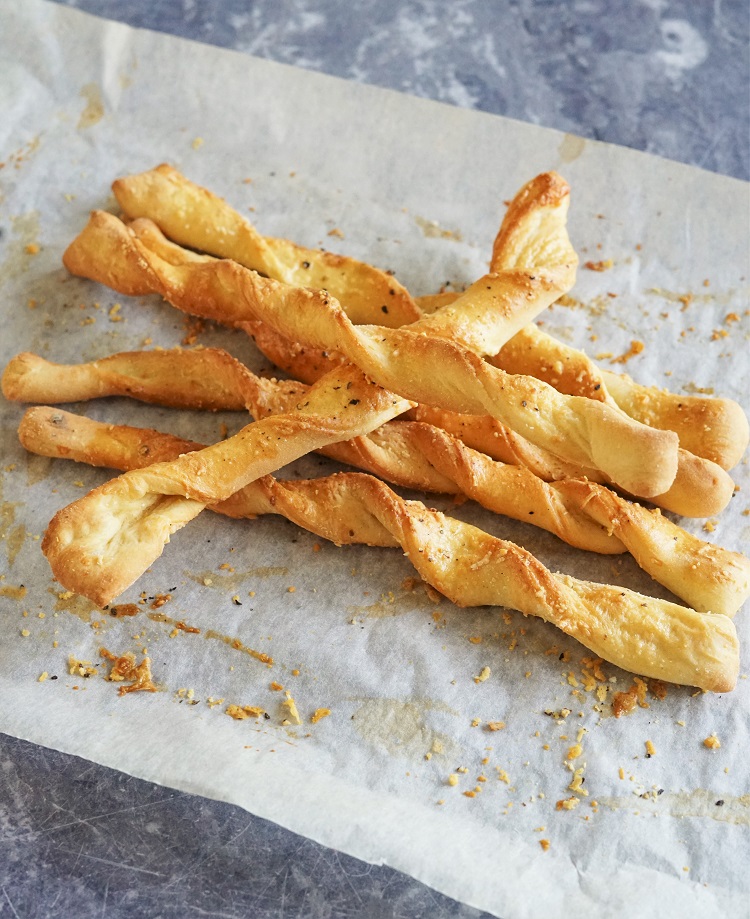
All I did was bring together the scraps, roll them out thinly and cut into strips. I gave them a bit of a twist from both ends then put them on greaseproof paper on a baking tray.
A quick brush with the egg and water glaze, a sprinkle of Parmesan and a grind of black pepper then it was into the oven for around seven minutes, same temperature as the Star Bread.


Savoury Tear & Share Star Bread
Savoury Tear & Share Star Bread looks impressive, but it’s actually not difficult to create. Filled with layers of sun-dried tomatoes, cheese, basil, salami, roasted onions and garlic plus fennel seeds, you won’t be able to resist pulling off a piece and eating it warm from the oven.
Ingredients
For the dough
- 350 g strong white bread flour
- 1 tsp salt
- 1 tsp fast acting dried yeast
- 1 egg
- 3 tbsp olive oil
- 170 ml water, milk, whey or a combination of these
For the fillings
- 2 medium onions skinned, roughly chopped
- 3 cloves garlic skinned, finely chopped
- 1 tsp fennel seeds
- salt & pepper to taste
- 2 tsp olive oil
- 75 g mature Cheddar cheese grated or finely cubed
- 25 g Parmesan cheese finely grated
- 70 g sun-dried tomatoes finely chopped
- 1 handful basil leaves roughly torn
- 70 g salami (approx 7 slices) cut into 1 cm squares
For the glaze
- 1 egg
- 1 tbsp water
Instructions
The night before you want to bake the bread:
-
Put the flour, salt, dried yeast and salt in a large mixing bowl.
-
Beat the egg and olive oil into the liquid then pour all of it into the mixing bowl.
-
Use a rubber spoon or spatula to bring the mixture together into a rough, wet dough.

-
Cover with cling film or a wet tea towel and leave overnight or 12-14 hours at room temperature.
-
For the roasted onion & garlic filling:
- Preheat the oven to 180C/160C fan/Gas 4
- Put the chopped onion, garlic and fennel seeds in an ovenproof dish and season with salt and pepper. Drizzle over the olive oil and stir to combine.
- Cook until onion is soft and starting to brown (25-30 min). Watch it doesn't burn.
- Cool and leave in the fridge overnight.
On the day of baking:
-
Line a round baking tray, approx 30cm in diameter, with a piece of baking parchment or greaseproof paper. Set aside.
-
Scrape the risen dough onto a well floured surface then bring together into a smooth ball by folding it a few times.
-
Divide the dough into four equal pieces and form those into balls.
Take one of the balls (keeping the rest covered) and roll it out into a circle approximately 25cm in diameter. Place it on the prepared tray.
-
Sprinkle the sun-dried tomatoes over the circle of dough, keeping around 1cm away from the edge, then sprinkle over HALF the cheddar and Parmesan and all of the basil.
-
Roll out the second ball of dough in the same way and place it over the sun-dried tomato filling.
-
Scatter the cut salami over the second circle.
-
Roll out the third ball of dough and place it over the salami.
-
Sprinkle the cold roasted onions and garlic over the third circle of dough and scatter with the remaining cheddar and Parmesan.
-
Roll out the fourth ball of dough and place it over the onion layer.
-
To create a perfect circle: place a large round plate or similar over the stack and cut around it, going through all the layers. Remove the trimmings.
Tip: dough trimmings can be rolled out, cut into strips, twisted and baked with a little cheese on top to make dough sticks.
Lightly press down the edges of the dough to seal in the fillings.
-
Place a 5cm cutter or glass temporarily in the centre of the dough.
Using a sharp knife, cut outwards from this central point to make 12 (or 16 if you prefer) equal triangular sections. Make sure you cut through all the layers.

-
Taking two adjacent sections at a time, twist the pieces in opposite directions, turning them around twice.
Pinch the ends of the two pieces together so they form a point.
Repeat with the rest of the sections, two at a time.

-
Cover the dough with cling film or a damp tea towel and leave to prove 30-40 minutes.
Preheat the oven to 200°C /180° fan /Gas 6 /400° F.
-
Beat together the egg and water for the glaze and brush over the risen dough.
-
Put bread on its tray in the oven. Bake until golden and cooked through (approx 20-25 minutes).
Check after 15 minutes that the bread isn't starting to brown too quickly; if necessary turn the oven temperature down.
-
When baked, cool for a few minutes before tearing off pieces and eating warm.
ENJOYED THIS RECIPE? YOU MAY LIKE THESE


Hi: I have a question about this recipe. If I want to make it for dinner but also prove it overnight, what do you do after it’s proved? That is, if I set it up to prove at, say, 8 at night, then what do I do all the next day before I’m ready to bake it? Do I put it in the fridge? Thanks!
Yes, you can just pop it in the fridge!
Hi this looks really great – could this be reheated? If so how would you suggest?
Hi Sam. I must admit I usually just reheat by pinging for a few seconds in the microwave. This does give a softer crust though, so if you want it slightly firmer you can heat for 5 – 8 minutes in the oven at 150C / 130 Fan / Gas 2. Spritzing the top with water first should stop it burning. Hope this helps!
I had a question : if you knead This dough , can you skip the overnight proof? Maybe have two proof sessions in the same day?
Hi Sarah, thanks for your question.
You could skip the overnight proof and instead do two proofing sessions on the day of baking. However, be aware that this dough is very wet and it’s that, together with the long first rise, which develops the gluten rather than kneading. So I’d suggest you reduce the amount of liquid so that you have a kneadable dough rather than the ‘rough, wet dough’ described in the recipe. Different flours absorb different amounts of liquid, so add a little at a time to get the consistency you want.
Hope this helps and you come back and let me know how it went if you try it!
1st time making this today & I was really pleased with the result..I say was because its gone 😁. Hubby and I ended up eating it instead of a dinner. I have a garlic hating household so my layers were -1 – peppered salami , 2- pepperoni & smoked cheese & the final layer was mature cheddar, mozzarella & onion. I used shwartz onion granules instead of fresh as they are just finely chopped dried onion so when you cook them they release great flavour. I grated little more cheddar over the top when it came out of the oven.
Another brilliant recipe, thank you.
Thank you for your lovely comments, Sandra! I love the sound of your layers – what a great dinner 😄
This recipe is fantastic! I’ve made this twice now in the last week and each time played with the ingredients to create a totally delicious centrepiece that was gone in minutes! Love the overnight no knead method and the long ferment creates so much flavour. The fillings I tried today were mozzarella and sun dried tomatoes on one layer, capers, pepperoncini, jalapeños and cheddar i layer two and finally pesto on the 3rd. So so happy with this recipe!
So pleased you’re enjoying the recipe, Vee! And I love the sound of your combinations 😋
Many thanks for taking the time to comment and rate the recipe!
Hi there, just wondering if you have tried this recipe in a Dutch oven…I’ve proofed my dough overnight and will be getting started in a couple of hours!
Thanks,
Juanita
Hi Juanita!
No, I haven’t tried this recipe in a Dutch oven. Although I do cook most of my loaves in a covered pot, I don’t have one that would be big enough for the star bread which is probably why I hadn’t thought of it!
But I see no reason why you shouldn’t use a Dutch oven if yours is big enough: I suspect you would get a nice rise. Please come back and let me know how it goes!
Hi,
Quick one – can this be frozen successfully?
G.
Hi Grant,
Yes! I’ve frozen this bread successfully.
Are you sure it is only one tsp of yeast and not the whole packet (2 1/2 tsp)? The rise on my dough after 14 hours was not as much as I expected.
Hi Deborah,
Yes, 1 tsp of yeast is correct. The recipe only contains 350g of flour so 1 tsp should be plenty (I only use 1.5 tsp in my full loaves which contain 600g of flour).
Likely reasons for the dough not rising very much after 14 hours could be old yeast (not a lot you can do about that now) or a cooler room temperature (just give it a bit longer, in a warmer place if possible).
Did you go ahead and make the bread anyway and what was it like? Sometimes you still get a good result even if the first rise wasn’t ideal.
Many thanks!
This was very daunting, as I am never very successful with yeast, but actually it wasn’t that bad! I think my proving step didn’t work but I am going to try again, because it was quite fun to make. Plus I quite like the idea of less mess (no kneading). My questions: in the first prove, should it have doubled in size? And second prove, should that be done in a warm place or is it ok at room temperature? Mine didn’t double in the first prove but the dough was soft and it held together. It didn’t do anything in the second prove or in the oven in terms of rise, but not sure what is supposed to happen, and if I should have waited a bit more for some sort of rise in the second prove. Thank you for sharing!
Hi Kay,
After the first (overnight) rise, I would’ve expected the dough to have risen a lot: at least doubled in size. For the second rise, normal room temperature is also usually fine, although at different times of year and in different places what exactly is ‘normal’ will of course change! I don’t know if you’re in the UK like me, but at the moment an unheated room would be quite cold. However, in a hot Summer I sometimes prove in the fridge to slow things down.
But if your dough didn’t rise at all in the second prove or in the oven, I’m wondering if there’s something wrong with your yeast? Is it well within its Best Before date and has the pack been opened long?
Also, you say you’re never very successul with yeast but are you definitely using the fast action yeast that can just be added to the flour etc and not the kind that has to be activated in warm water first?
As the length of time needed for the second rise can vary due to room temperature etc. a good way of checking whether any dough is ready to bake is the ‘poke’ test: the hole left by a finger gently poked into the dough should spring back slowly but still leave a slight indentation. If the indentation springs back immediately the dough is not fully proved so leave it a little longer.
I hope these tips help and that you’ll let me know how you get on if you have another go.
Hello! I wonder if you can over prove your no knead bread? I’m making my dough over night but will bake this for dinner. Will a few extra hours do harm?
Hi!
It is possible to over prove the dough, yes. This means it won’t rise much in the oven.
To slow the process down, you can put the dough or the shaped bread in the fridge at any stage. Just allow time to bring it back to room temperature before baking.
I’m making this right now, and can’t find where you mix in the milk/water. I assume at the beginning?
Sorry Andy, only just seen your question (bit busy as it’s Christmas eve! 🙂) so I guess it’s too late now, but it’s at step 2: “Beat the egg and olive oil into the liquid then pour all of it into the mixing bowl.”
Hope it worked out ok anyway. Do let me know!
I am not a super experienced baker by any means and this recipe turned out to be easy to follow and absolutely delicious! I was looking for a recipe after watching the tear and share bread challenge on GBBO and this was it. I am definitely looking forward to making this again with different fillings – sweet or savory.
The filling we used included pesto, prosciutto, red pepper flakes, oregano, cheddar, parmesan, and garlic butter in our layers. For the liquid in the bread dough, I used whole milk and a little bit of water to get a wetter consistency. Thank you so much for sharing this!
Hi Lauren,
Many thanks for taking the time to commment and rate the recipe.
I love that although the end result looks impressive, it’s really not that difficult to make.
The filling for your Savoury Tear & Share Star Bread sounds great!
This recipe was amazing. I made it with my son and it made us look way more impressive then we are. The only surprise was how little the dough rode over night but once we got over that everything went together beautifully. Delicious and fun to make. Thank you for sharing this recipe with us.
Thanks for your feedback and rating the recipe, Heather! So glad you found it delicious and you and your son had fun making it.
I love how impressive the star bread looks when finished, even though it’s pretty easy once you know how it’s done 😊
Just tried this and it was delicious, thank you Lynne! I used what I had going spare, some sundried tomatoes, olives, cheese and dried basil. It was great! Looks very impressive but it was so easy. Will try the sweet version next…
Thanks for the fab feedback, Joanne. So glad you liked the bread! As you say, it looks good but is deceptively easy. I think the sweet one is just as good too.