Semolina Baguettes Recipe
Semolina Baguettes are inspired by the famous breads of Sicily made with semolina flour. With a flavoursome, chewy crumb and sesame-topped crust, these rolls are perfect with your favourite fillings, or alongside soups and salads. Also excellent filled with the Sicilian classic of tomatoes, oregano, anchovies, and cheese.

Disclosure: this post contains affiliate links. If you buy via my links, I may earn a small commission at no extra cost to you.
Jump to Recipe

SICILIAN SEMOLINA BREAD
I first came across semolina bread in Clarissa Hyman’s beautiful book Cucina Siciliana. If you’re lucky you may find a hard back or paperback copy online (affiliate links). What drew me was the recipe for pane cunzato (literally ‘seasoned bread’): a sesame-topped long roll filled with sliced tomatoes, herbs, and anchovy, plus thin slivers of cheese just melting where the sandwich had been lightly warmed.
Although I went on to make pane cunzato with all sorts of bread and bread rolls, it was only this year I decided to learn more about semolina bread itself. The result was my recipe for Sicilian Semolina Bread; a golden-coloured, flavourful loaf with a chewy crumb and sesame-topped crust.
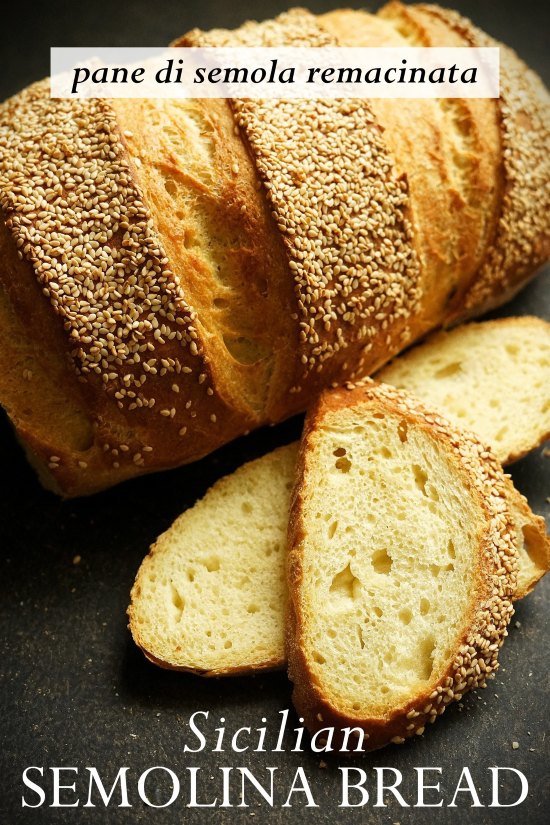
The reason pani di semola rimacinata (to give it its Italian name) is so special is due to the type of flour it’s made with. Instead of regular wheat flour, it’s the hard durum wheat typically used for pasta. After grinding, the flour is called semolina (semola) and is much coarser than regular wheat flour. For making bread, it’s ground a second time. The resulting double- or re-milled flour is known as semola rimacinata.

While this fine semolina flour is more expensive, I think the results are worth it for anyone who likes experimenting with different breads. I get it online where buying in bulk can bring the price down considerably. At the time of writing, buying six 1-kilo bags (affiliate link) of semola rimacinata works out half the price of buying just one kilo (affiliate link).
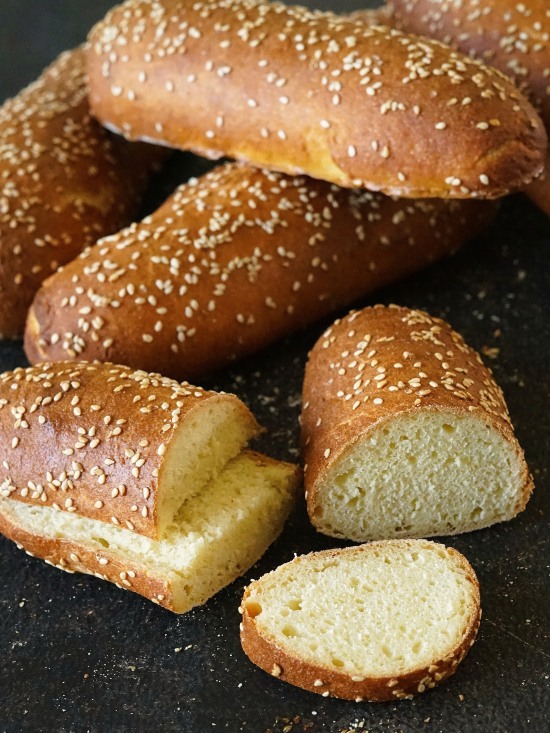
Now, after perfecting my pani di semola rimacinata, I’ve gone back to the original inspiration. Sesame-topped Semolina Baguettes that are perfect for making Sicilian pane cunzato or just enjoying with your own favourite sandwich fillings. Get my recipe for Pane Cunzato here.

SEMOLINA BAGUETTES
My semolina flour baguettes share all the qualities I love about my original semolina loaf. Outside, the crust is dotted with sesame seeds which add so much flavour. Inside, there’s the same slightly open, firm texture with a pale-yellow tint to the crumb. In the mouth, they’re satisfying and chewy. The flavour and aroma of semolina breads is hard to describe. I think they’re subtly sweeter than standard wheat flour with almost corn-like hints.
You’ll find ingredient amounts and full instructions in the recipe card at the end. However, I recommend you read the whole of this post first for extra tips and images to guide you.
INGREDIENTS
In addition to the semolina flour, you’ll need instant dry yeast (i.e. the sort that doesn’t need activating before adding to the other ingredients), salt, olive oil, and water. For the topping, you’ll need sesame seeds plus beaten egg to help them stick.

For this, and most of my homemade breads, I use a no-knead, overnight method. Many years ago, I discovered that a wetter than usual dough combined with a long fermentation can replace the kneading of conventional bread making. This develops the gluten which helps doughs rise and gives bread its structure. It’s this method you’ll see in the photographs here. However, if you want to speed things up and don’t mind kneading, you’ll find instructions in the notes to the recipe card for same-day semolina baguettes.
EQUIPMENT
Besides the usual kitchen equipment such as mixing bowl and spoon, you’ll need one large or two smaller baking trays. I find a silicone mat (affiliate link) invaluable for all sorts of baking, not just breads. You need less flour to prevent sticking, and it makes cleaning up easier too. For accuracy, I always recommend you use digital scales (affiliate link) and metric measurements. This is the way I create and test my recipes, so can’t vouch for the results if you convert them e.g. to American cups.
MAKE THE DOUGH FOR SEMOLINA BAGUETTES
To make the dough, put the semolina flour, salt, and yeast into a large mixing bowl. Stir together, make a well in the centre and add one tablespoon of olive oil. Now add approximately 250 ml of tap water (no need for warm water with overnight fermentation) and start stirring to bring the ingredients together.
As you stir, gradually add more water as necessary to create a dough. There should be no dry flour visible, but the dough should be firm and not overly wet. Use the image as a guide. Now add a teaspoon of olive oil to the bowl and turn the dough around in it to coat.

Cover the dough (I place the whole thing in a large reusable polythene bag) and leave to ferment overnight. If the room is warm, you can do the fermentation in the fridge. Alternatively, leave at room temperature for a few hours then put in the fridge overnight.
THE NEXT DAY
In the morning, don’t be surprised if the dough has spread out as much as it’s risen. This is normal with wetter doughs. It should be quite bubbly underneath. If it’s been in the fridge, allow to come to room temperature before proceeding.

SHAPE THE BAGUETES
Dust a little semolina flour over your work surface, ideally covered with a silicone mat, and transfer the dough onto it. Fold the dough over itself several times until smooth. Add more semolina flour if needed to prevent sticking but try to use as little as possible.

Use your scales to divide the dough into six equal pieces then shape each into a ball. Now roll each ball back and forth into a smooth baguette shape approximately 18 cm long. As you shape each one, transfer to a board (or divide between two boards) that you’ve lined with baking paper and sprinkled with a little semolina flour.
SECOND PROVE
You now need to cover again and put somewhere warm for the second rise or prove. Depending on temperature, this should take 30 – 45 minutes. But the best way to check whether they’re ready to bake is to gently insert a finger. Does the dough quickly or slowly spring back? If it springs back slowly and an impression is left by your finger, the dough is ready. If it springs back immediately and doesn’t leave an impression, prove for longer then check again.
Towards the end of the proving time, you should preheat your oven to the temperature shown in the recipe card. Have a shelf in the middle position and put a baking tray on it to preheat too. If your tray isn’t big enough to cook all the baguettes at once (mine isn’t) then you can bake in two batches.
I highly recommend you also put a deep metal roasting tray in the lowest position to heat up. When the baguettes go in, you can pour cold water into this to create steam. This delays a crust forming so your bread can rise for longer. Important: DO NOT USE A GLASS dish as it could shatter when the cold water goes in.
ADDING THE TOPPING & BAKING
When you’re ready to bake, brush beaten egg over the baguettes and sprinkle with sesame seeds. Remove the preheated baking tray from the oven and lift or slide the baguettes, still on their paper, onto it. If you’re cooking in batches, don’t put the topping on the second batch yet but do leave them somewhere cool so they don’t overprove.

Put the tray back on the middle shelf of the oven and pour cold water from a jug into the roasting tin below. Immediately close the door and bake for 18 minutes. After this time has elapsed, reduce the temperature to that shown in the recipe card, take the baguettes off the tray and return them to sit directly on the oven shelf.

Bake for a further 2 – 4 minutes or until they sound hollow when tapped. Place the baguettes on a wire rack to cool before eating or storing.
SERVING & STORING SEMOLINA BAGUETTES
Although it was a classic Sicilian sandwich that started my interest in semolina bread, these easy but lovely Semolina Baguettes will work with almost any filling you can think of. Cooked or cured meats, tuna, egg, hummus, prawns, sausage, BLT, roasted veg, good old cheese and tomato: you name it!

When they’ve cooled a while, like all breads, the crust on these won’t be as crispy. But the tasty, chewy bread is hugely satisfying. Cut into chunks or sliced, the baguettes are also perfect for serving alongside soups, stews, and salads.
While they’re best eaten within two days, Semolina Baguettes can be refreshed by spritzing with water and heating in a low oven or air fryer. They also freeze very well so I often have a few tucked away ready for quick and tasty lunches or as an accompaniment.

If you’ve made Semolina Baguettes, I’d love to know what you thought. Please do leave a comment and rating.


Semolina Baguettes
Inspired by the famous breads of Sicily made with semolina flour these flavoursome rolls with a chewy crumb and sesame-topped crust are perfect with your favourite fillings or the Sicilian classic of tomatoes, oregano, anchovies, and cheese.
Instructions are for an overnight, no-knead method: for same-day kneaded baguettes see Recipe Note 2.
Please read the accompanying blog post before starting the recipe and use digital scales and metric measurements.
Ingredients
- 675 g double-milled semolina flour (see Recipe Note 1) + extra for dusting
- 2 tsp salt
- 1.5 tsp (7 g) instant dry yeast (i.e. the sort that doesn't need activating before adding to the rest of the ingredients)
- 1 tbsp + 1 tsp olive oil
- 350 - 450 ml/g water (does NOT need to be warm)
For the topping
- 1 small egg, beaten (you won't need it all)
- white sesame seeds (for sprinkling)
Instructions
The night before baking
-
Put the semolina flour into a large mixing bowl along with the salt and instant yeast. Stir to combine.
Make a well in the middle and add 1 tbsp of the olive oil.
Add approximately 250 ml of water to the olive oil and stir to start bringing the ingredients together. Add more water, a little at a time, until a dough has formed: you may not need all the water, or you may need a little more. There should be no dry flour visible, but the dough should be firm and not sloppy.
Add 1 tsp of olive oil to the bowl and turn the dough in it so it's coated.
Cover the dough or place the whole thing in a large reusable polythene bag and leave to ferment at room temperature overnight.
Tip: If you want to slow fermentation down (e.g. if the room is warm or it's more convenient) do the fermentation in the fridge or leave at room temperature for a few hours then put in the fridge overnight.
On the day of baking
-
The dough should have risen, spread out and be bubbly underneath. If not, leave a little longer. If it's been in the fridge, allow to come to room temperature before proceeding.
-
Dust a little semolina flour over your work surface, ideally covered with a silicone mat, and transfer the dough onto it. Fold over itself several times until smooth: add more semolina flour if needed to prevent sticking but try to use as little as possible.
-
Divide the dough into 6 pieces, using digital scales for accuracy, then shape each one into a ball. Now roll each ball back and forth into a smooth baguette shape approximately 18 cm long.
As each baguette is shaped, transfer to a board lined with baking paper and sprinkled with a little semolina flour. Tip: you may find it easier to move the baguettes later if you divide the baguettes between two boards.
Put the board/s in a large polythene bag or cover with oiled cling film or a wet tea towel. Set aside to prove somewhere warm for 30-45 minutes or until, when you press with a finger, the dough springs back slowly, leaving an impression. If the dough immediately springs back, leave longer.
Complete the next step while the baguettes are proving.
-
While the baguettes are proving
Preheat your oven to 240°C / 220° Fan / Gas 9 / 475° F with a shelf in the middle position. Place a large baking tray on it: if it can't fit all the baguettes, cook in batches.
Optional but recommended: place another shelf in the lowest position and put a deep metal roasting tin on it to preheat. Later, you will pour in cold water to create steam and help the bread rise. DO NOT USE GLASS: it could shatter when the cold water goes in.
-
When ready to bake, brush beaten egg all over the tops of the baguettes then sprinkle with sesame seeds.
Tip: If cooking in batches, don't top the second batch yet but put them somewhere cool so they don't overprove.
-
Remove the preheated baking tray from the oven and lift or slide the baguettes, still on their paper, onto the tray.
Put the tray back on the middle shelf and pour cold water from a jug into the hot roasting tin below. Immediately close the door and bake for 18 minutes.
-
After 18 minutes, reduce the temperature to 220°C / 200° Fan / Gas 7 / 425° F and remove the baking tray with baguettes.
Take the baguettes off the tray then return them to sit directly on the oven shelf.
Bake for another 2 - 4 minutes or until they sound hollow when tapped.
Tip: if baking a second batch, empty the deep tin of any water and put back in to stay hot, along with the baking tray.
-
Place the baguettes on a wire rack to cool before eating or storing.
Best eaten within 2 days or can be frozen. Can be refreshed by spritzing with water and heating in a low oven.
Recipe Notes
Note 1: Semolina Flour. For this recipe you will need semolina flour that has been double- or re-milled so that it is finer than regular semolina. Look out for products labelled semola remacinata ('remilled semolina') in Italian. Recommended (affiliate links): 1kg bags here or buy in bulk to save money 6 x 1kg bags here.
Note 2: Same day, kneaded version. Follow the recipe except use lukewarm water (no more than 38 degrees C) to make the dough and use less of it. You may wish to add a teaspoon of sugar or honey to help feed the yeast during the shorter fermentation. The dough should not have any dry flour visible but not be too wet or you won't be able to knead it. Knead for 8 - 10 minutes, or until smooth and elastic, before leaving to ferment in a warm place for 1 - 2 hours or almost doubled in size. Proceed with the recipe.
MORE BREAD RECIPES