Seeded Malthouse Loaf (no-knead recipe)
Seeded Malthouse Loaf is a healthy, everyday bread with nutty flavour thanks to the inclusion of malted flour plus a generous amount of nutritious seeds. Great for sandwiches and toast or eaten with soups and salads.

For a light malthouse loaf you can swap in half white bread flour. Want a heartier bread? Replace half with wholemeal. I love Seeded Malthouse Loaf as an easy no-knead, overnight bread baked in a lidded pot/Dutch oven or loaf tin. But I’ve also included instructions for a same-day kneaded loaf. So many options to make this wonderful bread!

Disclosure: this post might contain affiliate links. Buy via these and I may earn a small commission at no extra cost to you.
Jump to Recipe
BREAD ENVY
Growing up in the 1970s and 80s, like most families we knew, ours only ate white bread. But I remember the first time I had ‘bread envy’.
I was eating my school packed lunch. As usual, it was white bread sandwiches with something simple like cheese. Those of a well-to-do friend though were made with what I now know was malthouse bread: lightly golden and speckled with dark brown intriguing little bits. Inside, as well as cheese, was a huge pile of fresh wavy-leafed lettuce plus sliced juicy tomatoes. Unlike my lunch, I imagined it must taste wonderfully satisfying.

The fact that I can still vividly recall that sandwich over forty years later should tell you just how great an impression it made on me. So, when I grew to love cooking, it’s not surprising that the desire for wonderful bread became a big part of it. And that includes home baked Seeded Malthouse Loaf.

WHAT IS MALTHOUSE BREAD?
Malthouse or malted breads have a richer, more complex flavour thanks to the inclusion of malted flour. Malt is made from soaked and sprouted grains that are then roasted and ground. This gives breads a fuller taste and aroma that are almost nutty. The crumb also takes on a lovely golden colour.
It’s sometimes assumed that malted or malthouse loaves are wholemeal. But that isn’t the case. They’re often made with a combination of white, brown, or wholemeal flours, sometimes with others such as rye added too. The lightest breads usually contain more white than wholemeal flours, and some contain extra ingredients like malted flakes, malted grains, or seeds.

For a simple homemade malthouse bread, start with one of the malted bread flour blends now widely available. These already have malt added to them, and I talk about some of them below. All can be used singly straight from the pack or, as I do, mixed with other flours and add-ins to make a range of different malted loaves.
HOMEMADE SEEDED MALTHOUSE LOAF
In this post, I’ll show you how to make 3 different malthouse loaves from the same easy recipe.
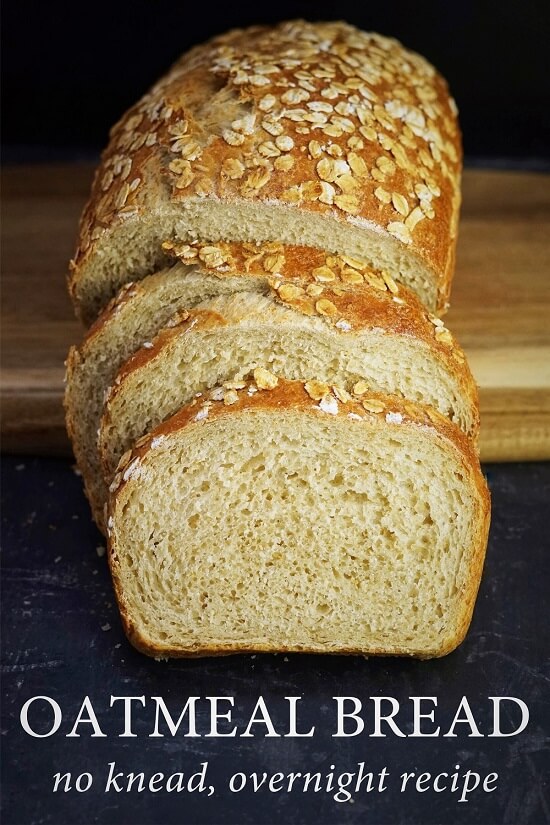
- Seeded Malthouse Loaf. Tasty, simple bread made with all malthouse bread flour plus mixed seeds.
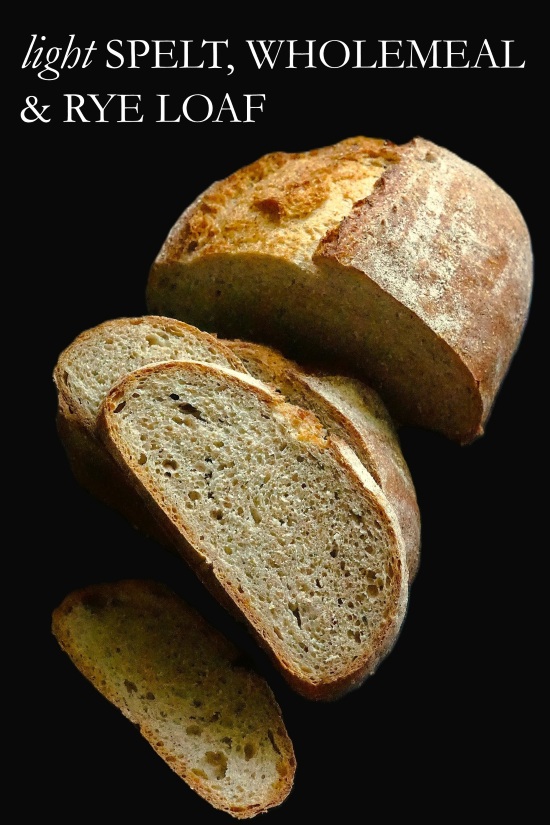
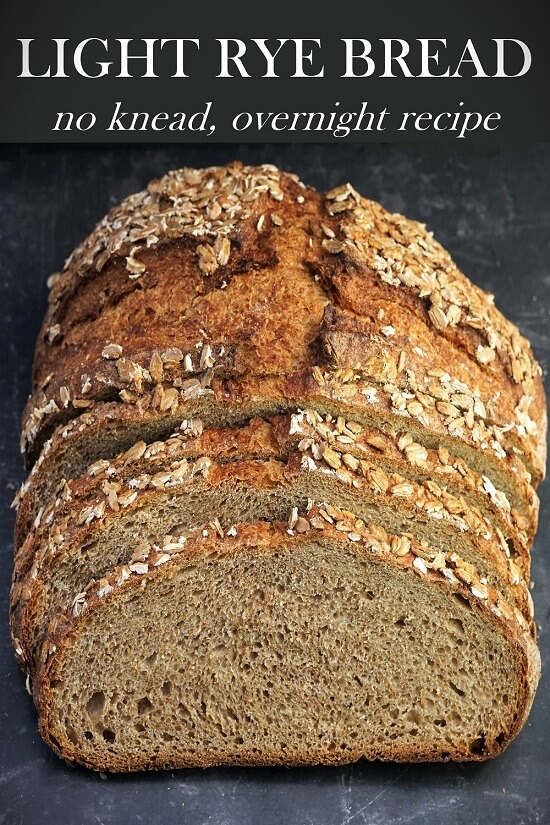
- Seeded Light Malthouse Loaf. Made with half malthouse bread flour and half white bread flour for a lighter bread plus mixed seeds.
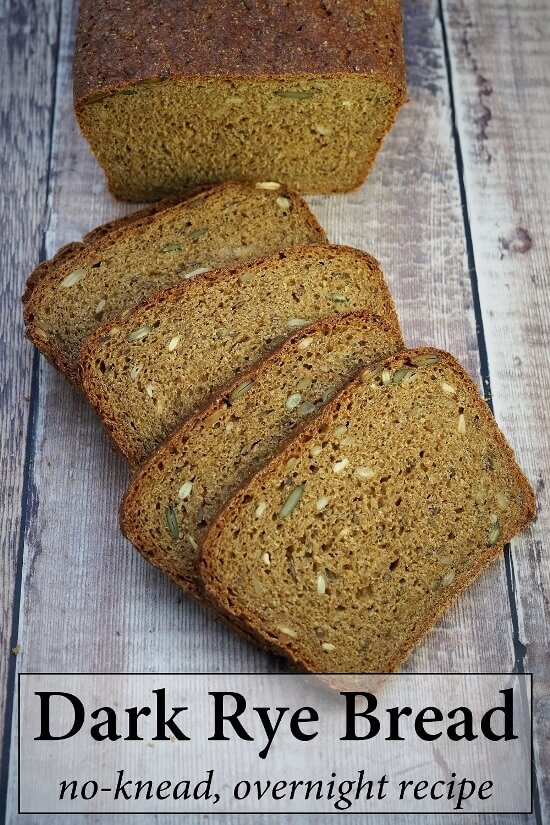
- Seeded Wholemeal Malthouse Loaf. Made with half malthouse bread flour and half wholemeal bread flour for extra fibre and nutrition plus mixed seeds.

All are delicious and make wonderful sandwiches and toast. They’re lovely alongside soup, stews, or salads too.
First, let’s talk about the types of malted or malthouse flour blends available.
MALTHOUSE FLOURS
There are several malted bread flour blends on the market to choose from. Look out for malted, malthouse plus less obvious words often suggesting something rustic e.g. country. Although people often use the word granary to mean malted, that’s actually a trademark of the Rank Hovis company. Different brands will have different flavours and varying amounts of malted ingredients. So check the label and maybe try a few different ones to see which you like best.
Below are affiliate links to the two brands I regularly use.
Dove’s Farm Malthouse Bread Flour. This is the one I use most often. It’s widely available, including in supermarkets, and is an excellent quality organic blend. As well as wheat flour it contains malted wheat flakes, rye flour and barley malt flour.
Marriage’s Country Fayre Malted Brown Bread Flour. A very high quality, organic flour with superb malty flavour. Contains wheat flour, malted wheat grains, wheat bran, and barley malt flour. Not as widely available as Dove’s but can also be bought online.
Other highly regarded blends include Marriage’s Moulsham Strong Malted Seeded Bread Flour which contains oats plus five types of seed, and Cotswold Crunch from Matthews Cotswold Flour.
HOW TO MAKE SEEDED MALTHOUSE LOAF
You’ll find a recipe card at the end with ingredient amounts and full instructions. However, I strongly recommend you read the whole of this post first for extra tips and step-by-step images to guide you.

For the best results use digital scales and metric measurements. For this and many other baking projects I also recommend you cover your work surface with a silicone mat. This reduces sticking and makes clean-up easier too. A dough scraper (often included with the silicone mat I’ve linked to) is also useful.
NO KNEAD BREAD
I make Seeded Malthouse Loaf as an easy no-knead bread, mixing up the simple dough and leaving overnight to ferment and deepen the flavours. Making the dough wetter than usual, plus a longer fermentation, develops the gluten which is normally achieved through kneading.
For those who’d prefer a same-day kneaded Seeded Malthouse Loaf, you’ll find a guide in the notes to the recipe card.
A CHOICE OF BAKING METHODS
I most often bake my Seeded Malthouse Loaf in a lidded heavy pot/Dutch oven. This traps steam which allows bread to rise for longer as forming of a crust is delayed. But when I want a sandwich loaf, I bake it in a 900g/2lb loaf tin. As we’ll see, even with a loaf tin you can still get the benefits of a steamy oven by placing a tray of water on the bottom shelf. I give instructions for both methods here in the blog post and in the recipe card.
INGREDIENTS FOR SEEDED MALTHOUSE LOAF
Besides malted bread flour, plus optional white or wholemeal bread flour if using, the other ingredients you’ll need are:
- Mixed seeds. I’ve used sunflower, pumpkin, flax, black and white sesame seeds, but almost any others can be swapped in.
- Salt. Important for the structure of bread as well as flavour.
- Instant dry yeast. The type that doesn’t need activating before adding to the rest of the ingredients.
- Water. Plain tap water is fine. For overnight breads it doesn’t need to be warm.

MAKING THE DOUGH
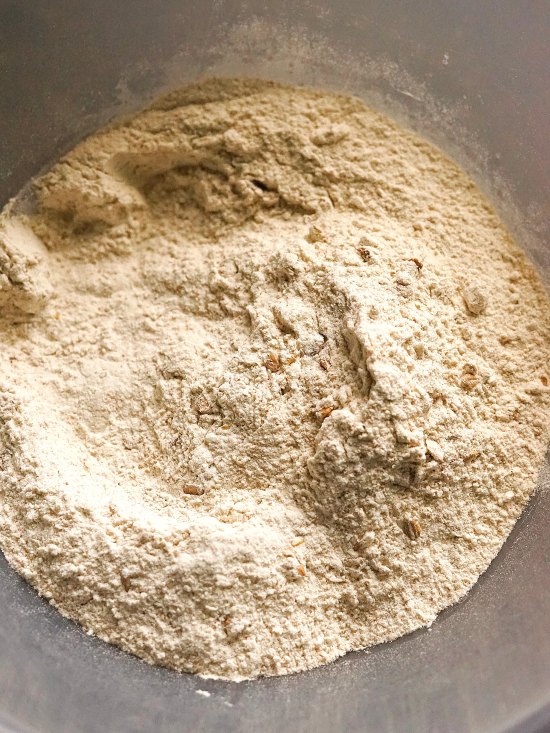
The evening before you want to bake the bread, put the malthouse flour (plus the white or wholemeal if using) in a large mixing bowl along with the seeds, salt, and instant yeast, then stir together. Add approximately 250 ml of water and stir to start bringing things together.

Gradually add more water to create a wettish but still firm rather than sloppy dough. Different flours will absorb varying amounts of liquid, so use the image below as a guide to what the dough should look like.

FERMENT OVERNIGHT
Now cover the bowl or place the whole thing in a large reusable polythene bag. Leave overnight to ferment at normal room temperature. If the room is particularly warm, you can put the dough in the fridge. This is also useful if you just want to slow things down, for example if you plan to bake the bread later the next day rather than in the morning. For extra flavour, you can even ferment in the fridge for up to 24 hours.
THE NEXT DAY
In the morning, the dough will have spread out as well as risen. This is perfectly normal with wetter doughs. If it doesn’t seem very lively (but note that much of the activity will be taking place underneath), leave a little longer. And if it’s been in the fridge, allow to come to room temperature before continuing.

Lightly flour your work surface, ideally covered with a silicone mat, and scrape the dough onto it. Hopefully, you should see underneath the network of gluten strands. Fold the dough over itself several times until smooth.
SECOND RISE OR PROVE
Before baking, the dough needs a second rise or prove. Ideally, this should be done somewhere warm. I place it in my cold microwave with a thick mug or jug containing boiled water. This creates a nice cosy space. Alternatives are the microwave warmed for a minute or so then switched off, or a small top oven briefly warmed then switched off.
If you’re going to bake Seeded Malthouse Loaf in a lidded pot or Dutch oven, fold and shape the dough to fit your lined, floured banneton or chosen proving vessel. If you’ll be baking in a loaf tin, shape it to that then put in the buttered and floured tin. Either way, cover or place back in the bag, then pop into the warm spot.

Depending on the temperature, the second rise could take 40 – 50 minutes for the dough to almost double in size. But the best way to check whether the dough is ready is to gently insert a finger. Does the dough quickly or slowly spring back? If it springs back slowly and an impression is left by your finger (as seen in the right-hand photo above), then the dough is ready. If it springs back immediately and doesn’t leave an impression, prove for longer, then check again.
During the second rise you should also preheat your oven to the temperature shown in the recipe card and with a shelf in the middle position.
- If baking in a pot/Dutch oven: place the pot (with lid on) on the middle shelf to preheat.
- If baking in a loaf tin: Put a deepish metal roasting tin (NOT glass: it could shatter) on the lowest shelf to preheat. Later, when you put in the Seeded Malthouse Loaf, you’ll pour cold water into the hot tin to create steam.
BAKING SEEDED MALTHOUSE LOAF
In a pot/Dutch oven
When ready to bake, remove the pot from the oven and take off the lid. Carefully flip the dough into the pot so the rounded side is now facing UP. Use a baker’s blade or sharp knife to slash the dough then put the lid on. Place in the oven and bake for 35 minutes.
After 35 minutes, reduce the temperature to that shown in the recipe card. Remove the pot from the oven, tip the bread out of it, then return the loaf to sit directly on the oven shelf. Bake for a further 10 – 12 minutes or until the loaf sounds hollow when you tap it underneath. Place on a wire rack until completely cold.

In a loaf tin
Transfer the loaf tin to the middle shelf of the oven. Straight away pour cold water into the preheated tin on the bottom shelf and immediately close the door. Bake for 30 minutes without opening the door.
After 30 minutes carefully open the oven door: keep your hands and face out of the way in case there’s any steam left that could rush out. Discard the bottom tray. Tip the bread out of its tin then return the loaf to the oven, placing it directly on the shelf. Bake for another 10 – 15 minutes or until the loaf sounds hollow when you tap it underneath. Place on a wire rack until completely cold.

EASY AND TASTY EVERYDAY SEEDED MALTHOUSE LOAF
If you want an easy everyday homemade loaf that’s more interesting than standard white, brown, or wholemeal bread, I think Seeded Malthouse Loaf is a great choice. Perfect for sandwiches and crunchy toast with sweet or savoury fillings and toppings, but also lovely alongside soups, stews, and salads.

Whether you go for the all malted flour version, make it lighter with half white bread flour, or add nutrition and fibre with wholemeal bread flour, you’ll get a great loaf with nutty flavour thanks to the inclusion of malted flour plus plenty of healthy seeds.

The bread should keep well for 3 days. Being a household of just two, I usually freeze it on the second day, slicing first so I can take out exactly the amount I need with no waste.
If you’ve made this recipe, I’d love to know what you thought. Please do leave a comment and rating.

Seeded Malthouse Loaf
A healthy, everyday bread with nutty flavour thanks to the inclusion of malted flour plus a generous amount of nutritious seeds. Great for sandwiches and toast or eaten with soups and salads.
Make as an easy no-knead, overnight bread baked in a lidded pot/Dutch oven or 900 ml/2 lb loaf tin. See Recipe Notes below for a same-day kneaded loaf.
For the best results use metric measurements and read the accompanying blog post before starting.
Ingredients
- 650 g malthouse bread flour (See Recipe Notes including variations for lighter and wholemeal versions)
- 100 g mixed seeds e.g. pumpkin, sunflower, flax, sesame, poppy
- 15 g (2½ tsp) salt
- 7 g (1½ tsp) instant dried yeast (i.e. the type that does not need activating before adding to the rest of the ingredients)
- 350 - 500 g/ml water (see instructions for guidance)
Instructions
The day before baking
-
Put the flour, seeds, salt and instant yeast in a large bowl and stir.
Pour in approximately 250 ml of water and stir to start bringing the ingredients together.
Gradually add more water, stirring as you go, until a dough has formed: you may not need all the water or you may need a little more. There should be no dry flour visible, but the dough should be firm and not sloppy: see image in blog post for how the dough should look.
Cover the dough or place the bowl in a large reusable polythene bag and leave to ferment at room temperature overnight.
Tip: If the room is warm, or if you'd like a longer rise for convenience or to allow more flavour to develop, you can put the dough in the fridge for up to 24 hours. Bring the dough back up to room temperature before proceeding with the recipe.
On the day of baking
-
The dough should have risen, spread out and be bubbly underneath. If not, leave a little longer. If it's been in the fridge, allow to come to room temperature before proceeding.
-
Lightly flour a work surface, ideally covered with a silicone mat, and scrape the dough onto it.
Fold the dough over itself several times until smooth. Try not to add much more flour, only just enough to prevent sticking to the work surface.
If baking in a lidded pot/Dutch oven
- Fold and shape the dough to fit a lined and floured banneton or other proving vessel.
- Place the dough into the banneton with the rounded side facing DOWN.
If baking in a loaf tin
- Grease a 900ml / 2lb loaf tin with butter then sprinkle with flour.
- Fold and shape the dough to fit the tin and place it inside with the rounded side facing UP.
-
Cover or place back in the polythene bag. Set aside somewhere warm until doubled in size (approx. 40 - 50 minutes). Complete the next step while this is happening.
-
While the dough is proving
Preheat the oven with shelf in the middle.
- For pot/Dutch oven: 240°C / 220° Fan / Gas 9 / 475° F with the pot (lid on) on the middle shelf.
- For loaf tin: 220°C / 200°Fan /Gas 7 / 425°F. Optional: put a deep METAL roasting tin on the bottom shelf. This will later be filled with cold water to create steam and help the bread rise. DO NOT USE GLASS or it could shatter.
-
Check that the dough is ready to bake
If, when a finger is gently poked into the dough, it slowly springs back but leaves a slight indentation then it is ready to bake.
If the dough springs back quickly then it's not yet fully proofed: leave another 5 -10 minutes and check again.
-
Bake the bread
Pot/Dutch oven
- Remove the pot from the oven and take off the lid. Carefully flip the dough into the pot so the rounded side is now facing UP.
- Use a baker's blade or sharp knife to slash the dough, put the lid back on and place in the oven. Bake for 35 minutes.
- After 35 minutes, reduce the heat to 220° C / 200° Fan / Gas 7 / 425°F.
Remove the pot from the oven, tip the bread out of it, then return the loaf to sit directly on the oven shelf.
Bake for a further 10 - 12 minutes or until the bread sounds hollow when tapped underneath.
Loaf tin
- Place the loaf tin on the middle shelf and straight away pour cold water from a jug into the hot roasting tin on the bottom shelf. Immediately close the door. Bake for 30 minutes without opening the door.
- After 30 minutes carefully open the oven door (caution: lots of hot steam may billow out so keep your face, hands etc. out of the way) and remove the tin of water.
Take the loaf out of its tin and place back in the oven directly on the middle shelf. Cook for another 10 - 15 minutes or until the bread sounds hollow when tapped underneath.
-
Place on a wire rack until completely cold before slicing.
Best eaten within 3 days or frozen.
Tip: slice before freezing so you can take out just as much as you need without waste.
Recipe Notes
Malthouse or malted flour. This is flour which has malt added to it and gives a lovely flavoured bread with a golden colour. Various malthouse bread flour blends are available to buy: read more in the blog post including ones I recommend.
- Seeded Malthouse Loaf is made with all malthouse bread flour.
- For a Light Malthouse Loaf, replace half the malthouse flour with white bread flour.
- For a Wholemeal Malthouse Loaf, replace half the malthouse flour with wholemeal bread flour.
Same-day kneaded loaf. The instructions and blog post give instructions for making the bread as an overnight, no-kneaded loaf. However, if you'd prefer a same-day kneaded loaf then follow steps 1 - 3 of the instructions for Simple Wholemeal Bread. Use the same ingredients as for Seeded Malthouse Loaf plus add 1 tsp sugar with the salt and yeast and use warm water. Note that you should add less water or the dough will be too wet to knead. This loaf can also be baked in either a lidded pot/Dutch oven or a tin.
MORE BREAD RECIPES