Light Spelt, Wholemeal & Rye Loaf
Light Spelt, Wholemeal & Rye Loaf is a no-knead, flavourful and nutritious bread that avoids heaviness with a fifty-fifty blend of white and wholemeal flours. Almost as light as a one hundred per cent white loaf, but with the added nutty sweetness of wholemeal spelt, the goodness of strong wholemeal bread flour, plus a hint of tangy sourness from wholemeal rye flour, you could say it’s the best of both worlds.

Disclosure: this post contains affiliate links. If you buy via these, I may earn a small commission at no extra cost to you.
Jump to Recipe
If you’re looking for a homemade bread that tastes great, is light but nutritious, makes great toast, and suits any sandwich filling from healthy hummus and salad to comfort foods like bacon, sausage, or fish finger sarnies, I’ve just the thing.

Because you really can have the best of both worlds with my Light Spelt, Wholemeal & Rye Loaf. And there’s more good news. It’s made with an easy, no-knead method.
HOMEMADE 50/50 BREAD: THE BEST OF BOTH
You might have noticed a trend in commercially made breads for loaves called things like 50/50, Half & Half, Blend of Both, and Best of Both. These are made with equal amounts of white and wholemeal flours. The aim is to retain the lightness of a white bread while getting the additional fibre and nutrition of wholemeal bread. However, being mass-produced, these invariably contain the preservatives and emulsifiers which contribute to making them an ultra-processed food.

But making your own best of both or 50/50 bread isn’t difficult. And with my Light Spelt, Wholemeal & Rye Loaf you get even more flavour thanks to an especially tasty blend of wholemeal flours. Together, these make it a great versatile, everyday bread.
LIGHT SPELT, WHOLEMEAL & RYE LOAF
You’ll find ingredient amounts and full instructions in the recipe card at the end. But I recommend you read the whole of this post first for extra tips and step-by-step images to guide you

INGREDIENTS
Alongside the strong white bread flour that makes up half of this bread, there are 3 types of wholemeal flour.
- Wholemeal spelt flour. Spelt is an ancient type of wheat that adds nuttiness and a little sweetness.
- Strong wholemeal bread flour. Made from the whole wheat grain, rich in flavour and fibre.
- Wholemeal rye flour. Another ancient grain, just a little adds a hint of dark, tangy sourness.
The only other ingredients you’ll need are:
- Salt. Important for the structure of bread as well as flavour.
- Instant dry yeast. The type that doesn’t need activating before adding to the rest of the ingredients.
- Warm water. See recipe card for details of how warm.
EQUIPMENT
You have 2 choices of baking method for my Light Spelt, Wholemeal & Rye Loaf. I give instructions for both methods here in the blog post and in the recipe card.
I bake it in a lidded heavy pot/Dutch oven. This traps steam which allows bread to rise for longer as forming of a crust is delayed.
But you can also bake it in a 900g/2lb loaf tin. As we’ll see, even with a loaf tin you can still get the benefits of a steamy oven by placing a tray of water on the bottom shelf.
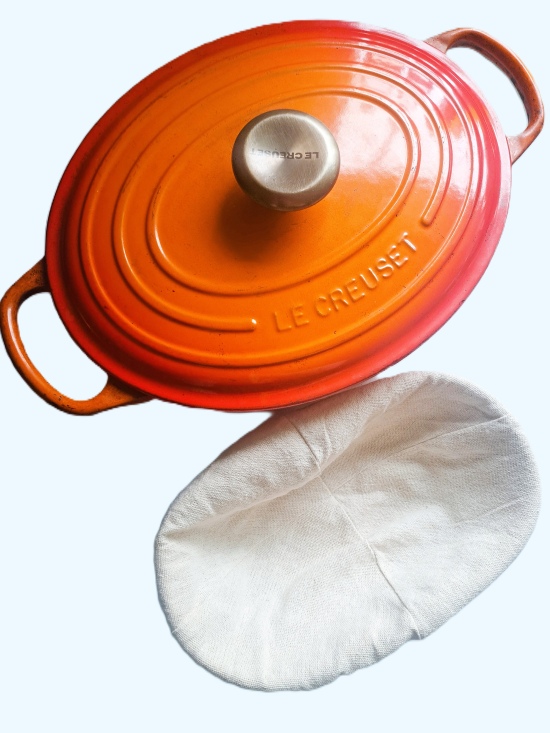
- If baking in a lidded pot, you’ll also need a cloth-lined proving vessel. If you don’t have a banneton like mine, use a suitably sized bowl.
- If baking in a tin, the prove takes place in there so you won’t need anything extra.
- I DON’T recommend baking this bread on a tray. Loaves which include spelt flour are best baked with the support of a pot or tin.
For the best results use digital scales and metric measurements.
Optional equipment
There are two additional items I recommend for bread and all kinds of baking. However, you can certainly still make this great loaf without them.
- Silicone mat. Cover your work surface with one of these to reduce sticking and the need for extra flour. They also make clean-up easier.
- Dough scraper. Useful for removing doughs from bowls, for folding, cutting and shaping. Note that you often get one free with the silicone mat I’ve linked to but do check the current listing.
SAME-DAY NO-KNEAD LIGHT SPELT, WHOLEMEAL & RYE LOAF
Like most of my breads, I make Light Spelt, Wholemeal & Rye Loaf using a no-knead method. Having a wetter dough and a longer fermentation (sometimes called first proof or prove) replaces the kneading of conventional bread making. Together, these promote the development of gluten which is normally achieved by kneading. And it’s gluten that gives bread its rise and structure.

However, while I most often ferment no-knead breads overnight , the inclusion of spelt flour means the longer fermentation can be reduced. That’s because spelt doughs rise more quickly, so the second proof is shorter too.
So, if you start my Light Spelt, Wholemeal & Rye Loaf in the morning, it can be baked and cooling by lunch time. For example, I started mixing the dough for the bread you see in this post at 9.45 am and it was out of the oven at 1.35 pm. Which isn’t much longer than for a kneaded loaf.
HOW TO MAKE LIGHT SPELT, WHOLEMEAL & RYE LOAF
As mentioned, you’ll find ingredient amounts and full instructions in the recipe card at the end. But do read on and look at the images first to get an overview. I’ve given quite detailed instructions so it may appear long. However, after you’ve made this wonderful bread just once, I think you’ll find it fairly easy.
MAKE THE DOUGH
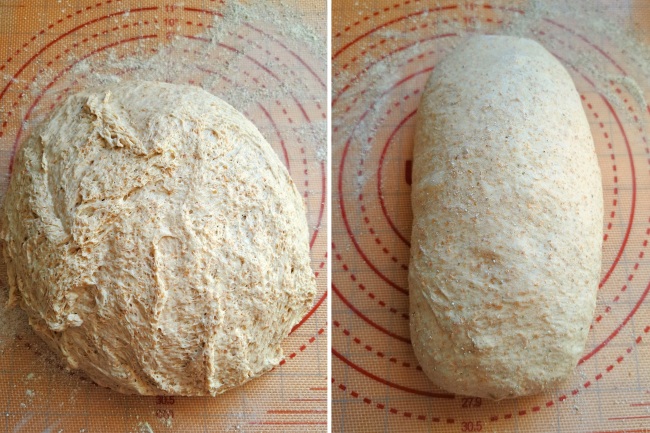
Put all the flours in a large mixing bowl along with salt and instant yeast, then stir together. Add approximately 250 ml of warm water and stir to start bringing things together. Gradually add more water to create a wettish but still firm rather than sloppy dough. Different flours will absorb varying amounts of liquid, so use the bottom left image below as a guide to what the dough should look like.

Now cover the bowl or place the whole thing in a large reusable polythene bag. Leave to ferment at normal room temperature until it’s almost doubled and is bubbly looking (above, bottom right). This might take between 1 – 1½ hours but will vary depending on room temperature.
STRETCH & FOLD
When that stage is reached, we give the dough a few stretches and folds while it’s still in the bowl. This helps develop structure without knocking the air out. All you do, with lightly wet hands, is lift up and stretch the top edge (I think of it as ‘north’) then fold it into the middle. Repeat with the ‘east’, ‘south’ and ‘west’ sides, then repeat twice more.
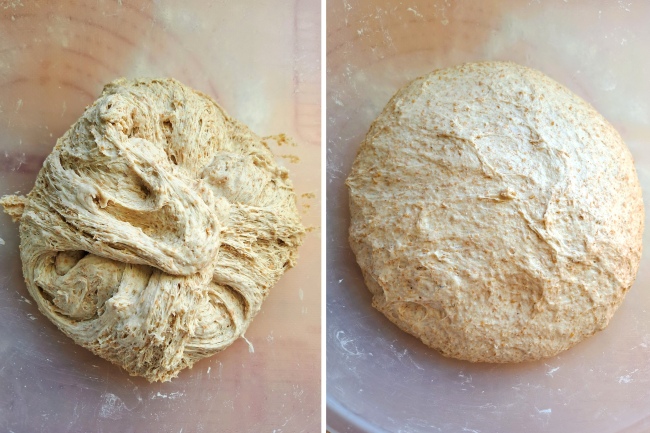
Turn over so the smooth side is now facing up, and you should have a plump, relatively round piece of dough. Cover again or place back in the bag, and leave until risen and puffy again, like the photo above right. This will probably take up to an hour, depending on room temperature.
PREP & PREHEAT
Because the spelt included in Light Spelt, Wholemeal & Rye Loaf can really hurry things along, I recommend you preheat your oven and do any other prep immediately after doing the stretches and folds. This is because spelt has a more delicate gluten structure than regular wheat. Over ferment or overproof and the gluten could break down. The result could be a dough that slackens and spreads rather than getting a nice oven spring.
Preheat your oven to the temperature shown in the recipe card. Note that it’s different depending on whether you’re going to be baking in a lidded pot or a loaf tin. If using a pot, preheat it too and with its lid on. If using a tin, don’t preheat it, but do put a deep METAL roasting tin on the bottom shelf. Later, you will tip in cold water to create steam and help the bread rise. DO NOT USE GLASS or it could shatter.
SHAPE THE DOUGH
When the dough is puffy again, lightly flour your work surface, ideally covered with a silicone mat, and scrape the dough onto it. Now gently fold the dough just until it fits the shape either of your floured banneton/other proving vessel or loaf tin. The aim is to avoid knocking out any of the air.
Place the dough in a banneton rounded side up, or in a tin rounded side down.
PROVE & TEST
The shaped dough now has its final prove. This is likely to be quite short, and I recommend checking after 10 minutes. The way to test whether any dough is ready for baking is to gently poke a finger in it. Does the dough spring back almost straight away? If so, leave a few minutes longer then check again. When the dough slowly springs back but leaves a slight indentation it’s ready to bake.
For the Light Spelt, Wholemeal & Rye Loaf you see in this post, the final prove was just 20 minutes. Yours might be even shorter, so you can see why it’s important to have your oven preheated and ready.
BAKING LIGHT SPELT, WHOLEMEAL & RYE LOAF
In a pot/Dutch oven
When ready to bake, remove the pot from the oven and take off the lid. Carefully flip the dough into the pot so the rounded side is now facing UP. Use a baker’s blade or sharp knife to slash the dough then put the lid on. Place in the oven and bake for 35 minutes.

After 35 minutes, reduce the temperature to that shown in the recipe card. Remove the pot from the oven, tip the bread out of it, then return the loaf to sit directly on the oven shelf. Bake for a further 10 – 12 minutes or until the loaf sounds hollow when you tap it underneath. Place on a wire rack until completely cold.
In a loaf tin
Transfer the loaf tin to the middle shelf of the oven. Straight away pour cold water into the preheated tin on the bottom shelf and immediately close the door. Bake for 30 minutes without opening the door.
After 30 minutes carefully open the oven door: keep your hands and face out of the way in case there’s any steam left that could rush out. Discard the bottom tray. Tip the bread out of its tin then return the loaf to the oven, placing it directly on the shelf. Bake for another 10 – 15 minutes or until the loaf sounds hollow when you tap it underneath. Place on a wire rack until completely cold.
BEST OF BOTH: NO-KNEAD LIGHT SPELT, WHOLEMEAL & RYE LOAF
Almost as light as a one hundred per cent white loaf, but with the added nutty sweetness of wholemeal spelt, the goodness of strong wholemeal bread flour, plus a hint of tangy sourness from wholemeal rye flour, you could say this bread is the best of both worlds. And I think it’s the blend of three wholemeal flours that make Light Spelt, Wholemeal & Rye Loaf particularly tasty.

The inclusion of spelt flour, which speeds up fermentation, also means you can have a no-knead loaf relatively quickly. Just remember to handle it gently and don’t let it overproof. The result is a light but nutritious loaf that’s the perfect everyday, versatile bread.
Great for toast as well as almost any sandwich filling you can think of, this homemade 50/50 bread should keep well for 3 days. Being a household of just two, I usually freeze it on the second day, slicing first so I can take out exactly the amount I need with no waste.

If you’ve made this recipe, I’d love to know what you thought. Please do leave a comment and rating.

Light Spelt, Wholemeal & Rye Loaf
A tasty no-knead nutritious bread that avoids heaviness with a fifty-fifty blend of white and wholemeal flours. Almost as light as a one hundred per cent white loaf, but with the added nutty sweetness of wholemeal spelt, the goodness of strong wholemeal bread flour, plus a hint of tangy sourness from wholemeal rye flour.
Bake in a lidded pot or loaf tin. Baking on a tray not recommended.
Please read the accompanying blog post before starting for extra tips and step-by-step images to guide you.
Ingredients
- 325 g strong white bread flour
- 165 g wholemeal spelt flour (plus extra for dusting)
- 130 g strong wholemeal flour
- 30 g wholemeal rye flour
- 15 g (2 tsp) salt
- 7 g (1.5 tsp) instant dry yeast (i.e. does not require activating before adding to the rest of the ingredients)
- 475 - 500 g/ml warm water (see Recipe Notes)
Instructions
-
Put all the flours in a large mixing bowl along with the salt and instant dry yeast. Stir to mix.
Make a well in the middle and pour in approximately 250 ml of the warm water. Stir to start bringing the mixture together.
Gradually add more water, stirring as you go, until a dough has formed: there should be no dry flour visible, but the dough should be firm and not sloppy: see image in blog post for how the dough should look.
Cover the dough or place the bowl in a large reusable polythene bag and leave to ferment at normal room temperature until almost doubled and bubbly looking (approximately 1 - 1½ hours but will vary depending on room temperature).
-
Stretch the dough
With slightly wet hands, stretch and fold the dough (still in its bowl) by lifting up the top edge (think of it as 'north') then folding it into the middle. Repeat with the 'east', 'south' and 'west' sides.
Repeat the process twice more to get a plump, relatively round piece of dough. Turn over so the smooth side is facing up.
Cover again or place back in the bag and leave until it's risen and puffy again (approximately 1 hour, depending on room temperature).
Complete the next step during this time.
-
While the dough is proving
Preheat the oven with a shelf in the middle.
- For lidded pot/Dutch oven: 240°C / 220° Fan / Gas 9 / 475° F with the pot (lid on) on the middle shelf.
- For loaf tin: 220°C / 200°Fan /Gas 7 / 425°F. Optional: put a deep METAL roasting tin on the bottom shelf. This will later be filled with cold water to create steam and help the bread rise. DO NOT USE GLASS or it could shatter.
-
When the dough is risen and puffy again: sprinkle some spelt flour over your work surface, ideally covered with a silicone mat to reduce sticking, and transfer the dough onto it.
-
If baking in a lidded pot/Dutch oven
- Gently fold and shape the dough to fit a lined and floured banneton or other proving vessel. Try not to knock any air out of the dough.
- Place the dough into the banneton with the rounded side facing DOWN.
If baking in a loaf tin
- Grease a 900ml / 2lb loaf tin with butter then sprinkle with flour.
- Gently fold and shape the dough to fit the tin, trying not to knock any air out of the dough, and place it inside with the rounded side facing UP.
-
Cover again or place back in the bag and leave at room temperature until, when a finger is gently poked into the dough, it slowly springs back but leaves a slight indentation then it is ready to bake.
Important: spelt doughs can rise very quickly so start checking after 10 minutes. If the dough springs back quickly then it's not yet fully proofed: leave another 2 - 3 minutes and check again.
DO NOT over proof or the dough may slacken or not rise in the oven.
-
Bake the bread
Pot/Dutch oven
- Remove the pot from the oven and take off the lid. Carefully flip the dough into the pot so the rounded side is now facing UP.
- Use a baker's blade or sharp knife to slash the dough, put the lid back on and place in the oven. Bake for 35 minutes.
- After 35 minutes, reduce the heat to 220° C / 200° Fan / Gas 7 / 425°F.
Remove the pot from the oven, tip the bread out of it, then return the loaf to sit directly on the oven shelf.
Bake for a further 10 - 12 minutes or until the bread sounds hollow when tapped underneath.
Loaf tin
- Place the loaf tin on the middle shelf and straight away pour cold water from a jug into the hot tin on the bottom shelf. Immediately close the door. Bake for 30 minutes without opening the door.
- After 30 minutes carefully open the oven door (caution: lots of hot steam may billow out so keep your face, hands etc. out of the way) and remove the tin of water.
Take the loaf out of its tin and place back in the oven directly on the middle shelf. Cook for another 10 - 15 minutes or until the bread sounds hollow when tapped underneath.
-
Place on a wire rack until completely cold before slicing.
Best eaten within 3 days or frozen.
Tip: slice before freezing so you can take out just as much as you need without waste.
Recipe Notes
Water temperature
If you have a food thermometer, use water at 38 degrees Centigrade. If you don't have one, the water should feel pleasantly warm if you put a finger in it, not hot which could kill the yeast. If in doubt, err on the side of cooler.
Amount of water to use
Different flours absorb varying amounts of water, so it isn't possible to say exactly how much you will need. I recommend making up a 500 g/ml jug of warm water and add gradually, using only as much as necessary to make a firm but not sloppy dough with no dry flour visible. Be guided by the image in the blog post.
MORE BREAD RECIPES