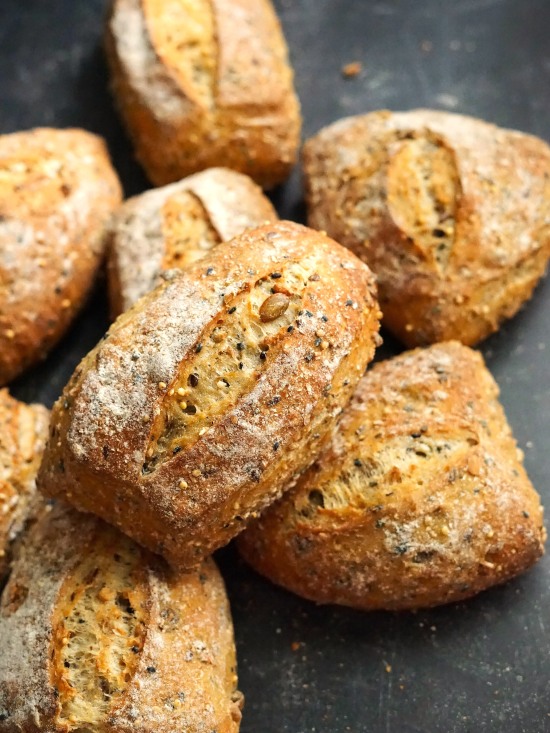
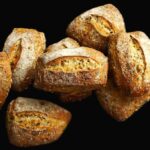
Seeded Rustic Bread Rolls
Seeded Rustic Bread Rolls are delicious and satisfying thanks to malted and wholemeal flours plus a generous amount of mixed seeds. But with the majority a strong white bread flour, these attractive rolls aren’t at all heavy.

With a simple no-knead dough that’s fermented overnight for great flavour, and minimal shaping for an attractive rustic appearance, you’ll be amazed at how easy it is to get wonderful artisan-style rolls.

Disclosure: this post may contain affiliate links. Buy via these and I may earn a small commission at no extra cost to you.
Jump to Recipe
RUSTIC BREAD ROLLS
Ever since my first batch, I’ve been making Seeded Rustic Bread Rolls pretty much every week. Perfect for a weekday lunchtime sandwich stuffed with plenty of filling (simple cheese and salad is a current favourite), one of these substantial, incredibly tasty rolls is just right for keeping me going until dinner time. They’re a variation on my Rustic Bread Rolls which I usually make with either all strong white bread flour or half fine Italian semolina.

But for weekday lunches I try to stick to bread with more wholegrain content. Often Multigrain Seeded Bread, Seeded Malthouse Loaf, or Simple Wholemeal Bread. There’s something about a chunky roll though, as opposed to a slice of bread, that’s incredibly appealing.
So, I decided to create a version of Rustic Bread Rolls with added brown and wholemeal flours plus lots of seeds for extra nutrition, flavour and crunchy texture.

The result was Seeded Rustic Bread Rolls. And, if you’ll forgive the lack of modesty, I think they’re wonderful!
SEEDED RUSTIC BREAD ROLLS
With a satisfying, chewy texture, full-on flavour, plus an enticing aroma before you’ve even taken a bite, I hope you’ll love Seeded Rustic Bread Rolls too. I think, with their charming irregular shapes (which is why I call them rustic), they look beautiful. They’re also incredibly easy. So, why wouldn’t you give them a go?
You’ll find full instructions and ingredient amounts in the recipe card at the end. But I recommend you read the whole of this post first for extra tips and step-by-step images to guide you.
NO-KNEAD, OVERNIGHT METHOD
Like most of my breads, I make these rolls using a no-knead, overnight method. Many years ago, I discovered that a wetter dough plus long fermentation (sometimes call first proof or prove) can replace the kneading of conventional bread making. Together, these promote the development of gluten which is normally achieved by kneading. And it’s gluten that gives bread its rise and structure.
So, I mix the dough in the evening then second prove and bake the next morning. But you can adapt this to suit you. For example, if you’ll be busy in the morning, slow down fermentation in the fridge. It will happily sit there until you’re ready to deal with it the next afternoon or evening.
INGREDIENTS
As well as a long fermentation, my Seeded Rustic Bread Rolls have great flavour and rise due to the combination of bread flours I use.
- White bread flour. Keeping most of the flour white ensures you get a lighter roll.
- Malted/granary bread flour. Malted bread flour blends have a rich, complex flavour that’s almost nutty. If you’re not familiar with malted flours you can read more, including which blends I use, in my Seeded Malthouse Loaf post.
- Wholemeal bread flour. While malted flour blends might be made with varying quantities of white, brown, or wholemeal flours, include one hundred per cent wholemeal flour in the dough and you know you’ll have some wholegrain in there. This doesn’t just improve the nutrition, e.g. more fibre, but gives a fuller flavour.

A generous amount of mixed seeds also increases the nutrition and flavour. I like their crunchy texture too. You can use almost any combination of seeds in whatever ratios you like. For the rolls you see in this post I used equal amounts of pumpkin, sunflower, flax, sesame (half black, half white), and millet.
The only other ingredients you’ll need are:
- Salt. Important for the structure of bread as well as flavour.
- Instant dry yeast. Choose the type that doesn’t need activating before adding to the rest of the ingredients.
- Water. Plain tap water is fine. For overnight breads it doesn’t need to be warm.
EQUIPMENT
Besides the usual kitchen equipment of mixing bowls, jugs, spoons, baking trays, digital scales etc. there’s two simple things I recommend for all kinds of baking. And they’re especially useful when working with wetter doughs. However, you can certainly still make Seeded Rustic Bread Rolls without them.
- Silicone mat. Cover your work surface with one of these to reduce sticking and the need for extra flour. They also make clean-up easier.
- Dough scraper. Useful for removing wet doughs from bowls, for folding, cutting and shaping. Note that you often get one free with the silicone mat I’ve linked to but do check the current listing.
HOW TO MAKE SEEDED RUSTIC BREAD ROLLS
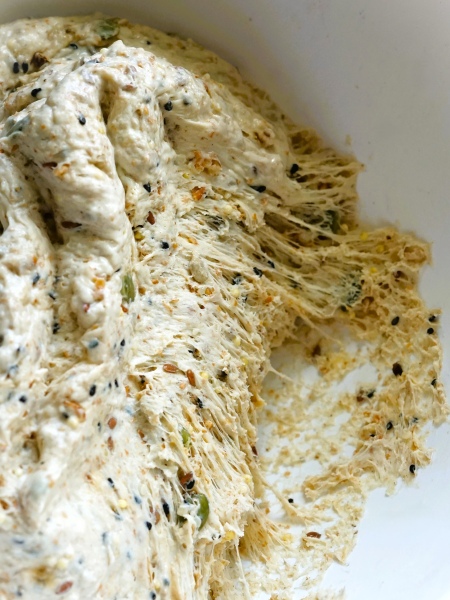
To make the dough, all you do is put the flours, mixed seeds, salt, and instant dry yeast into a large bowl and stir. Then pour in approximately 250 ml of water. Stir to start bringing a dough together then gradually add more water, stirring as you go to form a wettish but still firm rather than sloppy dough. As different flours absorb varying amounts of liquid, it’s not possible to be exact about how much water to add. Be guided by the image below as to what the dough should look like.

Cover the dough (I place the whole thing in a large reusable polythene bag) and leave to ferment overnight. As mentioned, you can extend the fermentation in the fridge. This is also useful if the room is warm. Or you can mix it up: leave at room temperature for a few hours then put in the fridge overnight.
THE NEXT DAY
In the morning, the dough should be very bubbly and have spread out as well as risen.

This is perfectly normal for wetter doughs. If it’s been in the fridge, allow to come to room temperature before continuing.
SHAPING
Next, scrape the dough onto your floured work surface (ideally first covered with a silicone mat). Fold the dough over itself a few times, adding more flour if necessary, until you have a smooth ball of dough. Cover the ball with the empty mixing bowl and leave to rest for a few minutes while you prep your baking tray(s). This will relax the dough and make it easier to form the rolls.

The breads will expand so, depending on your baking tray size you may need 1 or 2 to ensure there’s space between the rolls. Line the trays with baking paper then sprinkle in some wholemeal flour.
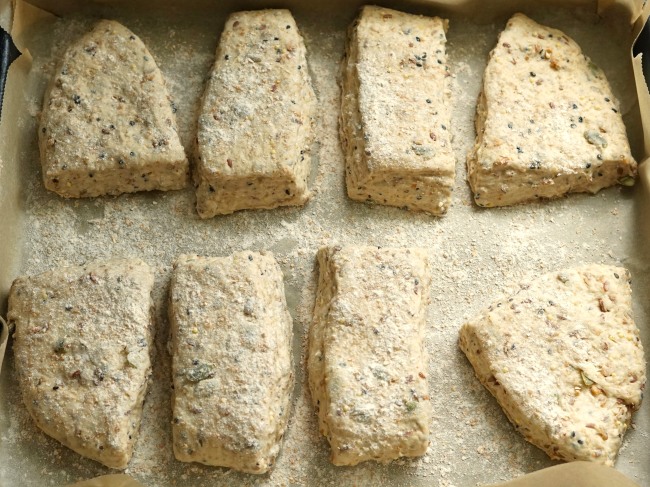
Now uncover the dough and pat into a rough rectangle 2 – 2.5 centimetres thick. Sprinkle more flour on top if it’s too sticky. If you find the dough springs back a lot, leave to rest a little longer then try again. Use your dough scraper or a knife to cut into 8 pieces.

Transfer to the prepared tray(s) and, if you want more uniform rolls, gently nudge them into neater rectangles. I like a dusting of flour over the tops, but you can leave off if preferred.
PROVING & BAKING
The rolls now need a second rise or prove. Exactly how long this takes will depend on room temperature. Place them somewhere warm and it’s likely to be around 30 – 45 minutes. The best way to test if they’re ready to bake is to gently push a floured finger into the dough. If it leaves an indent rather than immediately springing back, it’s ready. If not, leave for longer. When ready, I like to slash the top of each roll.

During the prove, preheat your oven to the temperature shown in the recipe card. Have a shelf in the middle position. I also take an extra step to get better ‘oven spring’. I put a deepish metal roasting tin (NOT glass: it could shatter) on the lowest shelf. As soon as you’ve put the Seeded Rustic Bread Rolls on the middle shelf, pour cold water into the hot tin below. This creates steam which delays the forming of a crust, allowing a longer rise.
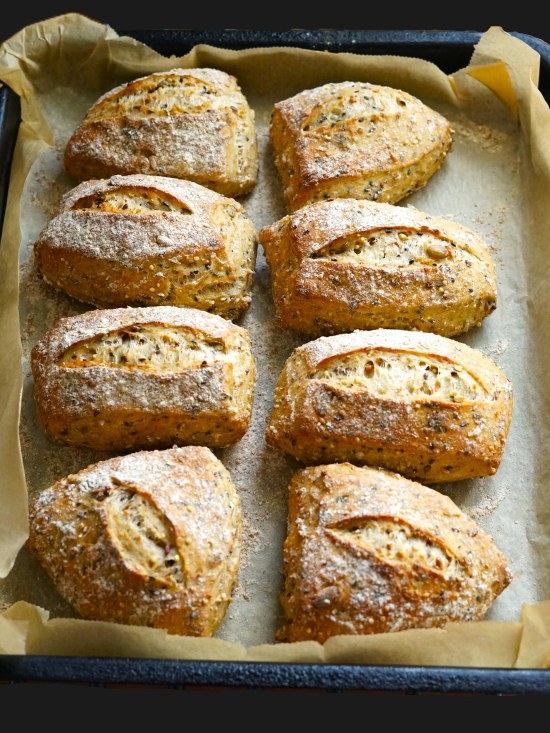
After 20 minutes, carefully open the door (keep your face and hands out of the way as lots of very hot steam may billow out) and take out the tray of rolls. Take the rolls off the tray and return them to the oven, this time sitting directly on the middle shelf. (If you’ve another batch to cook then pour out any water in the tin but put back in so it stays hot. If you’ve only one batch, the tray can be discarded).
Cook for a further 5 minutes or until the rolls are a rich brown colour and sound hollow when tapped underneath. Transfer to a wire rack to cool.
EASY & DELICIOUS SEEDED RUSTIC BREAD ROLLS
With very little hands-on time, I honestly think these are some of the nicest and easiest bread rolls I’ve made. And over the years I’ve made A LOT! They have a beautiful artisan look with their charmingly irregular shapes and craggy brown crust, speckled with seeds. The aroma, slightly sweet and nutty thanks to malted flour, is incredibly appetizing.

And they don’t disappoint on flavour either. Bite through the crust and you find a tasty, soft crumb. Wonderfully chewy and satisfying, Seeded Rustic Bread Rolls are perfect with your favourite sandwich fillings. Or eaten alongside salads and soups.

On the day of baking, the crust is wonderfully crisp. The next day, it will be chewier but still good. Like most crusty rolls though, you can easily bring back the crispness by gently reheating. Lightly rub with water to reduce the risk of drying out or burning, then pop in a moderate oven or air fryer (details in the recipe card). In my house, any rolls not eaten on the first day are frozen so they’re at their very best whenever I want them.
If you’ve made this recipe, I’d love to know what you thought. Do leave a comment and rating.

Seeded Rustic Bread Rolls
With a crispy crust and chewy, substantial interior these delicious no-knead rolls are made with a blend of white, malted and wholemeal flours plus mixed seeds. The easy dough is fermented overnight for exceptional flavour. Minimal shaping saves you time and gives the rolls a charming rustic appearance.
Enjoy with your favourite sandwich fillings or alongside soups and salads.
Please read the accompanying blog post before starting and use metric measurements.
Ingredients
- 350 g strong white bread flour
- 200 g malthouse/malted/granary bread flour (see Recipe Notes)
- 100 g strong wholemeal bread flour (plus extra for dusting)
- 100 g mixed seeds (e.g. pumpkin, sunflower, sesame, brown or yellow flax/linseed, millet, poppy)
- 12 g (2 tsp) salt
- 7 g (1½ tsp) instant dry yeast (i.e. the type that doesn't need activating before adding to the rest of the ingredients)
- 350 - 500 g/ml water (see method for how to judge amount)
Instructions
The day before baking
-
Put the flours, seeds, salt and instant dry yeast into a large bowl and stir together.
Make a well in the centre and pour in approximately 250 ml of the water, stirring to start bringing a dough together.
Gradually add more water while stirring to form a wettish but still firm rather than sloppy dough. Stir well so there is no dry flour, adding an extra splash of water if necessary.
Tip: see image in blog post for how the dough should look.
-
Place in a large reusable polythene bag, or cover the bowl, and leave at room temperature overnight, 12 - 14 hours, or until the dough is risen and very bubbly.
Tip: If the room is warm, or if you'd like a longer rise for convenience or to allow more flavour to develop, you can put the dough in the fridge for up to 24 hours. Bring the dough back up to room temperature before proceeding with the recipe.
On the day of baking
-
Sprinkle flour generously over your work surface (ideally first covered with a silicone mat to reduce sticking) then scrape the dough onto it.
Fold the dough over itself a few times, adding more flour if necessary, until you have a smooth ball of dough.
Cover the dough with the upturned bowl to rest while you complete the next step.
-
Line 1 large or 2 regular baking trays with baking paper: they should be big enough to fit 8 rolls with room to expand.
Dust the paper-lined tray(s) with flour.
-
Pat the dough into a rectangle approximately 2 - 2½ centimetres thick: if it keeps springing back, leave it to rest a few minutes more, then come back and try again. If it sticks to your hands, sprinkle with flour.
Cut the dough into 8 pieces then transfer to the prepared tray(s) and sprinkle the tops with flour.
Optional: neaten by nudging or gently stretching the pieces into more uniform shapes.
-
Place the tray(s) in 1 or more large reusable bags and set aside, ideally in a warm place.
Leave until the dough springs back slowly and leaves an indent when you press with a finger rather than immediately springing back: this will take approx. 30 - 45 minutes although depends on temperature.
While the dough is proving preheat the oven to 220°C /200°Fan /Gas 7 /425°F with a shelf in the middle and a deep METAL roasting tin on the bottom shelf (this will be filled with cold water later to create steam and help the bread rise: DO NOT USE GLASS or it could shatter).
-
Bake the rolls
When ready to bake use a baker's blade or sharp knife to make a slash along the length of each roll.
Place a tray of rolls on the middle shelf of the oven (if you have more than one tray, set the other aside somewhere cool while you bake the first).
Pour cold water from a jug into the hot roasting tin in the lower part of the oven. Immediately close the door.
Bake for 20 minutes without opening the door.
After 20 minutes carefully open the oven door (caution: lots of hot steam may billow out so keep your face, hands etc. out of the way) and take out the tray of rolls. Return the rolls to the oven, sitting directly on the middle shelf this time.
Note: if you only have one tray of rolls to bake you can also discard the tin of water at this point. But if you'll be baking another tray of rolls then pour out the water but return the empty tin to the bottom shelf so it stays hot.
Bake the rolls for another 5 minutes or until they're a rich brown colour and sound hollow when you tap underneath.
Put the baked rolls on a cooling rack and leave until cold (or until just warm if want to eat straight away while warm).
Bake the second tray of rolls in the same way, adding cold water to the tin on the bottom shelf as before.
-
Best eaten within 2 days of baking, but can be refreshed by heating as below, or frozen then defrosted and refreshed.
Reheat/refresh
Preheat an oven to 200°C /180° Fan /Gas 6 /400° F or an air fryer on 'Bake' to 160°C /350° F. Rub the rolls with cold water and bake until hot, the outside crisp and the interior soft again: approximately 8 - 12 minutes depending on the appliance and how many you're reheating.
Recipe Notes
Malthouse/malted flour. This is flour which has malt added to it and gives a lovely flavoured bread with a golden colour. Various malthouse bread flour blends are available to buy: read more about them in this Malthouse Loaf post including ones I recommend.
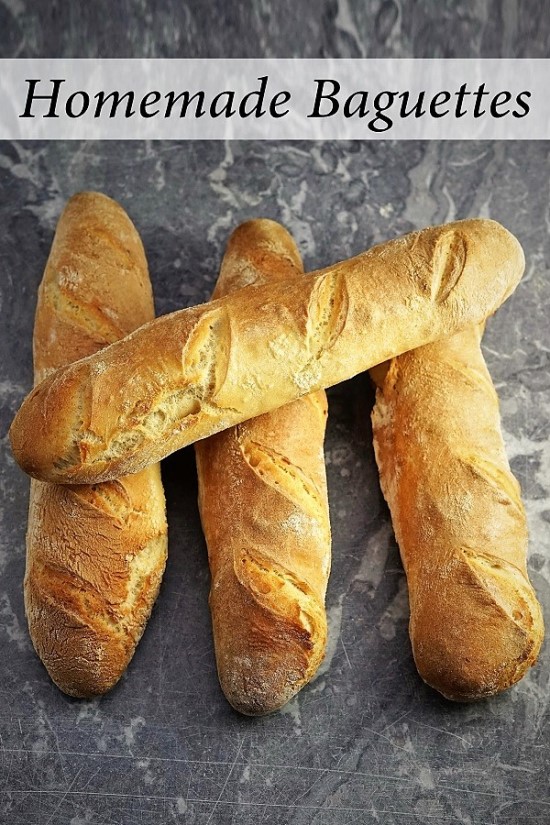
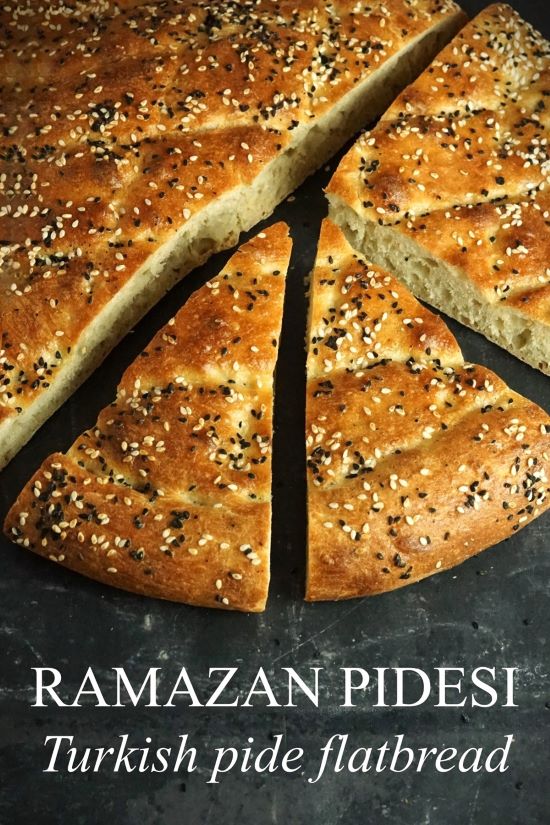
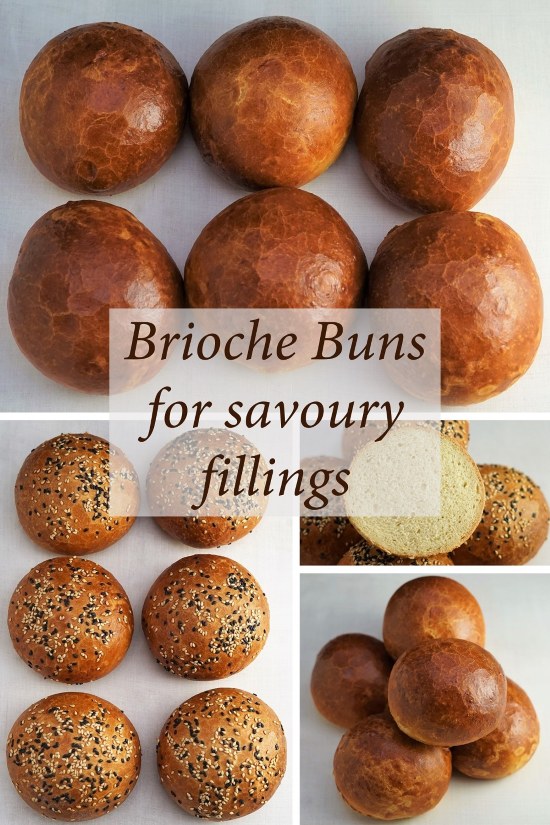
RELATED RECIPES


These are really tasty and I love how easy it is to make the rolls look good.
Thanks so much for taking the time to give your great feedback and 5-star rating!