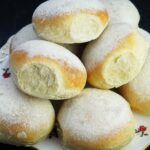
Soft White Baps Recipe
Soft White Baps with an attractive floury top are a British favourite. Whether you call them rolls, buns, or baps, these fluffy breads are perfect for simple, traditional fillings like egg, ham, cheese, burgers, or breakfast goodies like bacon or sausage. Enriched with a little butter, Soft White Baps are easy to make with under half an hour of hands-on time.

Disclosure: this post may contain affiliate links.
Jump to Recipe
Here in Britain we have all sorts of names for bread rolls, many of them regional. I grew up in the East Midlands where we call virtually all of them ‘cobs’. In most other places, they only call a bread roll a cob if it has a dark golden brown, crunchy crust. Other names for bread rolls include bun, barm or barm cake, batch or, as in north Staffordshire where I now live, a bap.

Bap is also the term used more widely for the type of soft white bread roll I’m sharing today. Unlike my homemade crusty rolls, my baps are not just fluffy inside but have a softer crust thanks to their floury topping. Add to that a little butter to enrich them and you have a versatile roll that’s surprisingly tasty given the simple ingredients and ease of making.
SOFT WHITE BAPS
I was inspired to make these Soft White Baps when I saw a recipe for ‘soft and fluffy blaas‘ in a food magazine. It was Cherie Denham’s version of a speciality from Waterford and is featured in her book The Irish Bakery. I confess I’d never heard of blaas. But they did sound like a great place to start developing my own soft white rolls as a change from my crusty rolls.
Mine are not blaas though. My ingredient proportions and method are different, so the result won’t be the same. But they are light, fluffy and flavoursome. Exactly what I was hoping for. And if you too want a simple, delicious soft bap to fill with all kinds of goodies then I think you’ll love them too.

You’ll find full instructions and ingredient amounts in the detailed recipe card at the end. But I recommend you read the whole blog post first for tips and step-by-step images. For the best results, use digital scales and metric measurements as these were used to test the recipe.
INGREDIENTS
My recipe makes eight medium sized Soft White Baps. For these you’ll need:
- Strong white bread flour. Bread flour has better gluten-forming properties than plain/all-purpose flour so will give the baps better structure.
- Instant yeast. For my method, you must use the type of dried yeast that doesn’t need to be activated before use. Often labelled ‘fast acting’ or similar, it can be added to the flour straight from the pack.
- Salt. As well as enhancing flavour, salt helps give structure to the dough.
- Caster sugar. Although I don’t add sugar to my no-knead overnight breads, a little in same-day kneaded doughs speeds things along.
- Butter. Gives a little rich flavour as well as making the baps softer.
- Warm water. The ideal temperature of liquid for getting yeast to do its work is 38 degrees centigrade. However, it actually works at quite a wide range of temperatures – as can be seen in room temperature or even fridge-risen doughs. If you don’t have a food thermometer to check the water is 38 degrees, then err on the side of cooler: too hot and it will kill the yeast. 38 degrees centigrade is a little above body temperature so the water should feel pleasantly warm if you put a finger in it.
- Oil for greasing. This is just to stop the dough sticking to the bowl as it rises. Any bland oil will do e.g. sunflower oil.
MAKING SOFT WHITE BAPS
The hands-on time required for making these baps is probably only around 20 minutes. This includes mixing up the dough, kneading it, then forming it into rounds. You’ll also need to allow time for a first rise (approximately 90 minutes) and a second rise or proving (30 – 40 minutes).
Start by stirring together in a bowl the bread flour, instant yeast, salt, and sugar. The butter, melted, goes in next along with the warm water. As different flours absorb different amounts of liquid it isn’t possible to be exact about the amount of water you’ll need. But 300 ml is usually about right. The main thing is to stir it in gradually, add as much as you need, but avoid a dough that’s sloppy.

When a dough has almost formed, tip out onto a lightly floured work surface or, ideally, a silicone mat which reduces sticking. Now fold and knead to finish bringing it together. Add a sprinkle of water if it seems dry and use the images above and below as a guide. Continue kneading until you have a smooth dough that immediately springs back when you poke a finger into it. This should take about 10 minutes.
PROVING
The dough should now be left in a warm place to double in size. I put a teaspoon of oil in the wiped-out mixing bowl and turn the dough in it so it’s lightly coated. Then I put the bowl in a large reusable polythene bag and pop in my small top oven which I’ve previously heated to its lowest temperature then turned off. If the oven seems a little too hot then I’ll leave the door open for a bit then shut it. In a warm spot like this, it usually takes 60 – 90 minutes. If you leave it somewhere cooler, it will take longer.

SHAPING THE BAPS
When the dough has doubled, take it out of the bowl and divide into eight equal pieces. I always use scales for accuracy. Now form each piece into a ball. The easiest way to do this is to fold using just your fingertips, then turn over so the smooth side is uppermost. Next, with your fingers lightly touching the worksurface and a dough ball cupped lightly beneath your palm, rapidly move your hand in a circle about 10 times. Take your hand away and you should have a neat, round-topped ball.

When you’ve done this with all the balls, lightly flatten with the palm of your hand. Now transfer to a baking tray you’ve lined with baking paper and dusted with flour. While you want to leave some space between the baps to allow for rising, I prefer not to use too large a tray. That’s because it’s quite nice to have the baps spread and join as they cook, giving you soft edges. My tray is 22 x 30 centimetres, but you could probably get away with 20 x 30.

Now the baps need their second rise or proof. Back in a warm place this should take 30 – 40 minutes. When they’re ready to bake, this time when you gently poke a finger into the dough it shouldn’t immediately spring back. It should come back slowly and leave a slight indentation.
While the baps are proving, preheat your oven to the temperature shown in the recipe card with a shelf positioned in the middle. I recommend putting another shelf in the lowest position with a deep roasting tray (metal NOT glass) on it to preheat too. We’ll use this to create steam to help the baps rise. I’ll tell you more below.
BAKING SOFT WHITE BAPS
When ready to bake, sift plenty of flour over the tops of the baps. This makes them distinctive as the protective coating helps to promote a softer crust. Put the baps on the middle shelf.
If you’ve taken my advice to heat a metal roasting tray as well, then pour cold water into it (this is why you shouldn’t use glass: it could shatter at this point). Immediately close the door. As it heats up, the water will create steam. This will help your baps rise for longer as the steamy atmosphere delays the forming of a crust.

The baps should take around 20 minutes to get risen, light golden and baked all the way through. But ovens do vary, so yours may take a minute or two less or more. Because my oven bakes rather unevenly, I turn the tray around after 10 minutes. Important: if you’ve added the extra tray to create steam then keep your hands and face well clear when you open the door. Lots of steam can quickly rush out!

When the Soft White Baps are done transfer them, complete with their paper, to a wire rack. Leave for a few minutes then, when cool enough to handle, take them off the paper and put directly on the wire rack. Leave until completely cold. During this time I cover them with a clean tea towel to absorb any escaping steam which should help give a softer top.

SERVING & STORING SOFT WHITE BAPS
Every time I make a batch of these lovely little baps I have to eat one as soon as they’re cold. I will almost always just split it and spread with butter. Which is a great way of appreciating just how good they are, despite their simplicity.

And I think simple really is the way to go here, with traditional fillings working the best. I love sliced hard-boiled egg or egg mayo and cress. Cheese and onion or cheese and tomato, or good quality ham are all excellent. Soft White Baps also make brilliant breakfast rolls: fill with crisp bacon or sausage, plus mushrooms if you like.

If you like a plain bun rather than fancy brioche for your burger these are ideal. Don’t forget a good old chip butty either: I love hot chips melting the butter on a soft bap.
While the baps are best eaten on the same day when they’re at their softest and fluffiest, there is a trick I do. Like many breads, I’ve found that for 2 – 3 days after you can ping these in the microwave for about 20 seconds and their lovely softness returns! Alternatively, you can always freeze the freshly baked and cooled baps.
If you’ve made my recipe, I’d love to know what you thought. Please do leave a comment and rating.

Soft White Baps
A British favourite, light and fluffy flour-topped bread rolls, perfect for simple traditional fillings like egg, ham, cheese, burgers, or breakfast goodies like bacon or sausage.
For the best results use digital scales, metric measurements, and read the accompanying blog post before starting.
Ingredients
- 500 g strong white bread flour (plus extra for kneading and dusting)
- 1.5 tsp instant yeast (i.e. the type that doesn't need activating before adding to the flour)
- 1.5 tsp salt
- 1 tsp caster sugar
- 15 g butter melted
- 300 - 350 ml warm water (see Recipe Notes)
- 1 tsp bland oil (e.g. sunflower) for greasing
Instructions
-
In a large bowl, stir together the flour, yeast, salt, and sugar.
Make a well in the centre then pour in the melted butter.
Add 250 ml of the warm water, stirring as you do so, to start bringing the mixture together. Gradually add more water until the dough is almost formed - it doesn't matter if there are a few bits of loose flour at this stage.
Note: different flours absorb different amounts of liquid, so you may not need all the water or you may need a splash more but the dough should not be wet.
-
Tip the dough and any remaining flour from the bowl onto a lightly floured clean work surface or, ideally, a silicone mat. Fold and knead to form a dough, only adding a little extra flour if needed to prevent sticking. If it seems dry, sprinkle over a little water.
Keep kneading for 10 minutes or until you have a smooth ball of dough that immediately springs back when you poke a finger into it.
-
Wipe out the bowl and put 1 tsp of oil in the bottom.
Turn the dough in the oil to coat it, then cover the bowl and put in a warm place (e.g. an oven heated to very low then turned off) for 60 - 90 minutes or until doubled in size.
-
Preheat your oven to 200°C / 180°Fan /Gas 6 / 400°F with a shelf in the middle.
Place another shelf in the lowest position and put a deep roasting tray on it to preheat (you will pour cold water in it later to create steam and help the baps rise: DO NOT USE GLASS or it could shatter).
Line a baking tray approximately 22 x 30 cm with baking paper and dust with flour.
-
When the dough has doubled, take it out of the bowl and divide into 8 equal pieces: use scales for accuracy.
Fold each piece into a ball then with your fingers lightly touching the worksurface and a dough ball smooth side up cupped beneath your palm, quickly move your hand in a circle about 10 times to finish shaping into a neat, round-topped ball.
When all the balls are made, press down to flatten them a little then place in the prepared baking tray in 2 rows of 4, spaced a little apart.
Cover and leave in a warm place again for 30 - 40 minutes or until, when you gently press the dough it slowly springs back but leaves a slight indentation. If the dough springs back quickly then it's not yet fully proofed: leave it another 5-10 minutes and check again.
-
Sift flour over the baps (this helps keep the tops soft) then transfer the tray to the oven. Pour cold water into the metal roasting tray to a depth of 3 cm and close the door.
Bake for 18 - 20 minutes or until the baps are risen, light golden brown and cooked all the way through: you may wish to turn the tray around after 10 minutes for even baking, but be careful as hot steam may billow out as you open the door so keep your hands and face out of the way.
-
Transfer the baps to a wire cooling rack until cold. Covering with a clean cloth should help to keep the tops soft.
-
Best eaten on the day of baking when they're at their softest, but 20 seconds in a microwave will refresh them on days 2 - 3.
Can also be frozen on the day of baking.
Recipe Notes
Warm water. Ideally, the temperature of the water should be 38 degrees Centigrade. If you don't have a food thermometer then the water should be pleasantly warm if you put a finger in it, not hot. If in doubt, err on the side of cooler: the dough may take longer to rise, but hot water will kill the yeast.
Recipe inspired by Cherie Denham's blaas or Irish bread rolls from her book The Irish Bakery.
RELATED RECIPES

Perfect and super easy! I literally pulled mine out of the oven 30mins ago and we’ve already tucked into them. I made two batches, one with white flour and one with some whole wheat and used a kitchen robot with a dough hook attachment for about 5 mins. The whole wheat ones needed a bit more rise but they are delicious!
I’ve attempted other bap recipes before but this by far the best one, super soft and fluffy, exactly the correct amount of salt ! Will absolutely be making them again
Such wonderful feedback Nina, thank you! Really pleased to hear my bap recipe is your favourite!
Not a lot of experience here, so I read every word, and carefully. I’d tried one other recipe with dense results.
I followed your recipe card to the letter, and the dough did not turn out as I expected from your notes—it didn’t quite come together, and was difficult to knead. I figured it’s your notes that give the wisdom, not the cold hard instructions, so I whipped up another batch while the first one started proofing.
I doubled the butter, and slowly added water until I felt I’d achieved what you’d written and photographed. Smooth dough. Needed the tiniest pinch of flour as the knead started to not be sticky. Bingo.
Both batches proofed up beautifully, and baked nicely too, with a similar rise. The second batch did end up a little prettier, and ever so slightly fluffier. My boyfriend, a native Manxman, enjoyed them thoroughly, and so did my 6yo.
Excellent recipe, and an incredible job painting a picture of exactly what to look and aim for. Even your comment about different flours demanding different moisture amounts was helpful—it made me feel comfortable making adjustments and tipped me off to what my particular problem might be. Super helpful when one is learning a new skill. Cheers!
Thank you so much for your detailed feedback and 5-star rating!
I think you’re absolutely right, especially when it comes to bread making, that recipes are best seen as a guide that you may have to tweak for your particular ingredients and environment. Sounds like you did wonderfully well, especially as you say you don’t have a lot of experience!
Thanks so much for taking the time to get in touch, I’m sure your comments will be helpful to others too!
This was to be my third and las attempt at making scottish baps. They turned out to perfection, thank you so much for your fabulous recipe, will be trying out dome more too.
Thank you, Christine! So glad my recipe worked so well for you!
I’m in America and made these for my Scottish step-dad. He loved them! Keep up the great work!
That’s wonderful! Thanks so much for taking the time to let me know, and for your 5-star rating!
I had these baps yesterday at a friends BBQ. She often talked about how good they where and yesterday i got the chance to try them. She was RIGHT delicious pillowy soft tasty buns. Today im making them too. Baps with pulled pork and fresh corn for dinner tonight
So glad you’re enjoying the baps: having them with pulled pork and fresh corn sounds wonderful! Thanks so much for your comment and 5-star rating ☺️
This is the best recipe for baps I’ve tried (and I’ve tried many). As soon as I finished prepping the dough I knew they were going to turn out great and they did for sure. Looking forward to trying some of your other recipes.
cheers and best regards,
Stoffel
Thank you for your lovely feedback Stoffel! I absolutely love these baps too!